DECT 6.0 Cordless Handset Telephone With DECT 6.
Equipment Approval Information Your telephone equipment is approved for connection to the Public Switched Telephone Network and is in compliance with parts 15 and 68, FCC Rules and Regulations and the Technical Requirements for Telephone Terminal Equipment published by ACTA. Notification to the Local Telephone Company On the bottom of this equipment is a label indicating, among other information, the US number and Ringer Equivalence Number (REN) for the equipment.
complaint to the Commission pursuant to procedures set forth in Subpart E of Part 68, FCC Rules and Regulations. The telephone company may make changes in its communications facilities, equipment, operations or procedures where such action is required in the operation of its business and not inconsistent with FCC Rules and Regulations.
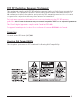
FCC RF Radiation Exposure Statement This equipment complies with FCC RF radiation exposure limits set forth for an uncontrolled environment. This equipment should be installed and operated with a minimum distance of 20 centimeters between the radiator and your body. This transmitter must not be co-located or operated in conjunction with any other antenna or transmitter.
Table of Contents Equipment Approval Information ................2 Inter ference Information ..............................3 FCC RF Radiation Exposure Statement ......4 Licensing .............................................................4 Hearing Aid Compatibility .............................4 Introduction .......................................................7 Parts Checklist ...................................................7 Telephone Jack Requirements ......................8 INSTALLATION..........
Table of Contents CALLER ID (CID) .........................................23 Receiving and Storing CID Records .....24 Reviewing CID Records ...........................24 Saving a CID Record to Phone Book Memory .................................................24 Deleting a CID Record .............................24 Deleting All Call Records ........................24 Dialing Back ...............................................25 If You Programmed Your Local Area Code ......................................
Introduction CAUTION: When using telephone equipment, there are basic safety instructions that should always be followed. Refer to the IMPORTANT SAFETY INSTRUCTIONS provided with this product and save them for future reference. IMPORTANT: Because cordless phones operate on electricity, you should have at least one phone in your home that isn’t cordless, in case the power in your home goes out.
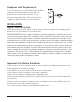
Telephone Jack Requirements To use this phone, you need an RJ11C type modular telephone jack, which might look like the one pictured here, installed in your home. If you don’t have a modular jack, call your local phone company to find out how to get one installed. INSTALLATION Digital Security System Your cordless phone uses a digital security system to protect against false ringing, unauthorized access, and charges to your phone line.
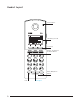
Handset Layout Visual Indicator Call Waiting Caller ID 3 Soft Keys Headset, Speakerphone & Handset Buttons Redial, Mute/Delete Buttons Hold 9 Memory/Exit
Headset Layout Base Layout Page Button 11 10
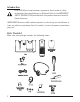
INSTALLING THE PHONE Installing the Handset Battery NOTE: You must connect the handset battery before use. CAUTION: To reduce the risk of fire or personal injury, use only the Nickel-metal Hydride (Ni-MH) battery model T-T104 (GP, 2.4V, 550mAh), which is compatible with this unit. Risk of explosion if battery is replaced by an Incorrect type. Dispose of used batteries according to the instructions. 1. Locate battery which is packaged inside a plastic bag and is separate from the handset. 2.
1. If the battery door is attached, press on both sides of the battery compartment cover and lift the cover up and off. 2. Insert the battery into the battery compartment with the warning label facing Up. 3. Push the battery plug into the connector inside the compartment according to the color-coded label and place the wires neatly inside the compartment. 4. Insert the tab on the bottom of the battery cover into the battery compartment. Press down gently on the battery cover until it snaps into place. 5.
EAR HOOK ATTACHMENT To attach the ear hook to the headset. 1. Remove the headband if currently attached to the headset. 2. Insert the earpiece into the ear hook. 3. Press the ear hook onto the earpiece until it clicks into place 4. Hook the headset onto the desired earand adjust the angle of the headset until the microphone is pointing towards your mouth. Note: Insert ear hook into either side of ear hook ring, matching with the L or R marked on ear clip ring to either your left or right ear.
Base Station 1. Choose an area near an electrical outlet and a telephone wall jack (RJ11C), and place your cordless telephone on a level surface, such as a desktop or tabletop. If you choose to, you may also mount it on the wall. 2. Plug the power supply cord into the power jack on the back of the base and the other end into an electrical outlet. Plug the included telephone cord into the jack on the back of the telephone.
Phone Setting 1. Make sure your phone is in standby mode (not in talk mode). 2. Press the Menu soft key on the handset to go to the main menu. 3. Press VOL (- or +) button to scroll to Phone Setting. 4. Press Select soft key to confirm and you may program the following items: Date/Time, Dial mode, Area Code, Auto Answer, 2nd Call Alert and Handset Name. Date/Time From the Phone Setting Menu 1. Press the VOL (- or +) button to scroll to Date/Time sub-menu. 2.
Date Format From the Date/Time Menu: 1. Use the VOL (- or +) button to scroll to Date Format. 2. Press the OK soft key. 3. Use the VOL (- or +) button to scroll to select either DD/MM or MM/DD format. 4. Press the OK Soft key. 5. A confirmation tone will indicate that your selection has been saved. Dial Mode From the Phone Settings Menu: 1. Use the VOL (- or +) button to scroll to Dial Mode. 2. Press the Select soft key. 3. Use the VOL (- or +) button to scroll to select either Tone or Pulse. 4.
Handset Name (only applicable for handset) From the Phone Setting Menu: 1. Press the VOL (- or +) button to scroll to the Handset Name sub-menu. 2. Press Select soft key to enter the menu. The default name is Handset. 3. Use the touch-tone pad to enter a name (up to 11 characters). More than one letter is stored in each of the number keys. For example, to enter Bill Smith, press the 2 key twice for the letter B. Press the 4 key 3 times for the letter I. Press the 5 key 3 times for the letter L.
Sound Settings 1. Make sure your phone is in standby mode (not in talk mode). 2. Press the Menu soft key on the handset to go to the main menu. 3. Press VOL(- or +) button to scroll to Sound Setting. 4. Press Select soft key to confirm and you may program the following items: Ring Tone, Ring Volume and Key Touch Tone. Ring Tones From the Sound Settings Menu: 1. Use the VOL (- or +) button to scroll to Ring Tones. 2. Press the Select soft key. 3.
Call VM From the Voice Mail Menu: 1. Press VOL (- or +) button to scroll to Call VM. 2. Press OK soft key 3. The phone will dial your voicemail access number. You may proceed to access your voicemail per your service provider’s instructions. Note: The default setting is empty. Settings From the Voice Mail Menu: 1. Press VOL (- or +) button to scroll to Settings. 2. Press OK soft key 3. Use the dial pad to enter the call-in access number for your voicemail.
Telephone Operation Making Calls with the Handset 1. Press the HANDSET button, the line will go off hook. 2. Wait for a dial tone then dial a phone number. 3. Press the End soft key when finished. Making Calls with the Speakerphone 1. Press the SPEAKER button, the line will go off hook. 2. Wait for a dial tone then dial a phone number. 3. Press the END soft key when finished. NOTE: If the line goes off-hook, the call timer counts time until the line goes on hook.
Answering a Call 1. Press the HANDSET button to answer the call in handset mode, OR 2. Press the SPEAKER button to answer the call in speakerphone mode, OR 3. Press the HEADSET button or Talk on/off button on headset to answer the call in headset mode. 4. When finished, press the End soft key. NOTE: If you have turned the Auto Talk function on, you can pick up the handset from the base to answer the incoming call directly, without pressing any buttons.
2. Press the REDIAL button. The redial number list is shown in the display. 3. Use the VOL (- or +) button to select the number, press the dial soft key to dial the desired number. NOTE: If the number is longer than 32 digits, only the first 32 digits will be saved in the redial list. Reviewing the Redial Numbers Your phone records up to three previously dialed phone numbers. 1. When the phone is idle, press the REDIAL button. 2.
Hold In Talk mode, press the HOLD button on handset to hold the line. LINE ON HOLD shows in the LCD display, and the line icon will flash. When the line is on hold, the hold alert tone will remind both the person on hold and the user that the call is still on hold. Press the HOLD button to release the hold and pick up the call again. Page The page feature helps you locate a misplaced handset. 1. Press the PAGE button on the base. The handset beeps and Page from Base shows in the handset display. 2.
Receiving and Storing CID Records This unit receives and displays information transmitted by your local phone company. This information can include the phone number, date and time; or the name, phone number, date and time. The unit can store up to 99 calls for later review. When the memory is full, a new call automatically replaces the oldest call in memory. NEW appears in the display for calls received that have not been reviewed. The line number for the call received is also displayed.
Dialing Back When reviewing CID records, you can dial back the numbers showing on the display by pressing the HEADSET button, the HANDSET button, or the SPEAKER button. If You Programmed Your Local Area Code 1. When reviewing CID records, use the VOL (- or +) button to display the number you want to dial. 2. If you see a number with 7 digits (i.e.555-1234), then the call was received from within your area code. However, this does not guarantee the call is a local call.
Phone Book (Directory) Memory You may store data in the Phone Book Directory. The Phone Book stores up to 16 characters and 32 digits. The records are stored by alphabetically ascending order. Adding Phone Book Entries 1. Make sure the phone is in standby mode (not in talk mode). 2. Press the MEM button and then press the DIR soft key to enter Phone book review mode. 3. Press the Option soft key, use VOL (- or +) to select NEW ENTRY. 4. Press the Select soft key, Enter name shows in the display. 5.
Deleting a Phone Book Record 1. While viewing a Phone book record, press the Option soft key. 2. Use the VOL (- or +) button to scroll to Delete, press Select soft key to enter Delete mode. 3. Delete? Will show in the display, press OK soft key to confirm and you will hear a confirmation tone. Deleting all Phone Book Record This feature allows you to clear all Phone Book records at once. 1. While viewing a Phone Book record, press the Option soft key. 2.
Speed dial function This function allows user to dial out the numbers which stores in the 0~9 location quickly. Speed dial out 1. Make sure the phone is in standby mode (not in talk mode). 2. Press the MEM button and then press the SPEED soft key, the display will show “Select button Location”. 3. Press the digit button (0~9) to select the Speed dial location. If the location is not empty, the unit will seize the line automatically and then dial out the numbers which stored in the location.
1. Make sure the telephone is in standby mode (not in TALK mode) before you replace battery. 2. Remove the battery compartment door. 3. Disconnect the cord attached to the battery pack and remove the battery pack from the handset. 4. Insert the new battery pack and connect the cord to the jack inside the battery compartment. 5. Put the battery compartment door back on. 6. Place handset in the base or handset charge cradle to charge.
Handset Sound Signals Signal A long warbling tone (with ringer on) Three short beeps (several times) One beep every 14 seconds Meaning Signals an incoming call Page signal Low battery warning Troubleshooting Guide Telephone Solutions No dial tone • Check or repeat installation steps: Make sure the base power cord is connected to a working electrical outlet. Make sure the telephone line cord is connected to the base and the wall jack. • Connect another phone to the same jack.
Date/Time setting is restored to default setting • May be caused by power failure. Set Date/Time again. Caller ID Solutions No Display • Charge the battery (for 14 hours). Or replace the battery. • Make sure the unit is connected to a non-switched electrical outlet. Disconnect the power adaptor from the base and reconnect it. No Caller ID • You must be subscribed to the standard Name/Number Caller ID service from your local telephone company to receive CID information.
Causes of Poor Reception • Aluminum siding. • Foil backing on insulation. • Heating ducts and other metal construction that can shield radio signals. • You ’re too close to appliances such as microwaves, stoves, computers, etc. • Atmospheric conditions, such as strong storms. • Base is installed in the basement or lower floor of the house. • Base is plugged into AC outlet with other electronic devices. • Baby monitor is using the same frequency. • Handset battery is low. • You’re out of range of the base.
Warranty Limited Warranty What your warranty covers: • Defects in materials or workmanship For how long after your purchase: • Two years, from date of purchase What we will do: • Provide you with a replacement unit. The exchange unit is under warranty for the remainder of the original product’s warranty period. How you get service: • Locate your proof of purchase in the form of a bill of sale or receipted invoice which is evidence that the product is within the warranty period.
• Products purchased or serviced outside the USA • Acts of nature, such as, but not limited to lightning damage Product Registration: • Please complete and mail the Product Registration Card packed with your unit. It will make it easier to contact you should it ever be neccessary. The return of the card is not required for warranty coverage. Limitation of Warranty: • THE WARRANTY STATED ABOVE IS THE ONLY WARRANTY APPLICABLE TO THIS PRODUCT.
Visit the RCA web site at www.rca4business.com Please do not send any products to the Oregon address listed in this manual or on the carton. This will only add delays in service for your product. Telefield NA Inc. 4915 SW Griffith Dr. #205 Beaverton, Or 97005 RCA is a trademark of RCA Trademark Management S.A., Used under license. © 2011. All rights reserved. Model: TC25111 T0000133 (Rev.