ENGLISH DIGITAL PHOTO FRAME OPERATING INSTRUCTIONS TELEFUNKEN DPF 10934 I. Learn about and install your frame ................................................. 2 1. Box contents ......................................................................................................... 2 2. Frame diagrams .................................................................................................... 3 3. Remote control .....................................................................................
ENGLISH PRELIMINARY NOTICE During the first use, the animated demo is played. To exit and go to the frame functions, simply press the “Slideshow” key on the remote control, or on “Left” key of the digital frame during 3 seconds. I. Learn about and install your frame Thank you for your recent purchase of a TELEFUNKEN DPF 10934 digital photo frame. Before using your device, please consult these operating instructions and keep them so you may refer to them later. 1.
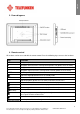
ENGLISH 2. Frame diagrams 3. Remote control All functions can be accessed with the remote control.
ENGLISH MUSIC Access setup menu (MUSIC) directly VIDEO Access setup menu (VIDEO) directly SETUP Access setup menu (Settings) directly 4. Installation - Take your frame and its accessories out of their packaging. - Remove the plastic film protecting the front of the frame. - Pull the plastic tab protecting the contacts in the remote control. - Stand the frame in the desired location, pulling the adjustable stand towards you (see diagram above).
ENGLISH 2. “ECO LOGIC” mode ECO LOGIC mode combines 3 essential elements to reduce energy consumption by over 40% compared to a standard frame: - A LED screen, which uses less energy while improving picture quality; - A low-energy and 'Energy Star'-certified power adapter; - A light sensor. This sensor, on by default, will automatically turn off your picture frame at night and turn it on during the day. You can deactivate the light sensor in your frame's system settings menu.
ENGLISH Resizing allows the copies to fit the resolution of your frame, considerably reducing their file size. Thanks to this system, you can store over 10,000 photos in the internal memory. If your media (memory card, USB key or built-in memory) contains music and if you want to play a musical slideshow, press the “Enter” key during the slideshow. The digital frame will display “Musical Slideshow”. 4.
ENGLISH 5. Choose the directory where you want to store your file using the “Up/ Down” keys and press “Enter”. Your file has been copied. If your memory card contains one or more folders, you can copy them one by one in full. They will be stored in the internal memory folder of your choice, and you can play each back independently of the others.
ENGLISH 5. Deleting photos You can delete photos that are in your frame's internal memory. - Delete your photos from the file manager If you use this method, you can only delete one file at a time. 1. Press the “Exit” key on your remote as many times as necessary for the media selection screen to come up. 2. Select the removable medium (memory card or USB key) storing the photos to be copied using the “Left/Right” keys on the remote. Press “Enter”. 3.
ENGLISH 4. Select the file using the “Up/Down” keys on the remote, and press the “Copy/Del” key. The screen will display “Delete file? YES/NO”. Choose the desired option and press “Enter”. Your file has been deleted. You can also delete one of your personal folders located in one of the preset directories. - Delete your photos from the thumbnail mode With this method, you can delete all or a selection of photos in the internal memory. 1.
ENGLISH III. Selecting the type of files to play 1. Internal memory/Removable media If no media has been inserted, the slideshow from the internal memory will launch automatically whenever the frame is turned on. If there is a memory card or a flash drive inserted when the frame is turned on, the card’s content will be played. In this case, you can toggle between the card and the internal memory as follows: Keep pressing the “Exit” key on your remote to go to the select media screen.
ENGLISH - Press the “Enter” key repeatedly to select the play mode as follows: Photo Slideshow Slideshow+Music Single Photo 4. Videos - Press the “Exit” key twice to display the main screen. - Using the “Left/Right” arrows on the remote, select the “Video” icon. - Press the “Enter” key: the video will start. - Use the “Left/Right” keys to select /(Play/Pause) on screen, and then press “Enter”.
ENGLISH - Use the “Left/Right” keys to select / (Previous/Next) on screen, and then press “Enter”. - Use the “Left/Right” keys to select / (Rewind/Fast Forward)) on screen, and then press “Enter”. - Use the “Left/Right” keys to select (Volume) on screen, and then press “Enter” keys to decrease the sound level. - Use the “Left/Right” keys to select (Volume) on screen, and then press the “Enter” key to increase the sound level.
ENGLISH - Display mode Select “Display Mode” using the “Up/Down” keys on the remote and press “Enter”, then use the “Up/Down” keys to choose between: Slideshow: images scroll one after another Thumbnails: the images display as thumbnails. (Note: When your frame is in this mode, you can access Slideshow, Slideshow+Music or Single by pressing the “Enter” key repeatedly.
ENGLISH - Slideshow repeat Select “Slideshow repeat” using the “Up/Down” keys on the remote and press “Enter”, then use the “Up/Down” keys to choose between: Repeat: the slideshow plays in a loop Once: the slideshow is played once Random: the pictures will be displayed randomly - Magic Window Select the “Magic Window” using the “Up/Down” keys on the remote, then press the “Enter” key to choose “On” or “Off”.
ENGLISH 2. Music Setup In the settings menu, select the “Music setup” using the “Up/Down” keys on your remote, and then press “Enter”.
ENGLISH Select “Auto Play” using the “Up/Down” keys on the remote, and then press “Enter” key to select “On” or “Off”. 3. Video Setup In the settings menu, select the “Video Setup” using the “Up/Down” keys on your remote and press “Enter”.
ENGLISH - The calendar's display mode Select “Display Mode” using the “Up/Down” keys on the remote and press “Enter”, then use the “Up/Down” keys to choose between: Monthly Calendar Calendar Analog clock - Date Format Select “Date Format” using the “Up/Down” keys on the remote and press “Enter”, then use the “Up/Down” keys to choose between: MM/DD/YYYY DD/MM/YYYY YYYY/MM/DD - Date Select “Date” using the “Up/Down” keys on the remote and press “Enter”, then: Use the “Up/Down
ENGLISH Use the “Up/Down” keys to choose between Hour, Min, AM, PM Use the “Left/Right” keys to set the values for Hour, Min, AM, PM - Alarm frequency Select “Alarm Frequency” using the “Up/Down” keys on the remote and press “Enter”, then use the “Up/Down” keys to choose between: Once Everyday Mon. to Fri.
ENGLISH 5. System configuration This menu allows you to set the operating parameters of your frame. - Light sensor on/off Select “Light sensor” using the “Up/Down” keys on the remote, then press “Enter” key to choose “On” or “Off”.
ENGLISH - Power on Select “Power on” using the “Up/Down” keys on the remote, then press the “Enter” key to select “On” or “Off”. - Auto boot time Select “Auto Boot Time” using the “Up/Down” keys on the remote and press “Enter”, then: Use the “Up/Down” keys to choose between Hour, Minute, AM, PM Use the “Left/Right” keys to set the values for Hour, Minute, AM, PM - Power off Select “Power off” using the “Up/Down” keys on the remote, then press the “Enter” key to choose “On” or “Off”.
ENGLISH V. Connecting to a computer It is possible to transfer files to the frame by connecting it to your personal computer. To do so, connect your frame via USB cable (mini-USB port on the frame, and standard USB port for the computer) to the computer, then turn on your frame: the frame's screen will show “PC connection...” Return to normal operation after disconnecting.
ENGLISH VI. Safety instructions Handle the digital photo frame with care, and avoid touching the screen; fingerprints are difficult to remove. Always set the digital photo frame on a flat and stable surface to prevent it from falling and being damaged. Avoid exposing the digital photo frame to the sun or high temperatures, as these may damage the frame or reduce its operational life. Do not place it near heat sources like radiators or space heaters.
ENGLISH VII. Warranty The warranty does not cover damage caused if you (or any unauthorized person) tried to repair the frame. If the frame is emitting smoke, noise, or an unusual smell, immediately turn it off and unplug it. Contact your store. If you do not use the digital frame for a while, make sure to unplug the power cord. The warranty concerns the digital photo frame and does not include the accessories.
ENGLISH Exclusions Damage or defects caused by the improper use or handling of the digital frame, or by the use of accessories, which are not original or not recommended in these instructions, are not covered by the warranty. The warranty does not cover damage caused by outside elements, like lightning, water, or fire, or any other damage caused during transport. No warranty coverage may be claimed if the digital frame's serial number has been modified, removed, erased, or made illegible.
ENGLISH VIII.
FRANCAIS MODE D’EMPLOI CADRE PHOTOS NUMERIQUES TELEFUNKEN DPF 10934 I. Découvrez et installez votre cadre ............................................................ 2 1. Contenu de la boîte ........................................................................................................... 2 2. Schémas ........................................................................................................................... 3 3. Télécommande .......................................................
FRANCAIS PRELIMINARY NOTICE AVERTISSEMENT PREALABLE : A la mise en route de votre cadre, le cadre affiche l’animation de démonstration. Pour en sortir et accéder aux fonctions du cadre, appuyez simplement sur la touche « Slideshow » de votre télécommande ou durant 3 secondes sur la touche « Gauche » du cadre. I. Découvrez et installez votre cadre Vous venez d’acheter un cadre photo numérique TELEFUNKEN DPF 10934 et nous vous en remercions.
FRANCAIS 2. Schémas 3. Télécommande Toutes les fonctions peuvent être contrôlées depuis la télécommande. Utilisez les touches suivantes pour accéder aux différentes fonctions : Touche Fonction ▲ Pour sélectionner l’option supérieure du menu. Pour sélectionner l’option de gauche du menu/sélectionner le fichier précédent (photo, musique ou vidéo). Pour sélectionner l’option inférieure du menu. Pour sélectionner l’option de droite du menu/sélectionner le fichier suivant (photo, musique ou vidéo).
FRANCAIS Pour agrandir l’image, appuyez de manière répétée sur cette touche pour permuter entre les différents modes de zoom : x2, x4, x8 et x16 ; appuyez à nouveau sur cette touche pour afficher l’image sous sa taille normale. Pour diminuer le volume, le niveau de volume s’affiche dès la pression de cette touche. (SLIDESHOW) Pour directement lancer le diaporama des photos. MUSIC Pour directement accéder au menu Configuration (MUSIQUE). VIDEO Pour directement accéder au menu Configuration (VIDEO).
FRANCAIS 2. Le mode « ECO LOGIC » Le mode ECO LOGIC associe 3 éléments essentiels permettant une réduction de la consommation d’énergie de plus de 40% par rapport à un cadre standard : - Un écran LED, moins gourmand en énergie tout en améliorant la qualité de l’image - Un adaptateur secteur basse consommation certifié « Energy Star » - Un capteur de luminosité Ce capteur, activé par défaut, permet à votre cadre photo de s’éteindre automatiquement lorsqu’il fait nuit, et de s’allumer avec le jour.
FRANCAIS - Votre carte mémoire est automatiquement détectée - Après quelques secondes, le message «Voulez vous copier dans la mémoire interne ?» s’affiche - Sans intervention de votre part au bout de 15 secondes, le diaporama contenu dans la carte sera lu mais les images ne seront pas copiées. - - Le redimensionnement permet à la copie de vos photos de s’adapter à la définition du cadre et ainsi de réduire considérablement leur poids.
FRANCAIS - Copier vos fichiers à partir du gestionnaire de fichiers Si vous utilisez cette méthode, vous ne pourrez copier les fichiers que un par un et n’aurez pas la possibilité de les redimensionner à la résolution du cadre. 1. Appuyez sur la touche « Exit » de votre télécommande autant de fois que nécessaire pour afficher l’écran de choix des supports. 2. A l’aide des télécommande, touches « Gauche/Droite » sélectionnez l’icône de la « Fichiers » et appuyez sur « Enter ». 3.
FRANCAIS 3. A l’aide des touches « droite gauche », sélectionnez le mode photo et appuyez sur « Enter ». Le diaporama se lance. 4. Appuyez sur la touche « Exit » de la télécommande pour accéder aux vignettes. 5. Appuyez sur la touche « Copy/Del ». L’écran affiche « Copier fichiers ? » (Sélection ou tout) Sélectionnez l’option choisie et appuyez sur « Enter ». Les miniatures s’affichent à nouveau, avec une case à cocher sur la partie supérieure gauche de chaque image.
FRANCAIS appuyez sur « Enter ». 3. Sélectionnez la photo ou le fichier musical ou vidéo pour à l’aide des touches « Haut/Bas » de la télécommande et appuyez sur la touche « Copy/Del ». L’écran affiche « Supprimer fichier ?Oui/Non ». Choisissez l’option souhaitée et appuyer sur « Enter ». Votre fichier est supprimé.
FRANCAIS III. Sélection du type de fichiers à lire 1. Mémoire interne/Support amovible Lorsqu’aucun support n’est inséré, le diaporama de la mémoire interne se lance automatiquement à l’allumage du cadre. Si une carte mémoire ou une clé USB est insérée au moment de la mise en route, c’est le contenu de la carte qui sera lu.
FRANCAIS 3. Les photos - Appuyez autant de fois que nécessaire sur la touche « Exit » pour afficher l’écran principal. - A l’aide des flèches « Gauche/Droite » de la télécommande, sélectionnez l’icône « Photo ». - Appuyez de manière répétée sur la touche « Enter » pour sélectionner le mode de lecture : Diapo photo Diapo + Musique Photo seule 4. Les vidéos - Appuyez autant de fois que nécessaire sur la touche « Exit » pour afficher l’écran principal.
FRANCAIS 5. La musique - Appuyez autant de fois que nécessaire sur la touche « Exit » pour afficher l’écran principal. - A l’aide des flèches « Gauche/Droite » de la télécommande, sélectionnez l’icône « Musique ». - Appuyez sur la touche « Entée » : la lecture de la musique démarre. - Utilisez les touches directionnelles « Gauche/Droite » pour sélectionner/(Lecture/Pause), appuyez ensuite sur la touche « Enter ».
FRANCAIS IV. Les réglages Lorsque vous êtes sur l’écran principal, Sélectionnez l’icône « Regl. » à l’aide des touches « Gauche/Droite » de votre télécommande pour accéder aux différents réglages de votre cadre. En cours de lecture d’un diaporama, appuyez simplement sur la touche « Régl. » de la télécommande pour accéder au menu de réglages.
FRANCAIS Recadrer pour remplir : la photo est centrée puis rognée afin de pouvoir être affichée Plein écran : la photo est modifiée afin de pouvoir être affichée en plein écran - Durée du diaporama Sélectionnez « Durée diaporama » à l’aide des touches directionnelles « Haut/Bas » de la télécommande puis appuyez sur la touche « Enter », utilisez les touches directionnelles « Haut/Bas » pour sélectionner parmi : 5 sec. 15 sec. 30 sec. 60 sec. 5 min. 15 min.
FRANCAIS - Répétition du diaporama Sélectionnez « Répéter diaporama » à l’aide des touches directionnelles « Haut/Bas » de la télécommande puis appuyez sur la touche « Enter », utilisez les touches directionnelles « Haut/Bas » pour sélectionner parmi : Répéter : le diaporama est lu en boucle. Une fois : le diaporama est lu une fois. Aléatoire : les images sont affichées aléatoirement.
FRANCAIS Lorsque vous êtes dans le menu de réglage, sélectionnez la ligne « Configuration musique » à l’aide des touches « Haut/Bas » de votre télécommande puis appuyez sur «Enter». Vous pouvez paramétrer : - Mode de lecture Sélectionnez « Mode de lecture » à l’aide des touches directionnelles « Haut/Bas » de la télécommande puis appuyez sur la touche « Enter », utilisez les touches directionnelles « Haut/Bas » pour sélectionner parmi : Répéter : les pistes sont lues en boucle.
FRANCAIS - Lecture automatique Lorsque cette option est activée, les fichiers audio sont automatiquement lus dès l’activation du mode Audio. Sélectionnez « Lecture automatique » à l’aide des touches directionnelles « Haut/Bas » de la télécommande puis appuyez sur la touche « Enter » pour sélectionner parmi « Activé » ou « Désactivé ». 3. Configuration vidéo Dans le menu de réglage, sélectionnez la ligne « Réglages vidéo » à l’aide des touches « Haut/Bas » de votre télécommande et appuyez sur «Enter».
FRANCAIS 4. Configuration calendrier Sélectionnez l’option « Configuration calendrier » du menu Configuration à l’aide des touches directionnelles « Haut/Bas » de la télécommande, appuyez ensuite sur la touche « Enter ».
FRANCAIS pour sélectionner parmi le format 12 heures et 24 heures, appuyez sur la touche « Enter » pour confirmer. - Heure de l’horloge Sélectionnez « Heure de l’horloge » à l’aide des touches directionnelles « Haut/Bas » de la télécommande, appuyez ensuite sur la touche « Enter », ensuite : Utilisez les touches directionnelles « Haut/Bas » pour sélectionner parmi Heure, Min, AM et PM. Utilisez les touches directionnelles « Gauche/Droite » pour régler un des champs suivants : Heure, Min, AM et PM.
FRANCAIS 5. Configuration système Ce menu vous permet de régler les paramètres de fonctionnement de votre cadre. - L’activation/Désactivation du capteur de luminosité Sélectionnez « Capteur de lumière » à l’aide des touches directionnelles « Haut/Bas » de la télécommande puis appuyez sur la touche « Enter » pour sélectionner parmi « Activé » ou « Désactivé ».
FRANCAIS - Saturation Sélectionnez « Saturation » à l’aide des touches directionnelles « Haut/Bas » de la télécommande puis appuyez sur la touche « Enter », utilisez les touches directionnelles « Gauche/Droite » pour régler le niveau de luminosité de 1 à 16. - Teinte Sélectionnez « Teinte » à l’aide des touches directionnelles « Haut/Bas » de la télécommande puis appuyez sur la touche « Enter », utilisez les touches directionnelles « Gauche/Droite » pour régler le niveau de luminosité de 1 à 100.
FRANCAIS - Fréquence d’alimentation automatique Sélectionnez « Fréquence d’alimentation automatique » à l’aide des touches directionnelles « Haut/Bas » de la télécommande puis appuyez sur la touche « Enter », utilisez les touches directionnelles « Haut/Bas » pour sélectionner parmi : Une fois Tous les jours Du Lundi au Vendredi. Weekend - Réinitialisation La réinitialisation du cadre est parfois utile lors d’une erreur de manipulation.
FRANCAIS - Cliquez sur « ouvrir le dossier et afficher les fichiers » afin de visualiser le contenu de la mémoire interne. L’écran suivant s’affiche : Ouvrez le répertoire dans lequel sont stockés les fichiers que vous souhaitez transférer dans le cadre, et déposez les dans le dossier voulu par « copier/coller » ou « Glisser/déposer ». Attention ! Les photos ainsi transférées ne seront pas redimensionnées. - Débranchez le câble USB : votre cadre se remet en fonction automatiquement.
FRANCAIS VI. Instructions de sécurité Manipulez le cadre photo numérique avec précaution et évitez de toucher l’écran ; les traces de doigts sont difficiles à enlever. Placez toujours le cadre photo numérique sur une surface plane et stable pour éviter qu’il ne tombe et ne soit endommagé. Évitez d’exposer le cadre photo numérique au soleil ou aux températures élevées car ceci peut endommager le cadre ou réduire sa durée d’utilisation.
FRANCAIS VII. Garantie La garantie ne couvre pas les dommages causés si vous (ou toute personne non habilitée) avez tenté de réparer le cadre. Si le cadre émet de la fumée, un bruit ou une odeur inhabituelle, éteignez-le et débranchez-le immédiatement. Contactez votre magasin. Si vous n’utilisez pas le cadre numérique pendant quelques temps, veillez à débrancher le cordon d’alimentation. La garantie porte sur le cadre photo numérique et n’inclut pas les accessoires.
FRANCAIS La période de garantie n’est pas prolongée en cas de réparation ou d’échange du cadre numérique par notre Service Après vente. Exclusion Les dommages ou défauts causés par une mauvaise utilisation ou manipulation du cadre numérique et par l’utilisation d’accessoires autres que ceux d’origine ou non recommandés par la présente notice ne sont pas couverts par la garantie.
FRANCAIS VIII.
DEUTSCH GEBRAUCHSANWEISUNG FÜR DIGITALEN BILDERRAHMEN TELEFUNKEN DPF 10934 ............................ 2 1. Inhalt der Verpackung ....................................................................................................... 2 2. Abbildungen des Bilderrahmens ..................................................................................... 3 3. Fernbedienung ................................................................................................................... 3 4. Installation ..
DEUTSCH ow“ vor Sie Ihr Gerät benutzen, lesen Sie bitte die vorliegende Gebrauchsanweisung durch und bewahren Sie sie gut auf, um später auf sie zurückgreifen zu können. 1. Inhalt der Verpackung - 1 digitaler Bilderrahmen - 1 Netzadapter - 1 Fernbedienung 2 Dokument ohne vertraglichen Charakter. Änderungen aufgrund von Druckfehlern bleiben vorbehalten (Mktg1011) 2011 Hersteller behält sich das Recht vor, die Produktmerkmale ohne vorherige Benachrichtigung zu ändern.
DEUTSCH 2. Abbildungen des Bilderrahmens 3. Fernbedienung Alle Funktionen können mit der Fernbedienung ausgeführt werden.
DEUTSCH Lautstärke verringern, die Lautstärke wird angezeigt (SLIDESHOW) Diashow direkt starten MUSIC Einstellungsmenü (MUSIC) direkt aufrufen VIDEO Einstellungsmenü (VIDEO) direkt aufrufen SETUP Einstellungsmenü (Settings) direkt aufrufen 4. Installation - Nehmen Sie Ihren Bilderrahmen und sein Zubehör aus der Verpackung. - Entfernen Sie die Schutzfolie von der Vorderseite des Bilderrahmens. - Ziehen Sie den Plastikstreifen zum Schutz der Kontakte der Fernbedienung ab.
DEUTSCH 2.
DEUTSCH - Nach einigen Sekunden erscheint die Nachricht „Möchten Sie die Bilder in den internen Speicher kopieren?“ - Falls Sie innerhalb von 15 Sekunden nicht reagieren, werden die auf der Karte enthaltenen Bilder als Diashow abgespielt, die Bilder werden jedoch nicht kopiert. - Beim Skalieren werden die Kopien Ihrer Fotos an die Auflösung des Rahmens angepasst, wodurch sich ihre Dateigröße erheblich verringert. Dank dieses Systems haben mehr als 10 000 Fotos im internen Speicher Platz.
DEUTSCH - Kopieren Ihrer Fotos über den Dateimanager Falls Sie diese Methode anwenden, können Sie die Dateien nur eine nach der anderen kopieren und haben nicht die Möglichkeit, sie auf die Auflösung des Bilderrahmens zu skalieren. 1. Drücken Sie die „Exit“-Taste Ihrer Fernbedienung so oft, bis die Datenträger-Auswahl auf dem Bildschirm erscheint. 2. Wählen Sie mit den Tasten „Links/Rechts“ der Fernbedienung das Symbol „Dateien“ aus und drücken Sie auf „Enter“. 3.
DEUTSCH 2. Wählen Sie mit den Tasten „Links/Rechts“ der Fernbedienung den mobilen Datenträger, auf dem sich die zu kopierenden Fotos befinden (Speicherkarte oder USB-Stick). Drücken Sie auf „Enter“. 3. Wählen Sie mit den Tasten „Links/Rechts“ den Fotomodus und drücken Sie auf „Enter“. Die Diashow startet. 4. Drücken Sie auf die „Exit“-Taste der Fernbedienung, um zu den Miniaturbildern zu gelangen. 5. Drücken Sie die Taste „Copy/Del“. Auf dem Bildschirm erscheint „Dateien kopieren?“.
DEUTSCH 2. Wählen Sie mit den Tasten „Links/Rechts“ der Fernbedienung das Symbol „Dateien“ aus und drücken Sie auf „Enter“. 3. Wählen Sie das Foto mit den Tasten „Hoch/Runter“ der Fernbedienung aus und drücken Sie auf die Taste „Copy/Del“. Auf dem Bildschirm erscheint „Datei löschen? –Ja/Nein“. Wählen Sie die gewünschte Option und drücken Sie auf „Enter“. Ihre Datei wird gelöscht. Sie können auch einen Ihrer persönlichen Ordner in einem der vordefinierten Verzeichnisse löschen.
DEUTSCH III. Auswahl des zu lesenden Dateityps 1. Interner Speicher/Mobiler Datenträger Wenn kein Datenträger eingeschoben ist, startet beim Einschalten des Rahmens automatisch die Diashow des internen Speichers. Falls sich beim Einschalten eine Speicherkarte oder ein USB-Speicher im Rahmen befindet, wird der Inhalt der Karte bzw. des USB-Speichers abgespielt.
DEUTSCH 3. Fotos - Drücken Sie „Exit“-Taste die so oft, bis Sie zum Hauptbildschirm gelangen. - Wählen Sie mit den Richtungstasten „Links/Rechts“ der Fernbedienung das Symbol „Foto“. - Drücken Sie „Enter“ mehrfach, um die Wiedergabemodi auszuwählen: Diashow Diashow+Musik Einzelfoto 4. Videos - Drücken Sie die „Exit“-Taste so oft, bis Sie zum Hauptbildschirm gelangen. - Wählen Sie mit den Richtungstasten „Links/Rechts“ der Fernbedienung das Symbol „Video“.
DEUTSCH 5. Musik - Drücken Sie die „Exit“-Taste so oft, bis Sie zum Hauptbildschirm gelangen. - Wählen Sie mit den Richtungstasten „Links/Rechts“ der Fernbedienung das Symbol „Musik“. - Drücken Sie „Enter“: die Musik wird abgespielt. - Wählen Sie mit den „Links/Rechts“ Tasten /(Wiedergabe/Pause) auf dem Bildschirm und drücken Sie „Enter“. - Wählen Sie mit den „Links/Rechts“ Tasten / (Vorheriger/Nächster) auf dem Bildschirm und drücken Sie „Enter“.
DEUTSCH IV. Einstellungen Wenn Sie sich auf dem Hauptbildschirm befinden, wählen Sie das Symbol „Einst.“ mit den Tasten „Links/Rechts“ und „Hoch/Runter“ Ihrer Fernbedienung, um zu den verschiedenen Einstellungsmöglichkeiten für Ihren Bilderrahmen zu gelangen. Falls Ihre Fotos abgespielt werden, drücken Sie einfach auf die „Setup“-Taste Ihrer Fernbedienung, um auf die Einstellungsmenüs zuzugreifen.
DEUTSCH - Diashowintervall Wählen Sie „Diashow Intervall“ mit den Tasten „Hoch/Runter“ auf der Fernbedienung, drücken Sie „Enter“, wählen Sie mit den Tasten „Hoch/Runter“: 5 Sek. 15 Sek. 30 Sek. 60 Sek. 5 Min. 15 Min.
DEUTSCH - Uhr Wählen Sie „Uhr“ mit den Tasten „Hoch/Runter“ auf der Fernbedienung, drücken Sie „Enter“, um „Ein“ oder „Aus“ zu wählen. - Größe anpassen Wählen Sie „Größe anpassen“ mit den Tasten „Hoch/Runter“ auf der Fernbedienung, drücken Sie „Enter“, um „Ein“ oder „Aus“ zu wählen. - Beim Kopieren ausschneiden Wählen Sie „Beim Kopieren ausschneiden“ mit den Tasten „Hoch/Runter“ auf der Fernbedienung, drücken Sie „Enter“, um „Ein“ oder „Aus“ zu wählen.
DEUTSCH Jazz DBB Normal Rock Pop Klassik Sanft - Spektrum anzeigen Während der Wiedergabe einer Musikdatei können Sie den Equalizer auf dem Bildschirm Ihres TELEFUNKEN Bilderrahmens anzeigen. Wählen Sie „Spektrum anzeigen“ mit den Tasten „Hoch/Runter“ auf der Fernbedienung, drücken Sie „Enter“, um „Ein“ oder „Aus“ zu wählen. - Automatische Wiedergabe Ist diese Funktion aktiviert, spielt der Bilderrahmen Audiodateien automatisch ab, sobald der Audiomodus gewählt wurde.
DEUTSCH Einmal: Ihr Video wird ein Mal abgespielt. - Automatische Wiedergabe Ist diese Funktion aktiviert, spielt der Bilderrahmen Videodateien automatisch ab, sobald der Videomodus gewählt wurde. Wählen Sie „AutoPlay“ mit den Tasten „Hoch/Runter“ auf der Fernbedienung, drücken Sie „Enter“, um „Ein“ oder „Aus“ zu wählen. 4. Kalendereinstellungen Wählen Sie „Kalendereinstellung“ im Einstellungsmenü mit den Tasten „Hoch/Runter“ auf der Fernbedienung, drücken Sie „Enter“.
DEUTSCH - Zeitformat (12- oder 24-Stunden) Wählen Sie „Zeitformat“ mit den Tasten „Hoch/Runter“ auf der Fernbedienung, drücken Sie „Enter“, drücken Sie nun „Hoch/Runter“, um das 12- oder 24-Stunden-Format zu wählen, drücken Sie „Enter“ zum Bestätigen. - Uhrzeit Wählen Sie „Uhrzeit“ mit den Tasten „Hoch/Runter“ auf der Fernbedienung, drücken Sie „Enter“: Wählen Sie mit „Hoch/Runter“ Stunde, Minute, AM, PM. Stellen Sie mit „Links/Rechts“ Stunde, Minute, AM, PM ein.
DEUTSCH 5. Systemeinstellung Dieses Menü ermöglicht es Ihnen, die Funktionsparameter Ihres Bilderrahmens einzustellen. - Aktivierung/Deaktivierung des Helligkeitssensors Wählen Sie „Lichtsensor“ mit den Tasten „Hoch/Runter“ auf der Fernbedienung, drücken Sie „Enter“, um „Ein“ oder „Aus“ zu wählen.
DEUTSCH - Einschalten Wählen Sie „Einschalten“ mit den Tasten „Hoch/Runter“ auf der Fernbedienung, drücken Sie „Enter“, um „Ein“ oder „Aus“ zu wählen. - Automatische Einschaltzeit Wählen Sie „Auto Einschaltzeit“ mit den Tasten „Hoch/Runter“ auf der Fernbedienung, drücken Sie „Enter“: Wählen Sie mit „Hoch/Runter“ Stunde, Minute, AM, PM. Stellen Sie mit „Links/Rechts“ Stunde, Minute, AM, PM ein.
DEUTSCH - Versionsnummer der internen Software (nur zu Ihrer Information). V. Verbindung mit einem Computer Es ist möglich, Dateien von einem PC auf den Bilderrahmen zu übertragen. Schließen Sie hierfür Ihren Bilderrahmen mit einem USB-Kabel (Mini-USB-Stecker für den Rahmen, Standard-USB-Stecker für den Computer) an den Computer an und schalten Sie den Rahmen ein: auf dem Bildschirm des Rahmens erscheint „PC-Verbindung …“.
DEUTSCH Öffnen Sie das Verzeichnis, in dem die Dateien gespeichert sind, die Sie auf den Rahmen übertragen wollen, und übertragen Sie sie durch „Kopieren und Einfügen“ oder „Ziehen und Ablegen“ in den gewünschte Ordner. Achtung! Die so übertragenen Fotos werden nicht skaliert. - Ziehen Sie das USB-Kabel heraus: Ihr Bilderrahmen nimmt seinen Betrieb automatisch wieder auf. 22 Dokument ohne vertraglichen Charakter.
DEUTSCH VI. Sicherheitshinweise Behandeln Sie den digitalen Bilderrahmen mit Vorsicht und vermeiden Sie es, den Bildschirm zu berühren, denn Fingerabdrücke lassen sich nur schwer entfernen. Stellen Sie den digitalen Bilderrahmen stets auf einer ebenen und stabilen Fläche auf, um Schäden durch Herunterfallen zu vermeiden. Setzen Sie Ihren Bilderrahmen nicht der Sonne oder hohen Temperaturen aus, da er hierdurch beschädigt oder seine Gebrauchsdauer verringert werden könnte.
DEUTSCH VII. Garantie Die Garantie deckt keine Schäden ab, die durch einen Reparaturversuch durch Sie (oder eine andere nicht autorisierte Person) entstanden sind. Sollte der Bilderrahmen Rauch, ein ungewöhnliches Geräusch oder einen ungewöhnlichen Geruch abgeben, schalten Sie ihn unverzüglich aus und ziehen Sie das Kabel aus der Steckdose. Kontaktieren Sie Ihren Händler. Falls Sie den digitalen Bilderrahmen längere Zeit nicht benutzen, achten Sie darauf, das Stromkabel aus der Steckdose herauszuziehen.
DEUTSCH Ausschluss Schäden oder Defekte, die durch eine unsachgemäße Benutzung oder Handhabung des digitalen Bilderrahmens oder durch die Verwendung von nicht originalen Zubehörteilen oder von Zubehörteilen, die von der vorliegenden Gebrauchsanweisung nicht empfohlen werden, entstehen, sind von der Garantie ausgeschlossen. Die Garantie deckt keine Schäden ab, die durch äußere Einflüsse wie Blitz, Wasser oder Feuer verursacht werden oder während eines Transports entstehen.
DEUTSCH VIII.
........................................................... 2 ............................................................................................. 2 ............................................................................................ 3 ................................................................................................ 3 ............................................................................................................. 4 ...............................................
ADVERTENCIA PREVIA: Al primero encender el marco, éste muestra la animación de demostración. Para salir de ella y acceder a las funciones del marco, sólo tiene que pulsar el botón Slideshow del mando a distancia, o sobre el boton «Izquierda» del marco durante 3 segundos. Le agradecemos la compra de un marco de fotos digital TELEFUNKEN DPF 10934. Antes de utilizar el aparato, lea las presentes instrucciones de uso, y luego guárdelas para poder consultarlas posteriormente.
▲ ◄ ▼ ► (COPY/DEL) (ROTATE) 3 Documento no contractual que puede sufrir modificaciones en caso de errores tipográficos (Mktg1011) El fabricante se reserva el derecho a modificar las características del producto sin previo aviso.
(SLIDESHOW) MUSIC VIDEO SETUP Saque el marco y sus accesorios de su embalaje Retire la lámina de plástico de protección de la pantalla del marco Tire de la lengüeta de plástico que protege los contactos del mando a distancia Coloque el marco en el lugar deseado tirando hacia usted de la base ajustable (véase el esquema más arriba) Conecte el cable de alimentación al marco en el punto previsto a tal efecto. Enchufe el marco a una toma de corriente. El marco se pondrá en marcha automáticamente.
El modo ECO LOGIC asocia 3 elementos esenciales que permiten reducir el consumo de energía más de un 40% en comparación con un marco estándar: Una pantalla LED, que consume menos energía a la vez que mejora la calidad de la imagen Un adaptador de corriente de bajo consumo certificado «Energy Star» Un sensor de luminosidad Este sensor, activado por defecto, hace que el marco se apague automáticamente al anochecer y se encienda al amanecer.
Al cabo de unos segundos, aparecerá el mensaje «¿Desea copiar los datos en la memoria interna?» Si no realiza ninguna acción durante 15 segundos, se iniciará la presentación de diapositivas desde la tarjeta pero no se copiarán las imágenes. Si responde «Sí» a la petición de copia de las imágenes, aparecerá el mensaje «¿Copiar archivos? » Seleccione «Sí» y pulse «Enter». Esta función permite adaptar las fotografías a la definición del marco en el momento de copiarlas, reduciendo así enormemente su peso.
Pulse el botón «Exit» del mando a distancia tantas veces como sea necesario hasta ver la pantalla de selección de soportes. Por medio de los botones «Izquierda/Derecha» del mando a distancia, seleccione el icono «Archivos» y pulse «Enter». Seleccione el archivo que desee copiar con ayuda de los botones «Arriba/Abajo» del mando a distancia y pulse «Copy/Del». Aparecerá el mensaje siguiente: «¿Copiar?» Seleccione la opción deseada con los botones «Izquierda/Derecha» y pulse «Enter».
Pulse el botón «Copy/Del». Aparecerá en la pantalla el mensaje «¿Copiar archivos? » (Selección o todas). Seleccione y pulse «Enter». Las miniaturas volverán a aparecer, con una casilla de verificación en la esquina superior izquierda de cada imagen. Seleccione las fotos que desee copiar mediante los botones «Izquierda/Derecha» del mando a distancia, y pulse «Enter» después de seleccionar cada foto. Se marcarán entonces las casillas de las imágenes seleccionadas.
También puede eliminar una de sus carpetas personales ubicadas en uno de los directorios predefinidos. Suprima sus fotos mediante el modo de viñetas Mediante este método, puede suprimir una selección de fotos de la memoria interna o bien todas ellas. Pulse el botón «Exit» del mando a distancia tantas veces como sea necesario hasta ver la pantalla de selección de soportes. Seleccione la memoria interna mediante los botones «Izquierda/Derecha» del mando a distancia. Pulse «Enter».
Si no se ha insertado ningún soporte, la presentación de diapositivas de la memoria interna se inicia automáticamente al encender el marco. Si en el momento del encendido hay insertada una tarjeta de memoria o un lápiz USB, se reproducirá el contenido de la tarjeta/lápiz USB. En tal caso, puede alternar entre la tarjeta/lápiz USB y la memoria interna de la siguiente forma: Pulse el botón «Exit» del mando a distancia tantas veces como sea necesario hasta ver la pantalla de selección de soportes.
Pulse repetidamente el botón «Exit» para volver a la pantalla principal. Por medio de los botones «Izquierda/Derecha» del mando a distancia, seleccione el icono «Foto» . Pulse el botón de «Enter» varias veces para seleccionar el modo de reproducción de la siguiente manera: Presentación Diapositivas + Música Foto Individual Pulse repetidamente el botón «Exit» para volver a la pantalla principal.
Pulse repetidamente el botón «Exit» para volver a la pantalla principal. Por medio de los botones «Izquierda/Derecha» del mando a distancia, seleccione el icono «Música» . Pulse el botón de «Enter»: la música comenzará. Utilice los botones de «Izquierda/Derecha» para seleccionar / (Reproducir / Pausa) en la pantalla, y luego presione «Enter». Utilice los botones de «Derecha / Izquierda» para seleccionar / (Anterior / Siguiente) en la pantalla, y luego presione«Enter».
Desde la pantalla principal, seleccione el icono «Ajustes» mediante los botones «Izquierda/Derecha» y «Arriba/Abajo» del mando a distancia para acceder a los distintos ajustes de su marco. Si está reproduciendo una presentación, simplemente pulse el botón de «Configuración» en su mando a distancia para acceder a los menús de configuración.
Duración de presentación Seleccione la «Duración de presentación» mediante los botones de «Arriba / Abajo» del mando a distancia y pulse «Enter», a continuación, use los botones de «Arriba / Abajo» para elegir entre: 5 seg. 15 seg. 30 seg. 60 seg. 5 min. 15 min.
Ventana Mágica Seleccione los botones de «Ventana Mágica» mediante los botones de «Arriba / Abajo» del mando a distancia, a continuación, presione el botón de «Enter» para seleccionar «Sí» o «No». Reloj Seleccione «Reloj» mediante los botones de «Arriba / Abajo» del mando a distancia, a continuación, presione el botón de «Enter» para seleccionar «Sí» o «No».
Efecto de la Música Su marco TELEFUNKEN tiene un ecualizador para adaptar el sonido al tipo de música que se escuche. Seleccione «Efecto de la Música» mediante los botones de «Arriba / Abajo» del mando a distancia y presione «Enter», a continuación, use los botones de «Arriba / Abajo» para elegir entre: Jazz DBB Normal Rock Pop Clásico Suave Mostrar espectro Al reproducir un archivo de música, usted puede mostrar el ecualizador en la pantalla de su marco de TELEFUNKEN.
Modo de reproducción Seleccione «Modo de reproducción» mediante los botones de «Arriba / Abajo» del mando a distancia y pulse «Enter», a continuación, use los botones de «Arriba / Abajo» para elegir entre: Repetir: el vídeo se reproducirá en bucle Una Vez: el vídeo sólo se reproducirá una vez Auto reproducción Cuando se activa, el marco auto reproduce sus archivos de video, tan pronto como se seleccione el modo de vídeo.
Fecha Seleccione «Fecha» mediante los botones de «Arriba / Abajo» del mando a distancia y pulse «Enter», entonces: Utilice los botones de «Arriba / Abajo» para elegir entre Mes, Día, Año Utilice los botones de «Derecha / Izquierda» para establecer los valores de Mes, Día, Año Modo de reloj (12 - 24 horas) Seleccione «Modo de reloj» mediante los botones de «Arriba / Abajo» del mando a distancia y presione «Enter», a continuación, presione el botón de «Arriba / Abajo» para elegir formato de 12 ó 24 ho
Este menú le permite ajustar los parámetros de funcionamiento de su marco. La activación/desactivación del sensor de luminosidad Seleccione «Sensor de luz» mediante los botones de «Arriba / Abajo» del mando a distancia, a continuación, presione «Enter» para seleccionar «Sí» o «No».
Tono Seleccione «Tono» mediante los botones de «Arriba / Abajo» del mando a distancia y pulse «Enter», a continuación, pulse el botón de «derecha / izquierda» para ajustar el nivel de tinte (1-100). Encendido Seleccione «Encendido» mediante los botones de «Arriba / Abajo» del mando a distancia, a continuación, presione el botón de «Enter» para seleccionar «Sí» o «No».
Restablecer Si el marco se maneja incorrectamente, puede ser útil restablecer la configuración predeterminada. Para ello, seleccione «Por defecto» mediante los botones de «Arriba / Abajo» del mando a distancia y pulse « Enter», entonces se recomienda usar los botones de «Arriba / Abajo» para seleccionar «Sí» o «No». Nota: Después de la restauración, la pantalla de selección de idioma aparecerá en la siguiente puesta en marcha, tal como lo hizo para su primer uso.
22 Documento no contractual que puede sufrir modificaciones en caso de errores tipográficos (Mktg1011) El fabricante se reserva el derecho a modificar las características del producto sin previo aviso.
Manipule el marco de fotos digital con precaución y evite tocar la pantalla; las marcas de dedos son difíciles de limpiar. Coloque en todo caso el marco de fotos digital sobre una superficie plana y estable para evitar que se caiga y se dañe. Evite exponer el marco de fotos digital al sol o a temperaturas elevadas, ya que podrían dañarlo o reducir su vida útil. No lo coloque sobre fuentes de calor como radiadores, estufas… Para evitar reflejos, no coloque el marco de cara al sol.
La garantía no cubre los daños ocasionados si usted (u otra persona no capacitada) intenta reparar el marco. Si el marco emite humo, un ruido o un olor no habitual, apáguelo y desenchúfelo de inmediato. Póngase en contacto con la tienda donde lo ha comprado. Si no utiliza el marco digital durante un tiempo, recuerde desenchufar el cable de alimentación. La garantía cubre el marco de fotos digital, pero no incluye los accesorios.
La garantía no cubre los daños ocasionados por elementos exteriores como rayos, inundaciones o incendios, ni ningún otro daño ocasionado durante un transporte. No se podrá hacer ninguna reclamación de garantía si el número de serie del marco digital ha sido modificado, eliminado o borrado, o es ilegible. No se podrá hacer ninguna reclamación de garantía si el marco digital ha sido reparado, alterado o modificado por su propietario o por cualquier otra persona no capacitada y cualificada oficialmente.
Características Tamaño Definición DPF 10934 10,1’’ (25,6 cm) 1024 x 600 Tipo de pantalla LED Relación de imagen 16/9 Memoria interna 2 GB Audio/vídeo Tarjetas compatibles Archivos reproducidos SI SD/MMC,SDHC, MS, XD, Clés USB JPEG,/WAV, MP3/MPEG1,4, MOTION JPEG Cambio de tamaño automático SI Rotación automática SI Entrada alimentación 100-240 V AC 50/60 Hz Salida alimentación 5V DC 2Ah Consumo en espera <1W Consumo durante el uso <8W Dimensiones Peso Sistemas compatibles 280*176*26mm
ITALIANO ISTRUZIONI PER L'USO DELLE CORNICI DIGITALI TELEFUNKEN DPF 10934 I. Descrizione e installazione della cornice ............................................... 2 1. Contenuto della confezione............................................................................................. 2 2. Schemi della cornice ....................................................................................................... 3 3. Telecomando .......................................................................
ITALIANO AVVISO PRELIMINARE: All'accensione della cornice digitale, viene visualizzata la dimostrazione animata. Per uscire e accedere alle funzioni della cornice digitale, è sufficiente premere il tasto "Slideshow" del telecomando o insieme, o il tasto "Sinistra" della cornice digitale per 3 secondi. I. Descrizione e installazione della cornice Grazie per aver acquistato una cornice digitale TELEFUNKEN DPF 10934.
ITALIANO 2. Schemi della cornice 3. Telecomando Il telecomando consente di accedere a tutte le funzioni.
ITALIANO (SLIDESHOW) Avvia direttamente la presentazione delle foto MUSIC Accesso diretto al menù di setup (impostazioni) (MUSICA) VIDEO Accesso diretto al menù di setup (impostazioni) (VIDEO) SETUP Accesso diretto al menu di setup (impostazioni) 4.
ITALIANO Modalità "ECO LOGIC" La modalità ECO LOGIC combina 3 elementi essenziali che consentono di ridurre il consumo di energia di oltre il 40% rispetto a una cornice standard: - uno schermo LED, che migliora la qualità dell’immagine con un ridotto consumo energetico; - un trasformatore di rete a basso consumo, certificato "Energy Star"; - un sensore di luminosità.
ITALIANO - Se non si interviene entro 15 secondi, lo slideshow contenuto nella scheda di memoria verrà letto ma le immagini non verranno copiate. Se si sceglie “si” alla richiesta di copia delle immagini, si 1. visualizza il messaggio “Copiare i file?” Selezionare “Sì” e premere “Enter”. - Il ridimensionamento permette alla copia delle foto di adattarsi alla definizione della cornice e quindi di ridurre notevolmente il loro peso. Grazie a questo sistema, è possibile salvare oltre 10.
ITALIANO 1. Premere il tasto "Exit" del telecomando fino a visualizzare la schermata di selezione dei supporti. 2. Con i tasti "Sinistra/Destra" del telecomando, selezionare l'icona "File"e premere "Enter" 3. Selezionare il file da copiare con i tasti "Su/Giù" del telecomando e premere "Copy/Del". Viene visualizzato il messaggio seguente: "Copiare?" Effettuare la selezione con i tasti "Sinistra/Destra" e quindi premere "Enter". 4.
ITALIANO Le miniature riappariranno con un box flaggato nell'angolo in alto a sinistra di ogni immagine. Selezionare le foto da copiare utilizzando i tasti "Sinistra/Destra" del telecomando e premendo "Enter" per ogni foto selezionata. Per ogni immagine selezionata, il quadratino viene contrassegnato da un segno di spunta. (Se si è scelto "copia tutto", tutti i thumbnail verranno contrassegnati da un segno di spunta). Premere il tasto "Copy/Del". Viene visualizzato un messaggio di conferma.
ITALIANO - Eliminazione delle foto dalla modalità thumbnail Con questo metodo è possibile eliminare una selezione o tutte le foto della memoria interna. Premere il tasto "Exit" del telecomando fino a visualizzare la schermata di selezione dei supporti. Selezionare la memoria interna utilizzando i tasti "Sinistra/Destra" del telecomando. Premere "Enter". Con i tasti "Sinistra/Destra", selezionare la modalità foto e premere "Enter". Allora inizierà la presentazione.
ITALIANO Se, al momento dell’accensione, è inserita una scheda di memoria oppure una chiave USB, verrà letto il contenuto della scheda di memoria o della chiave USB. In questo caso, è possibile passare dalla scheda di memoria alla memoria interna in questo modo: Premere il tasto "Exit" del telecomando fino a visualizzare la schermata relativa alla selezione dei supporti. Con i tasti "Sinistra/Destra" del telecomando, selezionare il supporto da leggere, quindi premere il tasto "Slideshow" del telecomando.
ITALIANO - Premere ripetutamente il tasto "Enter" per selezionare la modalità di riproduzione come segue: Presentazione Presentazione +Musica Immagine singola Video - Premere il tasto "Exit" fino a visualizzare la schermata principale. - Con le frecce "Sinistra/Destra" del telecomando, selezionare l'icona "Video". - Premere il tasto "Enter": il video verrà avviato. - Utilizzare i tasti "Sinistra/Destra" per selezionare/(Play/Pausa) sullo schermo, quindi premere “Enter”.
ITALIANO - Utilizzare i tasti "Sinistra/Destra" per selezionare / (Precedente/Successivo) sullo schermo, e quindi premere “Enter”. - Utilizzare i tasti "Sinistra/Destra" per selezionare / (Riavvolgimento/Avanzamento rapido) sullo schermo, quindi premere “Enter”. - Utilizzare i tasti "Sinistra/Destra" per selezionare (Volume) sullo schermo, quindi premere per abbassare il volume.
ITALIANO Quindi sarà possibile di modificare le impostazioni utilizzando i tasti freccia sul telecomando. - Modalità visualizzazione Selezionare "Modalità visualizzazione" utilizzando i tasti "Su/Giù" sul telecomando e premete “Enter”, quindi utilizzare i tasti "Su/Giù" per scegliere tra: Presentazione: le immagini scorrono una dopo l'altra Miniature: le immagini sono visualizzate come miniature.
ITALIANO Partizione Cancellare Persiane 3D Griglia Rect.
ITALIANO Impostazioni musica All'interno del menu di impostazione, selezionare la riga "Impostaz. Musica" con i tasti "Su/Giù" del telecomando e premere "Enter".
ITALIANO Selezionare "Auto Play" utilizzando i tasti "Su/Giù" sul telecomando, quindi premere il tasto “Enter” per selezionare”Acceso” o “Spento”. Impostazioni Video All'interno del menu di impostazione, selezionare la riga "Impostaz. Video" con i tasti "Su/Giù" del telecomando e premere "Enter".
ITALIANO - Modalità di visualizzazione dell'agenda Selezionare "Modalità visualizzazione" utilizzando i tasti "Su/Giù" sul telecomando, premere il tasto “Enter” quindi utilizzare i tasti "Su/Giù" per scegliere tra: Agenda mensile Agenda Orologio analogico - Formato Data Selezionare "Formato Data " utilizzando i tasti "Su/Giù"sul telecomando e premere “Enter”, quindi utilizzare i tasti "Su/Giù" per scegliere tra: MM/GG/AAAA GG/MM/AAAA AAAA/MM/GG - Data Selezionare "Data" utiliz
ITALIANO Utilizzare i tasti "Sinistra/Destra" per impostare i valori per Ora, Min, AM, PM - Frequenza Sveglia Selezionare la "Frequenza Sveglia" utilizzando i tasti "Su/Giù" sul telecomando e premete ”Enter”, quindi utilizzate i tasti "Su/Giù" per scegliere tra: Una volta Sempre da Lun. a Ven.
ITALIANO Configurazione sistema Questo menu consente di impostare i parametri di funzionamento della cornice. - Attivazione/disattivazione del sensore di luminosità Selezionare il "Sensore di luminosità" utilizzando i tasti "Su/Giù" sul telecomando, quindi premere il tasto “Enter” per scegliere "Acceso" o "Spento".
ITALIANO - Accensione Selezionare "Accensione" utilizzando i tasti "Su/Giù" sul telecomando, quindi premere il tasto ”Enter” per selezionare "On" o "Off".
ITALIANO - Numero di versione del software interno (a titolo informativo) 21 Documento non contrattuale soggetto a modifiche in caso di errori tipografici (Mktg1011) Il produttore si riserva il diritto di modificare le caratteristiche del prodotto senza preavviso.
ITALIANO V. Collegamento al computer È possibile trasferire dei file nella cornice collegandola al portatile.
ITALIANO VI. Istruzioni di sicurezza Manipolare con attenzione la cornice digitale, evitando di toccare lo schermo: le impronte digitali sono difficili da togliere. Posizionare sempre la cornice digitale su una superficie piana e stabile, per evitare cadute o danni. Non esporre la cornice digitale ai raggi del sole o a temperature elevate, per evitare di danneggiarla o di ridurne la durata. Non posizionare la cornice vicino a fonti di calore quali radiatori o unità di riscaldamento integrativo.
ITALIANO VII. Garanzia La garanzia non copre i danni causati dai tentativi di riparazione della cornice da parte dell'utente o di persone non autorizzate. Se la cornice emette fumo, rumori o odori inusuali, spegnerla e scollegarla immediatamente. Rivolgersi al rivenditore. Se non si utilizza la cornice digitale per un periodo prolungato, scollegare il cavo di alimentazione. La garanzia copre la cornice digitale e non include gli accessori.
ITALIANO Esclusioni I danni o i difetti provocati da utilizzo o manipolazione non corretti della cornice digitale nonché dall'utilizzo di accessori non originali o non consigliati nelle presenti istruzioni non sono coperti dalla garanzia. La garanzia non copre i danni provocati da agenti esterni quali fulmini, acqua, fuoco e i danni provocati durante il trasporto. Non sono ammessi interventi in garanzia se il numero di serie della cornice digitale è stato modificato, rimosso, cancellato o reso illeggibile.
ITALIANO VIII.
NEDERLANDS GEBRUIKSAANWIJZING DIGITALE FOTOLIJST TELEFUNKEN DPF 10934 I. Uw fotolijst uitpakken en installeren ........................................................ 2 1. Inhoud van de doos........................................................................................................... 2 2. Uitzicht van de fotolijst ..................................................................................................... 3 3. Afstandsbediening......................................................
NEDERLANDS WAARSCHUWING VOORAF: Bij het inschakelen van uw fotolijst geeft deze een demo-animatie weer. Om deze te sluiten en toegang te krijgen tot de functies van de fotolijst, drukt u gewoon op de toets ‘Diashow’ toets op de afstandsbediening, of gelijktijdig op de ‘Links’ toetsen van de digitale fotolijst voor 3 seconden. I. Uw fotolijst uitpakken en installeren U hebt zojuist een digitale fotolijst DPF 10934 van TELEFUNKEN aangekocht, waarvoor onze dank.
NEDERLANDS 2. Uitzicht van de fotolijst 3. Afstandsbediening Met de afstandsbediening kunt u alle functies verrichten.
NEDERLANDS Volume omlaag, het geluidsniveau wordt weergegeven (SLIDESHOW) Start de foto diashow onmiddellijk op MUSIC Geeft toegang tot het instellingenmenu (MUZIEK) VIDEO Geeft toegang tot het instellingenmenu (VIDEO) SET-UP Directe toegang tot het instellingenmenu (instellingen) 4. Installatie - Verwijder de fotolijst en de accessoires uit hun verpakking. - Verwijder de plastic beschermfolie van de voorkant van de fotolijst.
NEDERLANDS 2. De ‘ECO LOGIC’ modus De ‘ECO LOGIC’ modus combineert drie essentiële elementen die zorgen voor een 40% lager energieverbruik in vergelijking met een standaard fotolijst: - Een LED-scherm, dat energiezuiniger is en een betere beeldkwaliteit biedt - Een energiezuinige netadapter gecertificeerd door ‘Energy Star’ - Een lichtsensor Deze sensor, die standaard geactiveerd is, zorgt ervoor dat uw fotolijst zich 's nachts automatisch uitschakelt.
NEDERLANDS - Uw geheugenkaart wordt automatisch gedetecteerd. - Na enkele seconden verschijnt het bericht ‘Wilt u kopiëren naar het interne geheugen?’ op het display. - Als u binnen de 15 seconden niet reageert, dan zal de diashow op de kaart worden weergegeven maar zullen de foto's niet worden gekopieerd. 1. 2. - Dankzij formaataanpassing wordt de kopie van uw foto's aangepast aan de resolutie van de fotolijst. Hierdoor worden de bestanden veel minder zwaar. Zo is het mogelijk om meer dan 10.
NEDERLANDS - Uw foto’s kopiëren vanuit bestandsbeheer Als u deze methode gebruikt, kunt u de bestanden slechts één voor één kopiëren en hebt u niet de mogelijkheid om hun formaat aan te passen aan de resolutie van de fotolijst. 1. Druk zo veel als nodig op de toets ‘Exit’ op uw afstandsbediening totdat u toegang krijgt tot het scherm waar u gegevensdragers kunt selecteren. 2. Selecteer met behulp van de toetsen ‘Links/Rechts’ op de afstandsbediening het pictogram ‘Bestand’ en druk op ‘Enter’. 3.
NEDERLANDS met behulp van de toetsen ‘Links/Rechts’ op de afstandsbediening. Druk op ‘Enter’. 3. Selecteer met behulp van de toetsen ‘Links/Rechts’ de fotomodus en druk op ‘Enter’. De diashow start. 4. Druk op de toets ‘Exit’ op de afstandsbediening om toegang te krijgen tot de miniaturen. 5. Druk op de toets ‘Copy/Del’. Het scherm geeft ‘Best. kopiëren?’ (Selectie of alles) weer. Selecteer en druk op ‘Enter’.
NEDERLANDS 2. Selecteer met behulp van de toetsen ‘Links/Rechts’ op de afstandsbediening het pictogram ‘Bestand’ en druk op “Enter”. 3. Selecteer de foto met behulp van de toetsen ‘Omhoog/Omlaag’ op de afstandsbediening en druk vervolgens op de toets ‘Copy/Del’. Het scherm geeft ‘Best. verwijderen?-Ja/Nee’ weer. Kies de gewenste optie en druk op ‘Enter’. Uw bestand wordt verwijderd. U kunt ook een van uw persoonlijke mappen verwijderen in een van de voorgedefinieerde directory's.
NEDERLANDS 9. Selecteer de gewenste optie met behulp van de toetsen ‘Omhoog/Omlaag’ op de afstandsbediening. Druk op ‘Enter’. Uw foto’s worden nu uit het interne geheugen verwijderd.
NEDERLANDS III. Selecteren van het type te lezen bestanden 1. Intern geheugen/gegevensdrager Wanneer er geen enkele gegevensdrager is ingevoerd, wordt automatisch de diashow van het interne geheugen opgestart bij het inschakelen van de fotolijst. Als er een geheugenkaart of een USB-stick is ingevoerd op het moment dat de fotolijst wordt ingeschakeld, dan wordt de inhoud van de kaart of stick gelezen.
NEDERLANDS 3. Foto’s - Druk zo veel als nodig is op de toets ‘Exit’ om het hoofdscherm weer te geven. - Selecteer met behulp van de pijltjestoetsen ‘Links/Rechts’ op de afstandsbediening het pictogram ‘Foto’. - Druk meerdere keren op de "Enter" toets om de speelwijze op de beschreven wijze te selecteren: Diavertoning foto's Dia's+Muziek Eén foto 4. Video’s - Druk zo veel als nodig is op de toets ‘Exit’ om het hoofdscherm weer te geven.
NEDERLANDS 5. Muziek - Druk zo veel als nodig is op de toets ‘Exit’ om het hoofdscherm weer te geven. - Selecteer met behulp van de pijltjestoetsen ‘Links/Rechts’ op de afstandsbediening het pictogram ‘Muziek’. - Druk op de "Enter" toets: de muziek wordt afgespeeld. - Gebruik de "Links/Rechts" toets om op het scherm /(Afspelen/Pauze) te selecteren en druk vervolgens op "Enter". - Gebruik de "Links/Rechts" toets om op het scherm /(Vorige/Volgende) te selecteren en druk vervolgens op "Enter".
NEDERLANDS IV. Instellingen Wanneer u zich in het hoofdscherm bevindt, selecteer dan het pictogram ‘Inst.’ met behulp van de toetsen ‘Links/Rechts’ en ‘Omhoog/Omlaag’ op uw afstandsbediening om toegang te krijgen tot de verschillende instellingen van uw fotolijst. Druk tijdens een diashow op de "Instellingen" toets op de afstandsbediening voor toegang tot het instellingenmenu. In het instellingenmenu kunt u met de "Omhoog/Omlaag" toetsen op de afstandsbediening de in te stellen parameters selecteren.
NEDERLANDS - Duur diavertoning Selecteer " Duur diavertoning " met de toetsen "Omhoog/Omlaag" op de afstandsbediening en druk op "Enter". Gebruik vervolgens de "Omhoog/Omlaag" toetsen om een keuze te maken uit: 5 Sec. 15 Sec. 30 Sec. 60 Sec. 5 Min. 15 Min. - Effect diavertoning Selecteer " Effect diavertoning " met de toetsen "Omhoog/Omlaag" op de afstandsbediening en druk op "Enter".
NEDERLANDS - Magisch Venster Selecteer "Magisch Venster" met de toetsen "Omhoog/Omlaag" op de afstandsbediening en druk vervolgens op "Enter" om voor "Aan" of "Uit" te kiezen. - Klok Selecteer "Klok" met de toetsen "Omhoog/Omlaag" op de afstandsbediening en druk vervolgens op "Enter" om voor "Aan" of "Uit" te kiezen. - Ander formaat Selecteer "Ander formaat" met de toetsen "Omhoog/Omlaag" op de afstandsbediening en druk vervolgens op "Enter" om voor "Aan" of "Uit" te kiezen.
NEDERLANDS - Muziekeffect Uw TELEFUNKEN fotolijst is voorzien van een equalizer waarmee het geluid aangepast kan worden aan het soort muziek dat afluistert. Selecteer "Muziekeffect" met de toetsen "Omhoog/Omlaag" op de afstandsbediening en druk op "Enter".
NEDERLANDS Originele Grootte: uw video wordt weergegeven in het originele formaat - Afspeelmodus Selecteer "Afspeelmodus" met de toetsen "Omhoog/Omlaag" op de afstandsbediening en druk op "Enter".
NEDERLANDS - Datum Selecteer "Datum" met de toetsen "Omhoog/Omlaag" op de afstandsbediening en druk vervolgens op "Enter". Gebruik de "Omhoog/Omlaag" toetsen om te kiezen voor Maand, Dag of Jaar Gebruik de "Links/Rechts" toetsen om de waarde voor de Maand, Dag, Jaar in te stellen - Klokmodus (12- of 24-uur) Selecteer "Klokmodus" met de "Omhoog/Omlaag" toetsen op de afstandsbediening en druk op "Enter".
NEDERLANDS 5. Systeemconfiguratie In dit menu kunt u de werkingsparameters van uw fotolijst instellen. - In-/uitschakelen van de lichtsensor Selecteer "Lichtsensor" met de toetsen "Omhoog/Omlaag" op de afstandsbediening en druk vervolgens op "Enter" om voor "Aan" of "Uit" te kiezen. - Taal Selecteer "Taal" met de toetsen "Omhoog/Omlaag" op de afstandsbediening en druk op "Enter".
NEDERLANDS - Aanzetten Selecteer "Aanzetten" met de toetsen "Omhoog/Omlaag" op de afstandsbediening en druk vervolgens op "Enter" om voor "Aan" of "Uit" te kiezen. - Auto opstarttijd Selecteer "Auto opstarttijd" met de toetsen "Omhoog/Omlaag" op de afstandsbediening en druk vervolgens op "Enter".
NEDERLANDS - Het versienummer van de interne software (ter info) 22 Niet-contractueel document onderworpen aan wijzigingen in geval van drukfouten (Mktg1012) COPYRIGHT SOPEG 2012 De fabrikant behoudt zich het recht voor om de kenmerken van het product zonder voorafgaande kennisgeving te wijzigen
NEDERLANDS V. Aansluiten op een computer Het is mogelijk om bestanden over te zetten naar de fotolijst door deze aan te sluiten op uw pc. Sluit hiervoor uw fotolijst aan op de computer via een USB-kabel (mini-USB-aansluiting van de fotolijst en standaard USB-aansluiting van de pc). Schakel vervolgens uw fotolijst in: het scherm van de fotolijst geeft ‘Verbinden met pc …’ weer. Koppel de kabel los om terug te keren naar normale werking.
NEDERLANDS Opgelet! Het formaat van de foto’s die op deze manier worden overgezet zal niet worden aangepast. - Koppel de USB-kabel los: uw fotolijst zal weer normaal werken. VI. Veiligheidsinstructies Hanteer de fotolijst voorzichtig en vermijd het aanraken van het scherm. Vingerafdrukken zijn moeilijk te verwijderen. Plaats de digitale fotolijst altijd op een vlak en stabiel oppervlak om vallen en beschadiging te voorkomen.
NEDERLANDS VII. Garantie De garantie dekt geen schade die voortvloeit uit pogingen om de fotolijst zelf te repareren (of pogingen door niet-bevoegde personen). Als de fotolijst een ongewone geur afgeeft of een vreemd geluid maakt of als er rook uit de fotolijst komt, schakel deze dan onmiddellijk uit en trek de stekker uit. Neem in dat geval contact op met uw winkel. Als u de digitale fotolijst gedurende een bepaalde tijd niet gebruikt, koppel dan het netsnoer los.
NEDERLANDS Uitsluiting Schade of defecten veroorzaakt door een foutief gebruik of hanteren van de digitale fotolijst en door het gebruik van andere dan de oorspronkelijke accessoires of accessoires die niet worden aanbevolen door deze instructies worden niet gedekt door de garantie. De garantie dekt geen schade die veroorzaakt wordt door externe elementen zoals bliksem, water, brand of alle andere schade veroorzaakt tijdens transport.
NEDERLANDS VIII.
PORTUGUESE MANUAL DE UTILIZAÇÃO MOLDURAS FOTOGRÁFICAS DIGITAIS TELEFUNKEN DPF 10934 I. Conheça e instale a sua moldura .............................................................. 2 1. Conteúdo da embalagem .................................................................................................. 2 2. Esquema da moldura ....................................................................................................... 3 3. Controlo remoto ...................................................
PORTUGUESE AVISO PRÉVIO: Quando a moldura é ligada, é apresentada a animação de demonstração. Para sair da animação e aceder às funções da moldura, simplesmente prima a tecla "Slideshow" do telecomando.o "Esquerda" da Moldura durante 3 segundos. I. Conheça e instale a sua moldura Acaba de adquirir uma moldura fotográfica digital TELEFUNKEN DPF 10934, pelo que lhe estamos gratos. Antes de utilizar o seu dispositivo, queira consultar este manual de utilização, conservando-o para futuras consultas. 1.
PORTUGUESE 2. Esquema da moldura 3. Controlo remoto Todas as funções podem ser acedidas através do controlo remoto.
PORTUGUESE Diminuir volume; o volume é mostrado no ecrã (SLIDESHOW) Iniciar directamente a apresentação de fotografias MUSIC Aceder directamente o menu de configuração (MÚSICA) VIDEO Aceder directamente o menu de configuração (VÍDEO) SETUP Entrar no menu de configurações (Config) directamente 4.
PORTUGUESE 2. O modo "ECO LOGIC" O modo ECO LOGIC associa 3 elementos essenciais que permitem uma redução do consumo de energia de mais de 40% em comparação com uma moldura padrão: Um ecrã LED, menos ávido por energia mas que melhora a qualidade da imagem Um adaptador de alimentação de baixo consumo certificado "Energy Star" Um sensor de luminosidade Este sensor, activado por predefinição, permite à moldura apagar-se automaticamente à noite e ligar-se de dia.
PORTUGUESE Após 15 segundos sem intervenção da sua parte, o diaporama contido no cartão será lido mas as imagens não serão copiadas. Se escolher “Sim” para a cópia das imagens, aparecerá a mensagem “Copiar ficheiros?” Seleccione “Sim” e prima “Enter”. O redimensionamento permite que a cópia das suas fotos se adapte à definição da moldura, reduzindo assim consideravelmente o respectivo espaço na memória. É graças a este sistema que é possível armazenar mais de 10 000 fotos na memória interna.
PORTUGUESE Prima a tecla "Exit" do telecomando tantas vezes quantas necessárias para visualizar o ecrã de escolha dos suportes. Através das setas "Esquerda/Direita" do telecomando, seleccione o ícone "Ficheiros" e prima "Enter". Seleccione o ficheiro a ser copiado através das teclas "Cima/Baixo" do telecomando e prima "Copiar/Elim". A mensagem seguinte é apresentada: "Copiar?" Faça a sua escolha através das teclas "Esquerda/Direita" e depois prima "Enter".
PORTUGUESE 5. Prima a tecla "Copy/Del". O ecrã apresenta "Copiar ficheiros?" (Selecção ou tudo). Seleccione e prima "Enter". As fotos minimizadas aparecerão de novo, com uma caixa de verificação no canto superior esquerdo de cada imagem. Seleccione as fotos a copiar através das teclas "Esquerda/Direita" do telecomando premindo "Enter" para cada foto seleccionada. O pequeno quadrado fica então marcado para cada imagem seleccionada. (Se escolheu "Copiar tudo", todas as miniaturas estarão marcadas.
PORTUGUESE Eliminaras suas fotos a partir do modo miniaturas Com este método, pode suprimir uma selecção ou todas as fotos da memória interna. Prima a tecla "Exit" do telecomando tantas vezes quantas necessárias para visualizar o ecrã de escolha dos suportes. Seleccione a memória interna através das teclas "Esquerda/Direita" do telecomando. Prima "Enter". Através das setas "Esquerda/Direita", seleccione o modo foto e prima "Enter". A apresentação de fotos terá então início.
PORTUGUESE Se for inserido um cartão de memória ou um disco USB ao se ligar a moldura, é o conteúdo do cartão/disco USB que será lido. De qualquer maneira, pode sempre passar do cartão/disco USB para a memória interna da seguinte forma: Prima a tecla "Exit" do telecomando tantas vezes quantas necessárias para aceder ao ecrã de selecção dos suportes. Através das teclas "Esquerda/Direita" do telecomando, seleccione o suporte a ser lido e depois prima a tecla "Diaporama" do telecomando.
PORTUGUESE Premir a tecla "Enter" repetidamente para seleccionar o modo de leitura como se segue: Apresentação Apresentação+Música Foto única 4. Os vídeos Premir tantas vezes quantas necessárias a tecla "Exit" para visualizar o ecrã principal. Através das setas cdo telecomando, seleccione o ícone "Vídeo". Premir a tecla "Enter" : o vídeo iniciar-se-á. Usar as teclas "Esquerda/Direita" para seleccionar /(Ler/Pausa) no ecrã, e depois premir “Enter”.
PORTUGUESE Usar as teclas "Esquerda/Direita" para seleccionar/(Ler/Pausa) no ecrã, e depois premir “Enter”. Usar as teclas "Esquerda/Direita" para seleccionar / (Anterior/Seguinte) no ecrã, e depois premir “Enter”. Usar as teclas "Esquerda/Direita" para seleccionar / (Retroceder/Avançar Rápido) no ecrã, e depois premir “Enter”. Usar as teclas "Esquerda/Direita" para seleccionar (Volume) no ecrã, e depois premir as teclas "Enter" para diminuir o nível de som.
PORTUGUESE 1. Definição de Fotos Seleccionar "Configuração de Foto" usando as teclas "Cima/Baixo" no controlo remoto, depois premir "Enter". Aparecerá o ecrã oposto: Ser-lhe-á então possível alterar as definições usando as teclas com setas no controlo remoto.
PORTUGUESE Efeito de apresentação Seleccionar o "Efeito de apresentação" usando as teclas "Cima/Baixo" no controlo remoto e premir “Enter”, depois usar as teclas "Cima/Baixo" para escolher entre os seguintes efeitos: Aleatório Nenhum Desaparecer dentro fora Serpente Partição Apagar Persianas 3D Grade Rect.
PORTUGUESE Cortar quando está a Copiar Seleccionar "Cortar quando copiar" usando as teclas "Cima/Baixo" no controlo remoto, depois premir a tecla “Enter” para escolher “On” ou “Off”. Mostrar dica quando está a Copiar Seleccionar "Mostrar dica quando copiar" usando as teclas "Cima/Baixo" no controlo remoto, depois premir a tecla “Enter” para escolher “On” ou “Off”. 2.
PORTUGUESE Ligeira Visualização do Equalizador Quando está a ler um ficheiro de música, pode visualizar o equalizador no ecrã da sua moldura digital TELEFUNKEN. Seleccionar “Mostrar Espectro" usando as teclas "Cima/Baixo" no controlo remoto, e depois premir a tecla “Enter” para seleccionar “On” ou “Off”. Reprodução automática A activação da reprodução automática permite à sua moldura digital reproduzir os seus ficheiros áudio automaticamente, assim que o modo áudio seja seleccionado.
PORTUGUESE Seleccionar "Auto Reprodução" usando as teclas "Cima/Baixo" no controlo remoto, depois premira tecla ”Enter” para escolher “On” ou “Off”. 4. Configuração do Calendário Seleccionar “Configuração do Calendário” no menu Definições usando as teclas "Cima/Baixo" no controlo remoto e premir "Enter".
PORTUGUESE As Horas Seleccionar "Hora do Relógio" usando as teclas "Cima/Baixo" no controlo remoto e premir “Enter”, depois: Usar as teclas"Cima/Baixo" para escolher entre Hora, Min, AM, PM Usar as teclas "Esquerda/Direita" para definir os valores para Hora, Min, AM, PM Estado do alarme Seleccionar "Estado do Alarme" usando as teclas "Cima/Baixo" no controlo remoto, depois premir a tecla ”Enter” para seleccionar "On" ou "Off".
PORTUGUESE Idioma Seleccionar”Idioma" usando as teclas "Cima/Baixo" no controlo remoto e premir “Enter”, depois usar as teclas "Cima/Baixo" para escolher entre: Inglês Francês Alemão Italiano Holandês Português Espanhol Brilho Seleccionar "Brilho" usando as teclas "Cima/Baixo" no controlo remoto e premir “Enter”, depois premir as teclas "Esquerda/Direita" para ajustar o nível de brilho (1-16).
PORTUGUESE Desligar Seleccionar "Desligar" usando as teclas "Cima/Baixo" no controlo remoto, depois premir a tecla “Enter” para escolher “On” ou “Off”.
PORTUGUESE V. Ligação a um computador É possível transferir ficheiros para a moldura ligando-a ao seu microcomputador.
PORTUGUESE Abra o directório em que estão guardados os ficheiros que pretende transferir para a moldura e coloque-os na pasta escolhida através de “Copiar/Colar” ou “Arrastar/Largar”. Atenção! As fotos transferidas desta maneira não serão redimensionadas. - Desligue o cabo USB: a sua moldura volta a ligar-se automaticamente. VI. Instruções de segurança Manipule a moldura fotográfica digital com precaução para evitar tocar no ecrã; é difícil retirar as marcas de dedos.
PORTUGUESE Atenção! Nunca retire a tampa de plástico situada na parte de trás da moldura. A moldura fotográfica digital inclui circuitos eléctricos e poderá lesionar-se caso os toque. Não tente consertar por si mesmo a sua moldura digital. 23 Non contractual document subject to change in case of typographical errors (Mktg1011) The manufacturer reserves the right to modify the product specifications without notice.
PORTUGUESE VII. Garantia A garantia não cobre os danos provocados caso o adquirente (ou qualquer pessoa não qualificada) tenha tentado consertar a moldura. Caso a moldura liberte fumo, um ruído ou um odor não habitual, desligue-a e desligue imediatamente o cabo da tomada. Contacte o local onde adquiriu o dispositivo. Caso não utilize a moldura digital durante algum tempo, queira desligar o cabo da tomada. A garantia incide sobre a moldura fotográfica digital e não inclui os acessórios.
PORTUGUESE Exclusão Os danos ou defeitos provocados por uma utilização ou manipulação incorrecta da moldura digital e pela utilização de acessórios que não sejam aqueles de origem ou não recomendados pela presente nota não estão cobertos pela garantia. A garantia não cobre os danos provocados por elementos externos, tais como relâmpagos, água ou incêndio ou qualquer outro dano ocorrido durante transporte.
PORTUGUESE VIII.