V5.1 GPS Navigation Suite for: BlackBerry 8100, 8300, 8700, 8703e, 8800, and 8830 Handhelds User’s Guide ©2003-2007 TeleNav, Inc. All rights reserved. TeleNav is a trademark of TeleNav, Inc. The BlackBerry and RIM families of related marks, images, and symbols are the exclusive properties and trademarks or registered trademarks of Research In Motion Limited. All other trademarks or registered trademarks are acknowledged as the exclusive property of their respective owners. All rights reserved.
Table of Contents 1. Welcome...............................................................................................................................................................5 2. Data Service Options .........................................................................................................................................6 3. The BlackBerry Controls...................................................................................................................................
Navigation Options (Going To Screen).......................................................................................................24 Initial Driving Directions................................................................................................................................25 GPS Origin Refinement ...............................................................................................................................25 Audible Guidance Tones ......................................
Interruption of Other Services.............................................................................................................................46 Switching Between Applications.........................................................................................................................46 12. Changing your PIN number ............................................................................................................................46 13. Exiting TeleNav GPS Navigator...........
1. Welcome TeleNav™ 5.1 utilizes the integration of GPS position determination technology, the Java™ programming environment, and access to your wireless carrier’s data network. With regard to GPS location information: • Verizon 8703e and 8830, along with all 8100, 8300, and 8700 BlackBerries require an external GPS receiver to be connected via Bluetooth. • Sprint and Alltel 8703e and 8830 have an internal GPS receiver. An external Bluetooth GPS receiver can also be used.
2. Data Service Options The TeleNav GPS Navigator application that you install on your phone requires a means of accessing the public Internet, which is typically provided by your carrier’s data network. The TeleNav GPS Navigator application communicates with the TeleNav servers to get routing, maps, and points of interest via your carrier’s data network. You do not need to purchase additional data services if you already have a data or email services plan for your phone.
The BlackBerry 8700 and 8703 Controls Controls on the 8700 and 8703 are identically located. These two BlackBerries have the no Menu key, and the ESCape key is below the trackwheel. To open the menus, press the trackwheel. Power button Speaker button Headset jack USB port Trackwheel ESCape button DELete key ALT Key Enter key Space key TIP: To advance through TeleNav, press the trackball/trackwheel or use the Enter key. Use the trackball/trackwheel on forms to advance row by row. © TELENAV, INC.
Clicking the Menu key or the trackball/trackwheel while using the TeleNav application may give you a variety of options, depending on what screen you are on. The options are discussed in the appropriate sections below. There is usually an option for Help and one to take you back to TeleNav Home to reduce the number of times you would have to press the Escape key. 4.
3. Turn on the GPS receiver, and make sure it is within 10 feet of the BlackBerry. 4. Open the Menu and select “Add Device.” The BlackBerry will search for all nearby Bluetooth devices that are on. 5. Select the GPS receiver from the list of devices within range. 6. The BlackBerry may then ask you to provide the Bluetooth passcode for the GPS receiver. On many devices, this code is “0000.” You may need to check the GPS receiver manual to confirm it. 7.
After starting TeleNav, the splash screen will appear for a few seconds. The first time you use TeleNav, you must grant TeleNav access to the network so it can authenticate your account, fetch maps, get navigation routes, and search for businesses. When you see the screen to the right or the one below, use the trackball to highlight the checkbox allowing TeleNav to have access to all connections. Then scroll down to “Allow this Connection” and press the trackball to continue.
Terms of Use Next, in order to continue the TeleNav registration process, you must agree to the Terms Of Use. The terms shown are a subset of the terms and conditions found by clicking on the associated link at the bottom of the www.telenav.com web pages. Click the trackball or trackwheel and select “Accept & Login” to continue. NOTE: If you do not want to accept the TeleNav Terms Of Use, press the trackball and select “Exit TeleNav.
During your first use of TeleNav, the device will download the audible and graphical content needed to build the displays and produce audible messages. The alert screen similar to that shown on the right advises you that this is taking place. The time it takes to complete the download depends on your coverage.
Drive To Menu You can select a variety of ways to get driving directions to a destination. The Drive To Menu options are: • My Favorites • Recent Places • Address • Intersection • Business • Airport • Address Book See page 15 for more information on how to use the Drive To menu. Select one of these menu items or use the Escape key to return to the TeleNav GPS Navigator Main Menu.
Maps & Traffic Menu You can use the Maps & Traffic Menu to view a map of: • Your Current Location • A Favorite Place • A Recent Place • An Address you type in • An Intersection • A Business • An Airport • An Address Book address See page 38 for full details on these features. Tools/Extras Menu The Tools/Extras menu gives you options for setting your preferences and other features.
7. Drive To Menu There are three ways to get driving directions to a desired location. 1. Select the Drive To option from the TeleNav GPS Navigator Main Menu. Then select one of the seven Drive To menu options shown below. 2. Use the Search option on the TeleNav Main Menu and search for a Point of Interest. Then Drive To that location. 3. Select Maps from the TeleNav Navigator Main Menu and choose a location.
The Going To screen usually appears before your navigation route is displayed so you can confirm your trip. Click the trackball/trackwheel on this screen to change your trip preferences. In the menu, you can choose Get Route to get the route right away. You can also choose Change Origin (to start navigation from a different location that you select), Change Route Style (Fastest, Shortest, etc.), get Help, or go back to TeleNav Home. To use the Drive To menu, do the following steps: 1.
My Favorites Favorite are places that you have found and saved in the past so you can quickly access them. Many TeleNav users save their home and work addresses as a Favorite so they can easily reuse the addresses later. For instructions on how to save a Favorite, see “Record Location” on page 41. If your Favorites list gets very large, it may be easier to use the Find function to find your desired Favorite. To use the Find function, enter one or more alphanumeric characters in the Find field.
Recent Places Recent Places are addresses used recently for navigation, directions, directory searches, or mapping. When an address in the list is used within TeleNav, it is promoted to the head of the list. TeleNav GPS Navigator automatically saves all of the places that you: • Viewed as a map. • Located using a street address, intersection, or airport. You can get directions to a Recent place, view maps of the Recent place, or save a Recent place to your Favorites list.
Address – Typing In Enter a street address by typing in the appropriate fields. You can get directions, view a map of the address, or save the address to your Favorites list. The address is automatically saved to your Recent Places list. 1. On the Drive To menu, highlight Address and click the trackball/trackwheel to expose the menu. Then choose “Type in Address.” 2. Type in a street address. Partial entry (5 or more letters) is okay for the street name.
NOTE: You can change your Navigation Options while in navigation mode. See page for 24 further details. Address – Calling In The auto voice entry system in TeleNav can be utilized two different ways: • Before starting TeleNav, call the Voice Address Input System at 408-523-1429 or 877-886-9762 and dictate your address as prompted, or • Select the “Call in an Address” option on the Drive To menu as described below. 1.
Your response> Arlington, Texas TeleNav GPS Navigator prompt> I heard Arlington, Texas. Say GO BACK if this is not correct. Say the street including both the number and name, like 422 Main Street. It can also be a highway. Your response> 1620 Oak Street TeleNav GPS Navigator prompt> I heard 1620 Oak Street. Say GO BACK if this is not correct. Great, your destination has been entered: 1620 Oak Street, Arlington, Texas 75210.
Intersection – Typing In Enter an intersection by typing in the appropriate fields. You can get directions, view a map of the intersection, or save the intersection to your Favorites list. The intersection is automatically saved to your Recent Places list. 1. On the Drive To menu, highlight Intersection and click the trackball/trackwheel to expose the menu. Then choose “Type in Address.” 2. Type in an intersection.
Intersection – Calling In 1. On the Drive To menu, highlight Intersection and click the trackball/trackwheel to expose the menu. Then choose “Call in Address.” See “Address – Calling In” on page 20 for more details on this feature. Business TeleNav GPS Navigator offers a full national business directory. Search by popular categories or access an extensive directory.
Address Book Quickly find addresses that you have saved in your BlackBerry Address Book. If you have a large Address Book, it may be easier to use the Search function to find your desired address. To use the Search function, enter a First or Last name of a contact in the Search text box. As you type, the closest match(es) will appear at the top of the list. 1. In the Address Book screen, select a contact to drive to. 2. Click the trackball/trackwheel to confirm your choice.
You can also choose “Change Route Style” for your trip. Select one of the following options in the Route Style menu: • Fastest – This default Route Style finds the fastest driving route. • Traffic Optimized – This Route Style finds the fastest route that minimizes current traffic delays. • Shortest – This Route Style may or may not take more time to drive, but it shows you the shortest distance. • Prefer Streets – Use streets instead of highways if possible.
Audible Guidance Tones The TeleNav GPS Navigator application delivers spoken audible directions as you drive. A preparatory audible tone is typically heard no less than 30 seconds before reaching a turn, and an action audible tone is typically heard no less than 10 seconds before reaching a turn. The preparatory audible tone may not be sounded if the distance to the next turn only allows time for the action tone.
The View menu has the following options: 3D Moving Map A 3-dimensional map with turn icons (default). This view allows you to see how the road ahead is organized, similar to the perspective of a bird flying 50 feet above the route. You can see the route to your destination as a blue overlay on one of the roads with white triangles leading you in the correct direction. The name of the street you are currently on is displayed at the bottom of the screen.
In 3D and 2D moving maps, you can zoom in or out while doing run-time navigation. You can also pan the map up, down, left, or right using the trackball or the “E,“ “‘F,” “S,” and “X” keys. On BlackBerries with a trackwheel, use the trackwheel to pan the map up and down. Holding the ALT key while using the trackwheel allows you to pan the map left and right.
Turn Icons This view allows you to see the next two consecutive turns in your navigation route. The name of the street you are currently on is displayed at the bottom of the screen. About 2 minutes before the next turn, the street name changes to the one you will turn onto. You can change this option in Preferences so that immediately after the prior turn, the name becomes that of the street you will turn onto. The content on the Turn Icons navigation view is explained below.
Route Summary A text listing of every turn for this navigation session from your starting location to your destination, along with mini turn icons. Traffic Summary Displays overall delay from traffic, a summary of incidents on the route, and the average speed for each segment where available. You can click on any line to view more details.
If you click on an incident line, you can view the details. Below is an explanation of what you will see on the Traffic Detail screen: • Delay – The additional time it will take to travel the segment as compared with the time it would take if traveling at the posted speed. • Travel Time – Estimated time it will take to travel the segment. • Slowest Speed – Slowest speed observed on the segment.
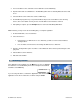
Map Summary The entire route from your starting location to your destination is drawn on a map, complete with the latest traffic alerts and traffic flow information. The route is displayed as a blue line connecting the Start and Finish flags. Highways and major roads with traffic flow information are color-coded by speed in each direction of travel: Speed > 50 mph 30 – 50 mph < 30 mph Unknown Road Color Green Yellow Red Grey 1.
Re-routing Options Manual While you are in a navigation session, you can choose to manually reroute to avoid traffic congestion. 1. During navigation, click the trackball/trackwheel and choose “Traffic Summary.” 2. Highlight one of the lines with slow traffic and click the Menu key for more options: • View Details – View the traffic details for this particular segment. • Avoid Segment – Reroute to avoid the selected segment (You will be taken to the Suggested Route screen).
5. Click the Menu key for more options: • Accept Route – Accept the proposed route (You will be taken to the Navigation Screen for the new route). • Cancel Reroute – Reject the proposed route (You will be taken back to the Traffic Summary screen). • Navigation Screen – Go back to the Navigation session for the current route. Avoid Ahead (Audio Detour) When you hear an audio warning about a traffic incident during your navigation session, you can reroute to avoid congestion ahead. 1.
8. Directory Menu The Directory menu provides you with a few different ways to find the addresses and phone numbers of businesses such as restaurants, motels, and gas stations, as well as other places like churches, schools, government offices, and police and fire stations. If the search succeeds, you will be presented with a list of businesses that are near the search point, or within the search area you specified.
Search Within Category 1. Highlight Search Within Category and click the trackball/trackwheel to expose the menu. 2. In the Search Within screen, you can narrow down your search by selecting from the appropriate category. Click on the plus (+) signs to expand a category and the minus (-) sign to collapse it. The “Any” choice means any business in that particular category. 3. After you choose a category, a list of nearby results will be displayed in order of closest distance.
5. Click the trackball/trackwheel to expose the menu and choose from the following options: • Drive To – Get driving directions (this option will take you to the Going To confirmation screen). • Map It – View a map of the area surrounding the business address. • Call It – Call the location (option only available if there is a phone number shown on the Results screen). See “Making a Phone Call” on Page 45 for more details about this feature.
3. Highlight Gas By Price and click the trackball/trackwheel to expose the menu. 4. Choose “Any” to search all categories, or choose a fuel grade and click the trackball/trackwheel. 5. In the menu, choose “Search Current Location” or “Search Other Location.” 6. After you select a location, the Search Results screen displays with a list of gas prices sorted by price. 7. Choose a gas station and click the trackball/trackwheel to go to its Results screen.
2. From the Map option for Favorites and Recent Places in the Drive To menu. For example, from the TeleNav GPS Navigator Main Menu, select Drive To >> My Favorites >> Menu key >> Map It. 3. From the Map It option for any location that you have found using the Directory. For example, from the TeleNav GPS Navigator Main Menu, select Directory. Search the category for your desired location and then select the Map It option in the menu for the location that you found.
Check Traffic In the Maps & Traffic menu, you can also check traffic conditions around a certain area. 1. Select “View Maps & Traffic” on the TeleNav Main Menu. 2. Select a location. 3. The map of the location appears. Click Menu and choose “Show Traffic.” NOTE: You can zoom in or out using the * and # keys on your phone. Zoom levels range from 1 (closest) to 9 (farthest). Use the trackball or trackwheel and ALT-trackwheel to pan the map.
10. Tools/Extras Menu The Tools/Extras menu gives you options for setting your preferences and other features as described in the following sections. Record Location To record you current location as a Favorite and mark it for future use, do the following: NOTE: There may be a brief activity to determine GPS position. 1. Select Tools/Extras from the TeleNav GPS Navigator Main Menu. 2. On the Tools/Extras menu, choose Record Location. 3.
Compass This screen is similar to a nautical compass. It displays: • The direction that you are heading in (if you are moving). • Your latitude and longitude. -If no GPS data is available, “No GPS” appears instead of the latitude and longitude. -Latitude is represented as N for north or S for south. Longitude is represented as W for west or E for east. • Your speed in miles or kilometers per hour (select miles or kilometers in the Preferences menu as discussed below).
• Help Card - Help cards prompt you with hints or cautions about using various menu options. To clear a help card from the screen, press the trackball/trackwheel. The Help cards feature has the following three options: -Show Three Times (and then don’t display them again—this is the default setting) -Always On -Always Off • Call In - The Call In option lets you select which number is called when you enter an address or intersection by speaking. One number is toll-free and the other is not.
Give Feedback The Feedback menu gives you the following options so you can give us your feedback about how TeleNav GPS Navigator is working for you. • Usefulness - High, Medium, or Low • Frequency - Daily, Weekly, Monthly, or Less Often (less than monthly) • Speed - Was the speed of TeleNav GPS Navigator’s response time Fast, Average, or Slow? • Most Used - Drive To, Directory, Maps, or Other • Overall Rating - High, Medium, or Low Choose Menu >> Submit to send us your feedback.
11. Suspending TeleNav GPS Navigator Making a Phone Call from TeleNav GPS Navigator You can Call In to a location that you have found in a Search such as a restaurant, a hotel, or a church. You can also select the Call It option in certain menus to speak in an address instead of typing it. Taking an Incoming Call When you are using the TeleNav GPS Navigator and your phone receives an incoming call, your phone rings and displays a screen that gives you the option to Answer the call or Ignore the call.
Interruption of Other Services Whenever the TeleNav GPS Navigator application needs to contact its servers (such as when generating a route), it uses your carrier’s data service. When the TeleNav GPS Navigator application uses your carrier’s data service, other services such as SMS messaging and conventional cellular calls are not available. Typically, this interruption of other services lasts no more than 20 seconds.
13. Exiting TeleNav GPS Navigator To exit the TeleNav GPS Navigator application, do the following: 1. When you are on the TeleNav GPS Navigator Main Menu, press the Escape key on the BlackBerry. 2. In the “Exit TeleNav now?” pop-up, choose Exit. 14. Removing TeleNav GPS Navigator TeleNav can be removed from your BlackBerry quickly right from the device. Follow these steps to remove TeleNav from your BlackBerry. NOTE: You should always remove TeleNav before completing a reinstall of the TeleNav application.
• Contact Customer Support. My TeleNav In My TeleNav, which requires logging in with your phone number and PIN, you can also: • Add an address and save it to the My Favorites list on your phone. The next time you launch the TeleNav GPS Navigator application on your phone, the new address will appear in your My Favorites and Recent Places lists.
If you forgot your PIN, contact TeleNav GPS Navigator Customer Care at 1-888-353-6284. Low Battery The GPS will not work if the device’s battery charge level is below about 15%. Starting with a freshly charged standard battery, we have used TeleNav for around 4 hours before it became necessary to connect the charging cable. If you get a low battery warning, connect a charging cable as soon as possible.
Unable to generate a route TeleNav GPS Navigator could not generate a route between the two endpoints of the route. This may be a temporary error if you have a weak GPS signal when establishing the origin, but may be due to errors in the map data in the area around the destination. Unable to login Someone may be fraudulently using your account. You will need to change your PIN and attempt to log in again.
How accurate is the GPS? GPS accuracy can range from 20m (approx. 65 ft) to 100m (approx. 328 ft). Most of the time, the GPS is accurate to less than 50 meters (approx. 164 ft). What is ideal GPS environment? The GPS requires an open, clear view of the sky. Buildings, covered parking areas, tunnels, and dense foliage can cause the GPS receiver to be unable to locate a GPS satellite or may cause extended initialization time (time to first GPS fix).
19. TeleNav Services Warranty The content and Java application services provided by TeleNav is provided “as is” and “as available” without warranties of any kind, either expressed or implied, including but not limited to any warranties of merchantability or fitness for particular use, or non-infringement. You acknowledge that your use of the TeleNav service is at your sole risk and you agree that the service and the information provided are without warranty of any kind by TeleNav.