™ EVID Ceiling Speaker Systems Installation and Operation Manual
Table of Contents Table of Contents . . . . . . . . . . . . . . . . . . . ii Welcome . . . . . . . . . . . . . . . . . . . . . . . . . . 1 Important Features . . . . . . . . . . . . . . . . . . 1 Model Summary . . . . . . . . . . . . . . . . . . . . 2 Packing List. . . . . . . . . . . . . . . . . . . . . . . . 2 Product Feature Identification. . . . . . . . . . 3 Installation and Wiring . . . . . . . . . . . . . . . 4 Step 1 — Cut the Hole . . . . . . . . . . . . . .
Welcome/Important Features Welcome Important Features Thank you for purchasing EVID™ Ceiling Series loudspeakers. Read through this manual to familiarize yourself with features, applications, and precautions before you use these products. EVID Ceiling Series loudspeakers use innovative design and materials to provide premium-level performance in a f lush-mount ceiling format. Four models comprise the EVID Ceiling Series: the C4.2 with a 4-inch LF driver and a .
Model Summary/Packing List Packing List (Figure 1) EVID™ C4.2 Perfect for conventional rooms. It has excellent bandwidth in an esthetically very unobtrusive installation profile. Its compact design fits in tight areas. Its 4-inch woofer and waveguide-coupled, titanium-coated dome tweeter give smooth, wide frequency response. The enclosure is ported and tuned to provide surprising bass response in such a compact package. Features an easy 3-point mounting system for quick installations. EVID C8.2 The C8.
Product Feature Identification EVID™ Ceiling Series Systems (sold in pairs) Model Part No. Description C4.2 301258000 4" coaxial speaker with horn-loaded, Ti-coated tweeter C8.2 301261000 8" coaxial speaker with horn-loaded, Ti-coated tweeter C8.2LP 301318000 Same as C8.2 above except with low-profile backcan C8.2HC 301262000 8" waveguide-coupled* coaxial speaker with horn-loaded, Ti-coated tweeter C10.
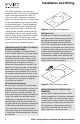
Installation and Wiring The EVID™ mounting system has been designed so that, if necessary, the installation can be done from beneath the ceiling. In some cases with a suspended ceiling grid, however, it may be easier to access from both the top and bottom of the ceiling tile during the installation process. Typical installation hardware needed for either suspended ceilings or sheetrock ceilings is included.
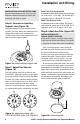
Installation and Wiring Step 1: Cut the Hole (Figure 6) For suspended tile or sheetrock ceilings, cut out the hole either by tracing the cardboard template or with a circular cutter set to the appropriate cutout size. If the wire has been pre-installed, pull the wiring through the cutout hole. Figure 6: Cut ceiling hole Step 2: Install C-Ring and/or Tile Rails (Figure 7) All EVID speakers come packaged with two types of backing hardware: a C-ring and two tile rails.
Installation and Wiring INSTALLATION NOTE: CONNECTOR WIRING GUIDELINES The input connector’s 4 terminals are numbered and marked on the connector. Pins 1 and 2 are positive (+); pins 3 and 4 are negative (–). (Pin 1 is connected to Pin 2 and Pin 3 is connected to Pin 4 inside the speaker.) Pins 1 and 4 are used as daisy-chain connections to other loudspeakers. Two possible layouts for wiring a group of speakers are described below. 1. Wiring in parallel.
Installation and Wiring 1. If plenum cable is used, slide the wiring through the strain relief fitting on the terminal cover plate (Figure 14). Hold the strain relief fittings tight around the cable. Tighten the strain relief screws first, then the horizontal screw. In the cases of insulated speaker wire and plenum cable, it is often possible to provide acceptable strain relief force by simply tightening the strain relief screws onto the terminal cover plate.
Installation and Wiring INSTALLATION NOTE: MOUNTING TABS EVID™ C4.2, C8.2 and C8.2LP For each attachment screw, first turn one half-turn counterclockwise to release the mounting tab from its guide. In addition to the 8-ohm setting, the power taps are 30 W, 15 W, 7.5 W, and 3.7 W at both 70.7V and 100V, with a 1.8 W tap for 70.7V only. EVID™ C8.2HC and C10.1 Step 6: Connect an Auxiliary Support Line (Figure 18) Note the support ring on the back of the speaker.
Appendix A — Painting the Speaker If the speaker is installed in an area where the interior design requires a color match, these speakers are simple to paint. The speakers can accommodate almost any type of latex or oil-based paint. The bezel/rim can be painted before installation or after mounting into the ceiling. Painting Process Clean the rim and grille with mineral spirits or other light solvent. Do not use harsh solvents such as gasoline, kerosene, acetone, or other chemicals.
Appendix B — System Design Guide Selecting and Positioning Ceiling Loudspeakers Several key criteria determine the type and quantity of ceiling speakers to employ in a job. Specific EVID™ Ceiling Series models accommodate each job, depending on how these criteria are specified. • Room size • Coverage density desired • Coverage angle specification of the speaker • Ceiling height • Audio program material being played The information below, and the free design program downloadable from www.electrovoice.
Appendix B — System Design Guide tions that do not need the extended performance of the larger models. Reverberant Rooms and High Ceilings Situations arise, however, in which controlled coverage is more desirable than broad dispersion. Very large live spaces such as gymnasiums, convention centers, shopping mall atriums, and the like all benefit from more controlled sound projection. In such installations, the EVID 8.2HC is the best choice.
Appendix C — Troubleshooting Table Troubleshooting Table Problem Possible Causes Action No output Amplifier Make sure the amplifier channel is being fed an input signal (preferably via a “signal input” indicator on the amp). Check that the amplifier channel’s volume is turned up. Connect the speaker and cable, which had no output to another amplifier channel, making sure an input signal is fed to the new amp channel. If you then get output, the problem was the amplifier channel.
Appendix D — Warranty Uniform Limited Warranty Electro-Voice® speakers and speaker systems are guaranteed against malfunction due to defects in materials or workmanship for a period of five (5) years from the date of original purchase. The Limited Warranty does not apply to burned voice coils or malfunctions such as cone and/or coil damage resulting from improperly mounted or installed enclosures.
14 8.3" (210 mm) 6 lbs (2.7 kg) Steel enclosure and UL94V-0 rated baffle and bezel 4" (100 mm) highcompliance driver (weatherized cone) .
EVID™ Ceiling Series Installation and Operation Manual 15 EVID C4.2 65 Hz–20 kHz 50 W (with overload protection) 130° conical 86 dB 8Ω; 70V/100V 1.8 (70V only)/ 3.7/7.5/15/30W Tile bridge, mounting ring Specification Frequency response Power handling Ω) (@ 8Ω Coverage pattern Sensitivity (SPL 1 W/1 m) Input configuration 70V/100V power taps Included accessories Tile bridge, mounting ring 1.8 (70V only)/ 3.7/7.
Notes 16 EVID™ Ceiling Series Installation and Operation Manual
Notes EVID™ Ceiling Series Installation and Operation Manual 19
America USA: Telex Communications Inc. 12000 Portland Ave South, Burnsville, MN 55337, USA, Phone: 952-884-4051, Fax: 952-884-0043 Canada (East): Acoustik GE Inc. 5715 Kincourt, Montréal, PQ H4W 1Y7, Canada, Phone: 866-369-2864, 514-369-2864, Fax: 514-487-9525 Canada (Ontario): HEK Marketing Inc. 27 Fearn Crescent, Ajax, ON L1S 5L7, Canada. Phone: 800-494 6770, Fax 905-619-0366 Canada (West): KMT Pro Audio.