
User Manual


11/05/19
Rev 1
Page 1 of 1
*URXSX&K
&0&K
7P: 6$
P: 2))
576
%751
VE/$
*3B&+6HOHFW
%DVH0DLQ
,QWHUFRP6HWWLQJV
$X[6HWWLQJV
/RFDO+HDGVHW
7[3RZHU
6TXHOFK6HWWLQJV
0RUH
0LF*DLQ
9ROXPH
*URXSX5&K
&K
7P: &K
P: &K
:,QWHUFRP
:,QWHUFRP
GP/CH Select
Intercom Settin
g
s
Base Main
*URXSX5
7
Grou
p
/Fre
q
uenc
y
Select
<MENU>
<SET>
<SET>
<SET>
<SET>
<MENU>
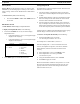
NOTES:
1. If editing any screen, pressing <MENU> once, ends editing without saving
changes, and displays current screen with nothing flashing. The only exceptions
are the Group/Ch, Group/Freq., and Freq. edit screens where a <MENU> press
does save frequencies and places unit on those frequencies.
2. Pressing <MENU> in any screen where no editing is occurring returns unit to
status screen.
3. If an entry is set to “off” that has level setting values following, skip the level
settings.
4. Status screen RX options: OFF, NoTx, Ch 1, Ch 2, Ch12, WT 1, WT 2, WT12,
SA
5. TX power options: Off, 10, 50, 100, 249mW
6. Antenna power options: On, Off
7. 2W Intercom types: Telex, RTS, Clear-Com, Off
8. 2W Intercom channels: On, Off
9. Aux IC Mode options: Off, Local, Global
10. 4W IC1 and IC2 options: On, Off
11. All screens default to status screen after 5 minutes except RSSI screen. If RSSI
screen is selected the unit stays on that screen until user switches it back.
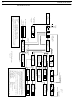
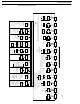
BTR-30N Menu Structure
Status Screen
,&$X[0RGH*OREDO
,&$X[0RGH/RFDO
$X[,Q
$X[2XW
Aux Settin
g
s
Grou
p
/Channel Select
566,5
/HYHO5
5
52))
RSSI Screen
Start-up Screen
<SET>
<SET>
6TXHOFK 52SHQ
/HYHO 5
5
5
<MENU>
+
<SET>
held for 2 seconds
&OHDU6FDQ
70
NOTE: From any screen
*URXS$
2." >6(7@
3UHY
1H[W
<SET> Does
set results
Display
Contrast
Adjust
OR
7[3RZHUP:
721721
*URXSX&K
)UHT(GLW
7
Status Screen
Fre
q
uenc
y
Edit
<MENU>
(User-Programmed Groups Only)
(Factory Groups Only)
<MENU>
Status Screen
<MENU> or <SET>
save settings
6$/HYHO
$QWHQQD3ZU2II
%DVH1R0DVWHU
Local Headset
TX Power
:,QWHUFRP7(/(;
,&21,&21
:,&,Q
:,&2XW
:,&,Q
:,&2XW
:,& 2Q
:,&,1
:,&287
<SET>
<SET>
<SET>
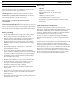
Special Key Sequences:
1. Lockout: Press and hold <UP> + <DOWN> for 2 seconds.
2. Copy: Press and hold <SET> + <DOWN> for 2 seconds.
3. 1
st
Use Default: Press <MENU> while turning on the base station.
4. Factory Default: Press and hold <MENU> + <SET> + <UP> + <DOWN> for 2 seconds.
NOTE:
After holding the button for 2 seconds, the screen will change to the desired screen before the
button release.
<SET>
5
5
5
5
7
5
5
&K
7
7
7
7
<SET>
:,& 2Q
:,&,1
:,&287
<SET>
<SET>
<MENU> Held for 2
seconds to enter
<MENU> Does
NOT set results
<MENU> + <UP>
For quick frequency
display / edit
<SET>
<SET>
<SET>
<SET>
<MENU> Tap to
return
72 BTR-30N, TR-30N, TR-32N
BTR-30N Menu Structure