
User Manual


BTR-30N, TR-30N, TR-32N Operation 33
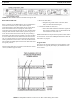
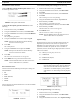
Frequency Edit (User-Defined Groups Only)
The Fr
equency Edit screen is similar to the Group Frequency
Select screen, but allows the complete editing of each transmit
and receive frequency.
FIGURE 41. Frequency Edit Screen
To edit the frequency screen, do the following:
1. From the status screen, press MENU.
GP_CH select, Base Main, Intercom Settings, and Aux
Sett
ings appear in the main selection screen.
2. Using the UP/DOWN arrow buttons, select GP_CH Select.
3. Press the MENU button twice.
The Frequency Edit screen app
ears. The Group flashes.
4. Using the UP/DOWN arrow buttons, select a frequency.
5. Press SET.
The changes are accepted and the focus moves to the next
tran
smitter. After transmitter 2 is set, the channel 1 receiver
frequency begins to flash.
6. Using the UP/DOWN arrow buttons, select a frequency.
7. Press SET.
The change is accepted and the focus moves to the next
chan
nel. After the last receive channel frequency is set, the
unit sets itself to the frequencies and returns to the main
selection screen.
NOTE: Press MENU at anytime
and the unit changes to
the group and frequencies selected.
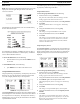
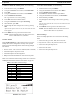
Base Main Settings
Settings contained in the base main menu are the following:
• Local headset microphone gain
• Local headset volume
• Transmit power level
• Squelch setting for each receiver
• Stage Announce (SA) audio level setting
• Receive antenna bias T power
• Base Number...Master or Servant
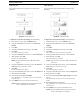
FIGURE 42. Local Headset Area of Front Panel
TALK Button
To enable
the audio path from the headset microphone, do
the following:
> Press the TALK button.
The talk light activates when the TALK button is active.
This light has two (2) functions:
Green - In
dicates activation of the TALK button.
Red or flashing red -
Indicates input audio too strong
(Peak)
Channel Select Button
The Chan
nel Select button selects the intercom channel for the
local headset. Each press of the button cycles through the
options: intercom one, intercom two, or both, and then back to
intercom one (1). The LEDs above the button indicate what
channel is currently connected to the local headset.
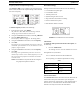
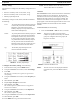
Peak Light Microphone Gain
Light flashes on loudest
speech
Okay
Light flashes on all
speech
Too high
Light never flashes on
normal speech
Too low