
User Manual


38 Operation BTR-30N, TR-30N, TR-32N
Auxiliary Settings
The parameters to configure in the auxiliary setting menu are as
fo
llows:
• Intercom 1 Auxiliary mode: Local, Global, or Off
• Intercom 2 Auxiliary mode: Local, Global, or Off
• Auxiliary input/output levels
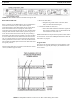
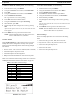
The auxiliary setting for Local, Global,
and Off are defined as
the following:
Local Any
audio placed into the auxiliary input port
is routed only to the base’s local headset and
beltpack(s). Any audio heard out of the
auxiliary output port is only from the base’s
local headset and beltpack(s).
Global Any
audio placed into the auxiliary input port
is routed not only to the base’s local headset
and beltpack, but also to any wired 2-wire or
4-wire system connected to the base station.
Any audio heard from the auxiliary output is
not only from the base’s local headset and
beltpack, but also from any wired 2-wire or 4-
wire system connected to the base station.
Off The au
xiliary input and output for the
intercom channels is disabled.
FIGURE 51. Auxiliary Input/Output
To configure the auxiliary settings, do the following:
1. From the status screen, press the MENU button.
2. Using the UP/DOWN arrow buttons, select Aux Settings.
3. Press SET.
The Intercom 1 auxiliary local, global, or off selections
start fl
ashing.
4. Using the UP/DOWN arrow buttons, select the option you
desire.
5. When finished, press SET.
6. Repeat steps 1 through 5 for Intercom 2.
7. When finished, press SET.
The auxiliary input level flas
hes.This level is applied to
both intercom channels.
8. Using the UP/DOWN arrow buttons, set the input level.
9. When finished, press SET.
The auxiliary output level flashes.
10. Using the UP/DOWN arrow buttons, set the output level.
11. When finished, press SET.
12. Press MENU twice to go back to the status screen.
NOTE: Th
e base defaults back to the status screen if no
action is taken after five (5) minutes.
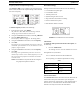
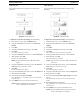
ClearScan
When ClearScan activates, the base
shuts down its transmitters
and begins scanning receive frequencies. The frequencies
scanned are those in its factory-defined groups and any user-
defined groups with at least one (1) frequency defined. The
result is a screen like the one shown in Figure 52. The scan
groups appear in order from the highes
t number of clear receive
channels available to the least number of clear channels
available.
To start ClearScan, d
o the following:
> Press and hold MENU + SET for three (3) seconds.
NOTE: Thi
s process can take up to 24 seconds to
complete. It depends on how many user-defined
groups are configured. The more groups, the
longer the scan takes.
FIGURE 52. Clear Scan Results Screen
NOTE: The base is not set to the displayed ClearScan
result if the user presses the MENU button to
abort.