
User Manual


BTR-30N, TR-30N, TR-32N Operation 69
LEDs Off/On
The LED Off/On screen is used to disable all LEDs. This
function is useful for users who do not wish to show LEDs in
the dark.
To turn LEDs on or off, do the following:
1. Push SET at the LED off/on screen.
2. Using the UP/DOWN arrow buttons, select the desired
mode.
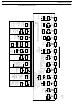
Software Version/Band
The Software Revision and Frequency Band of the beltpack
may be displayed from any of the main beltpack screens.
To view the software revision and frequency band, do the
following:
> In any of the beltpack main screens, press and hold
DOWN for two (2) seconds.
• The first screen indicates the frequency band of the
beltpack.
• The second screen indicates the software revision.
After displaying the information, the screen reverts back to the
main screen.
The screens below indicate an E5 band beltpack with 80E052
version software.
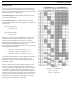
ClearScan™
ClearScan™
helps you find clear RF frequencies in your area.
The beltpack’s receiver scans all the factory-defined groups and
any set user-defined groups. The result is a list of beltpack
receive groups, clear of interference.
To enter ClearScan
TM
,
do the following:
1. Press and hold MENU + SET for two (2) seconds to start
ClearScan
TM
.
The beltpack display changes to ClrScn and the GP icon
flashes. After about 12 seconds, the beltpack displays the
first clear group. The group number flashes.
2. Using the UP/DOWN arrow buttons, display the clear
groups.
3. Press SET to select a group.
4. Press MENU to bail out without selecting a group.
Clear groups are displayed first. They are in group order. You
can scroll down through groups using the DOWN button. The
left-half of the screen gives you an indication of interference
levels as you scroll through the groups.
User-defined groups without a defined frequency for one of the
receive channels display a u to indicate undefined.
The degree of interference found for R1 and R2 displays on the
far-right two (2) positions on the screen.
Lock Out
Lock Out allows the user to lock the top panel and menu
options. The top panel buttons still work, but the TALK button
options cannot be changed. Likewise, values on the LCD screen
in the beltpack can be viewed but not changed.
To enable/disable Lock Out, do the following:
1. Press and hold the UP and DOWN buttons for two (2)
seconds.
The words Loc on appear on the screen when lock out is
active.
2. Press and hold the UP and DOWN buttons for two (2)
seconds again to disable lock out.
The words Loc off appear.
First Use Default
First Use Default sets the beltpack to Group 1A, channel 1 and
leaves any user-programmed groups in memory. It sets units to
factory-defined menu settings. It also sets the TALK buttons to
their default modes.
To activate the 1st Use Default, do the following:
> Press and hold MENU while powering-up the
beltpack.
Interference Level Right Half of LCD Display
None Blank
Weak Single Bar
Moderate Double Bar
Strong Triple Bar