
User Manual


70 Operation BTR-30N, TR-30N, TR-32N
Factory Reset
Factory Reset sets the beltpack to Group 1A, channel 1 and
ERASES any user-defined groups in memory. It sets a unit to
factory settings. It also sets the TALK buttons to their default
modes.
To activate factory r
eset, do the following:
> Press and hold MENU + SET + UP + DOWN for two
(2) seconds.
RF Monitor Screen
The RF Monitor Screen displays beltpack RF status.
To di
splay the beltpack RF status, do the following:
1. Press and hold MENU for two (2) seconds to display
beltpack RF status.
• If the channel button is set to 1, then signal strength
displays for R1 frequency.
• If the channel button is set to 2, then signal strength
displays for R2 frequency.
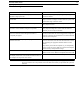
TX Power Signal Strength
Lo = 10m
W 0= NO
hi = 50mW 1= Very Weak
2= Weak
3= Moderate
4= Strong
5= Very Strong
2. Press MENU again to exit RF Monitor Screen.
Setting Beltpack ID
Several functions require the beltpack to know which base and
channel it is associated with.
1. Auto Power Setting: The beltpack reduces its TX power
when close to the base. Beltpack transmit power must be set
to Auto.
2. Portable Station Deselect: The base can disable the TALK
button of a beltpack. This shuts off the mic in PTT mode
and turns off the transmitter in PT TR mode.
3. First-On-Latch-Out: This locks a base receive channel so
only one beltpack can transmit on the frequency at a time. A
beltpack user attempting to talk on top of another beltpack
on the same frequency hears a double beep in their headset.
A beltpack tries to establish its ID auto
matically when its group/
channel changes. The base must be on for this to work.
To check or set beltpack ID manually, do the following:
1. Press and hold UP for two (2) seconds.
The LCD displays ID Base# - Receiver#.
For example: ID 1-3 means Base 1, Receiver 3.
If the LCD displ
ays ID--- or does not match the base and
receiver, the beltpack is assigned to, Auto Power, Portable
Station Deselect, and First-On-Latch Out will not work
correctly.
2. If the beltpack ID is correct, press MENU to exit.
3. If the beltpack ID is not correct, press SET.
The
ID numbers flash.
4. Using the UP/DOWN buttons, select a new ID.
5. Press SET to apply the new ID.
Bases with transmitters enabled are alw
ays base #1. A second
base using the first base transmitters instead of its own, and
properly connected to the first base through CAN bus link
cables becomes base #2, etc.