
User Manual


CHAPTER 3
Operation
BTR-30N
Operation
This section discusses the operation and features of the BTR-
30N base station, opening with base operation and quick system
setup. It then discusses basic interfacing and setup of a base
station, then ends with the connection of multiple base stations
and discussion of the links between them.
Basic Operational Description
The BTR-30N narrow band wireless intercom system offers the
most comprehensive, user-friendly, and versatile set of features
available in wireless intercom systems anywhere in the world.
The base station accommodates up to four (4) full-duplex TR-
30N or TR-32N beltpacks, and can be used with an unlimited
number of beltpacks in push-to-TX (half-duplex) operation. In
push-to-TX mode, the unit provides a First On Latch Out feature
which allows only one beltpack transmitter to be active at a time
when multiple users are on a single base receive channel.
The base station, via the beltpacks or it’s local headset, allows
communications with other wireless or wired users. The
2-wire and 4-wire intercoms may even be used at the same time.
The wired audio interfaces to the base are:
• 2-Wire (Telex, RTS, Clear-Com) - 2 intercom channels
• 4-Wire - 2 audio channels
• Auxiliary (both input and output)
• SA (Stage Announce) (output)
• WTA (Wireless Talk-Around)/ 2 channels of private
2-wire intercom among TR-30N and TR-32N beltpacks
• Local base station headset
The base station also features:
• A relay closure activated when the SA button is pressed at
any beltpack
• Four (4) easily accessible portable connect buttons on the
front panel. Use the buttons to turn off the audio from any of
the four (4) base receivers while at the same time killing the
talk/transmitter at the associated beltpack
• 36 engineering selected, intermodulation avoiding, factory-
defined groups
• The ability for users to enter frequencies of their own via 12
user-defined groups
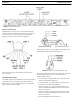
System Quick Start
The following is a list to quickly get a base station and beltpacks
operating.
1. Unpack the base.
2. Connect the power cord and antennas.
3. Connect the base to audio interfaces, such as: 2-wire,
4-wire, SA, Auxiliary, or local headset.
4. Press and hold MENU while powering up the base station.
5. When the base station displays FACTORY SETUP, release
MENU.
6. Unpack the beltpacks.
7. Press MENU while powering up the beltpack(s).
8. Using the UP and DOWN arrow buttons, change the
beltpack channel to an unoccupied receive channel on the
base station.
9. Press SET twice to set channel and group.
The base should now display the audio channel of the
beltpack and a battery symbol appears shortly.
10. Plug a headset into each beltpack.
11. Adjust the microphone gain in the software menu so the
overmodulation light flashes only on some of the words at
normal speech levels.