
User Manual


32 Operation BTR-30N, TR-30N, TR-32N
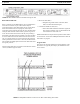
RSSI Screen
RSSI stands for Received Signal Strength Indicator. This screen
displays the detected signal strength of each of the four (4)
receivers in the base.
FIGURE 37. RSSI Screen
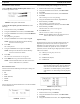
The following are the approximate receive levels indicated by
the bars after each receiver.
If no beltpacks are operating, an RSSI level of two (2) bars or
above may indicate interference on that frequency. A different
receive channel should be selected.
To access the RSSI screen, do the following:
> From the status screen, press and hold MENU for two
(2) seconds.
To exit the RSSI scr
een, do the following:
> press MENU to arrive back at the status screen.
Group/Channel Select Screen
The group/channel, group/frequency, and frequency edit screens
allow the user to set the frequencies of the base station. Each
screen has a slightly different way to set frequencies.
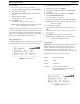
FIGURE 39. Group/Channel Screen
The Group/Channel screen displays the group number and the
channel assigned to each of the four (4) receivers. Each channel
is a unique base receive frequency. The frequencies of factory -
defined groups 1A to 18 can only be selected from a set number
of predetermined channels.
User-defined groups 18u to 30u may be changed by the user to
any frequ
ency within range of the base.
Group/Channel Screen
To select
the group and channel, do the following:
1. From the status screen, press MENU.
GP_CH select, Base Main, Intercom Settings, and Aux
Set
tings appear in the main selection screen.
2. Using the UP/DOWN arrow buttons, select GP_CH Select.
3. Press SET.
The Group/Channel Select screen appears. The Group
fl
ashes.
4. Using the UP/DOWN arrows, select a group.
5. Press SET.
The change is accepted and Channel starts to flash.
6. Using the UP/DOWN arrows, select a channel.
7. Press SET.
The change is accepted and the
focus moves to the next
receiver. After the last receiver channel is set, the unit
changes to the group and channels selected, and then
returns to the main screen.
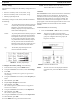
Group/Frequency Screen
The Gr
oup Frequency screen displays the group number and
frequencies assigned to each of the four (4) receivers. It is just
like the Group/Channel screen except the receive channels are
displayed as frequencies. Also, the transmit frequencies are
displayed.
FIGURE 40. Group/Frequencies Screen
To select the group and frequency, do the following:
1. From the status screen, press MENU.
GP_CH select, Base Main, Intercom Settings, and Aux
Set
tings appear in the main selection screen.
2. Using the UP/DOWN arrow buttons, select GP_CH Select.
3. Press MENU again in the Group/Channel screen.
The Group/Frequency Select scr
een appears. The Group
flashes.
4. Using the UP/DOWN arrows, select a group.
5. Press SET.
The change is accepted and Frequency starts to
flash.
6. Using the UP/DOWN arrows, select a frequency for the
channel.
7. Press SET.
The change is accepted and the
focus moves to the next
frequency. After the last receive frequency is set, the unit
displays the group and frequencies selected, and then
returns to the main screen.
FIGURE 38. Receive levels indicated by bars.