Operating Manual Wireless Intercom System XO-AP XO-1 Wireless Intercom System Telex ® Telex Communications, Inc.
Table of Contents Section 1 Introduction 1-1 General Description .............................................................................................................1-1 System Features ...................................................................................................................1-1 Section 2 XO-AP Base Station 2-1 Controls and Connections....................................................................................................
Section 1 - Introduction General Description System Features The Telex Legacyä Series is a full duplex (simultaneous talk and listen), multi-channel, wireless intercom system. Legacy offers a complete solution for 2 to 7 coaches per sideline, fast and easy set-up, durable beltpacks, 64 bit audio encryption, and professional grade headsets. • Easy base station and beltpack setup. • Uses mature 2.4GHz IEEE 802.11 Wireless LAN Technology.
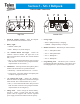
Section 2 - XO-AP Base Station Controls and Connections 5 6 3 1 TRANSMIT ANTENNA ON 7 9 11 RECEIVE ANTENNA Telex SELECT POWER LOW BATTERY CORD RETAINER AP ACTIVE OFF CHANNEL 2 4 CHANNEL CLEAR SCAN LOCK RED: CHARGING GREEN: READY 12 VDC 400mA PGM XO-AP 10 8 Front View Rear View 8. Select Button – Press the button to select the desired RF channel for the base station. 1. On/Off Switch – Turns the power on/off to the base station.
Section 3 - XO-1 Beltpack Controls and Connections 2 3 4 1 Telex 6 5 7 8 9 BATTERY R MIC TALK MIC + CHG OFF O EXT X Bottom View Top View 1. On/Off & Volume Control – Turns the beltpack power on/off and controls headset volume. 7. Charge Light. • RED = Beltpack battery is charging. 2. Battery Light – • GREEN = Beltpack battery is charged. • GREEN - Battery OK 8. Headset Connector – Standard 4-pin XLR connector. • RED - Battery Low (needs charged) • Pin 1 = Microphone GND 3.
Section 4 - Specifications Legacyä Technical Specifications RF Technology............................................................................................................IEEE 802.11 (WiFi) Frequency Band of Operation ......................................................................................2.412 to 2.462 GHz FCC License ..............................................................................................................No License Required Encryption Technology...............
Section 5 - Operation Set-up Prior to use, the XO-1 beltpacks and the XO-AP base station need to have their battery packs fully charged. Refer to the charging instructions of this section for instructions on charging. 4. Plug the XO-AP’s external power supply into an AC outlet if available. If external power is not available then the XO-AP can run off internal battery (if already charged). 1. Place the XO-AP base station in the area of use. 2. Attached the two antenna cables from the antenna to the XO-AP.
2. You can now scan for another channel, manually select a channel or lock the current channel by using one of the following procedures: 4. Wear the beltpack on the hip. Place them in a position that allows for greatest visibility to the XO-AP antenna in the press box. • Clear Scan – Hold the
After an event the XO-AP base station will need to charge for at least 10 – 14 hours. ° Release the “O” or “X” button, and the button when at the desired level. • The higher the microphone gain the louder that beltpack user’s voice will sound to other users and themselves. The XO-AP may be left on charge indefinitely. Long Term Storage Halftime “Long term storage” of the system is defined as no use of the system for 1 month or longer.
Li-Ion Batteries The Li-Ion batteries used in the XO-1 and XO-AP are excellent batteries for portable, outdoor applications. They have a high energy density (energy per weight) compare to other rechargeable battery technologies (NiCd, NiMH, Alkaline, Gel Cells), are low maintenance, and offer superior performance at low temperatures. For best performance after long-term storage, Telex recommends the batteries be charged to 30% - 50% of capacity before being placed in storage.
Section 6 - Encryption Code Encryption Code The Legacy system uses a 64 bit DES (Digital Encryption Standard) encryption algorithm to encrypt all audio in the system. The beltpacks in the system have a “key” in the software that the algorithm uses as the basis for the encryption. The same “key” must be used in all beltpacks on the system for communication to occur. The base station only relays the audio, and as such, does not need any encryption code set.
9. Press and hold down the “X” button on the beltpack. Keep holding the “X” button and turn-on the beltpack. Hold the beltpack button down until the green LED next to the “X” button lights up (about 20 seconds), then release button (Places the beltpack in programming mode). 1. Enter new password 10. Plug the other end of the Ethernet cable into the beltpack. 2. Enter new encryption key This option allows the user to change this XO-1’s password. The default from the factory is legacy.
Section 7 - Troubleshooting Please reread the operation and encryption section of this manual to make sure you have completed system set-up properly. The following contains troubleshooting tips that may be helpful in solving the problem. Problem If you are unable to solve the problem, contact the manufacturer or dealer from whom you purchased the system for assistance.
Section 7 - Troubleshooting continued Problem Possible Cause Solution When the XO-1 beltpack power was turned on, the unit's power light came up, but the "O" button light never came up and communication never started. • • Internal battery is nearly exhaused. Headphone audio from another beltpack(s) is loud and distorted. • Microphone gain on beltpack(s) is set to high. Headphone audio from beltpack(s) is too low. another • • Charge the battery.
Section 8 - RF Channels 802.11 RF Channels The Legacy system has the ability to operate on any one of eleven RF channels. Although there are several different frequency channel settings, there is overlap between the channels. There are three non-overlapping channels available in the FCC regulatory domain. When choosing frequency channels for systems in the vicinity of each other, you should choose frequency channels that do not overlap (e.g. Channels 1, 6, and 11).
Section 9 - Regulatory Information Regulatory Information The XO-1 and XO-AP comply with Part 15 of FCC rules and Canada RSS-210. Operation is subject to the following conditions: 1. This device may not cause harmful interference. 2. This device must accept any interference received, including interference that may cause undesired operation. 3. Use only the manufacturer or dealer supplied antenna(s), beltclips and/or accessories for this device. 4.
Section 10 - Accessories and Replacement Items Model Number Part Number Description LP-XO1 301950002 XO-1 Beltpack and Battery Charger. NOTE: User must provide XO-AP serial number and IP address of all XO-1/XO-APs in system with order. PH-1 64438100LG Single sided w/flexible dynamic boom mic, 150 ohm earphone, 6" (1.8m) cord and A4F connector PH-2 644371000LG Dual sided w/flexible dynamic boom mic, 150 ohm earphone, 6' (1.
Section 10 - Accessories and Replacement Items Continued Model Number Part Number Description ANT-FP 302054001 Dual Diversity, Flat Patch Antenna with Dual Coax, 11dBi ANT-FPM 302054000 Metal Tilt and Swivel Antenna Mounting bracket for ANT-FP Antenna. Use for permanent mount of ANT-FP Flat Panel Antenna.
8601 East Cornhusker Highway, Lincoln, NE 68507 Made in U.S.A.