
User's Manual


Please reread the operation and encryption section of this manual
to make sure you have completed system set-up properly. The
following contains troubleshooting tips that may be helpful in
solving the problem.
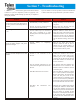
Section 7 - Troubleshooting
If you are unable to solve the problem, contact the manufacturer
or dealer from whom you purchased the system for assistance.
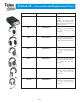
Problem Possible Cause Solution
When the XO-AP power switch was
turned on, the unit's power light came on
but the system never booted-up after 25
seconds
• Internal battery is nearly exhausted.
• On boot, an error was encountered and
the unit could not finish boot-up
• Charge the battery or run off external
AC power.
• Power down the XO-AP, wait two
seconds, then power-up again.
Can't change the RF channel the XO-AP
is on.
• The base station may be set to channel
lock. This is indicated by a solid
decimal point in the bottom right of the
display.
• Hold the <SELECT> button down for
about 10 seconds. This unlocks the RF
channel lock button. A user could also
reboot the XO-AP, but the beltpacks
would need to be turned off until the
XO-AP finished booting, then turned
on.
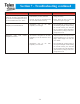
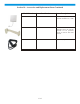
When the XO-AP power switch was
turned on nothing happens. The power
light does not light.
• Internal battery is completely
exhausted.
• Plug the AC power plug into the
XO-AP. Allow the unit at least 5
minutes for the internal battery to
receive an initial charge. Then turn the
unit on and run it off AC power.
RF range of all the beltpacks is less than
normal.
• Antenna is not connected to the
XO-AP.
• The two antenna connections are not
connected to the right connectors on the
XO-AP.
• WiFi RF interference has occurred.
• Non-WiFi RF Interference has
occurred.
• Connect the antenna to the XO-AP.
Make sure the correct cable of the
antenna goes to the corresponding
connector on the XO-AP. The XO-AP
front label indicates the transmit and
receive connectors.
• The XO-AP front label indicates the
transmit and receive connectors. The
antenna's cables are labeled as to their
connection point.
• Press and hold the <SELECT> button
for 3 seconds (until the decimal point
flashes), then release. The unit will do a
clear scan and place itself on the
clearest channel. The beltpacks do not
have to be turned off, they will follow
the XO-AP to the new channel within a
few seconds after the clear scan is done.
• Manually select a different RF channel
by hitting the <SELECT> button. Make
sure the new channel is at least several
channels away from the old channel for
the best chance of avoiding the RF
interference. The beltpacks do not have
to be turned off, they will follow the
XO-AP to the new channel after a few
seconds.
7-1