
Owner's Manual


EcoInsight Thermostat Installation Guide
4
If this is a new installation:
1) Locate the wiring in the wall.
2) Identify the red (power) wire, strip to ~0.25” and cap with a wire nut or electrical tape.
3) Strip the ends of all remaining wires, except the common (blue) leads, to ~0.25”. The insulation on the
common wire will provide additional protection against a short circuit during installation.
4) Continue with step 5 below.
If replacing a previous thermostat model:
1) Document the existing wiring arrangement before removing the existing thermostat.
2) Disconnect the existing wiring. Remove the red (power) wire first, and cap it using a wire nut or electrical
tape.
3) Remove the blue (common) wire and cut the copper flush with the insulation. The insulation on the common
wire will provide additional protection against a short circuit during installation.
4) Remove the old thermostat.
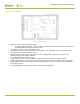
5) Remove the security screw from the left side of the new EcoInsight using the security screw wrench provided
by Telkonet. Detach the backplate.
Wiring emerging from wall
6) Mount the backplate on the wall (see Step 2).
• For EcoInsight thermostats, place a section of Armaflex foam insulating tape on the backplate to cover the
wall opening and prevent drafts from reaching the thermostat.
Note: For illustration clarity, this tape is not shown in the photos in this document, but is essential in order
to prevent thermal leakage from the between-wall space from affecting the in-room temperature.
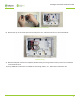
7) Begin making the wiring connections. Refer to the wiring map on the backplate, the custom wiring
specifications if provided by Telkonet Integration Engineering, or the Wiring Guide.
a) Connect the red (power) wire last.
b) Begin working with the lowest wires on the terminal block, moving upwards (excluding the red (power)
wire).
c) Use a small screwdriver to tighten the terminals against the wire, and verify a good physical connection by
gently tugging on the wire after it is attached.
Note that not all terminal connections will be used in every installation. The specifics of the site and proposed
deployment will determine the number of wires and their placement.