
User's Manual


EcoSmart VRF Controller Required Equipment
EcoSmart VRF Controller
I, O & M Guide
Telkonet, Inc.
For Use with Firmware Version 2.x
20800 Swenson Drive, Suite 175
EcoSmart VRF
Controller Required Equipment
Waukesha, WI 53186
Revision 2.3
(800) 380-9640
Page 9 www.telkonet.com
Caution Power to the indoor unit should be removed before connecting the EcoSmart
VRF Controller.
Communication The EcoAir and EcoTouch+ communicate with the EcoSmart VRF Controller
via a 2.4GHz wireless interface.
Join & Pair Set up the EcoAir & EcoSmart VRF Controller to talk to each other by
“pairing” them. If EcoSmart products will be networked, they must first
“join” the network (see steps below). Joining the network is optional but
pairing the EcoSmart VRF Controller and the EcoTouch+/EcoAir is required.
Battery Power If the EcoAir or EcoTouch+ is battery powered, no hard wired power
connection to the EcoSmart VRF Controller is required.
Indoor Unit
Configuration
The EcoSmart VRF Controller does not have capability to configure the
indoor unit. Configuring the indoor unit must be done using a separate
device.
Temp Sensor
Selection
The indoor unit "Temperature sensor selection" value should be configured
to "1: Wired remote control". This configures the indoor unit to use the
temperature sensor in the EcoAir/EcoTouch+.
EcoSmart VRF Controller Required Equipment
EcoSmart VRF Controller (P/N: SS6600)
EcoAir (P/N: SS6550) or EcoTouch+
(P/N SS6560)
Wire stripper
Wire cutter
Wire nuts
Multi-screwdriver or Philips screwdriver
Screw options as applicable based on
mounting surface:
o 2 Drywall screws 1¼”
o 2 Metal screws ½ - ¾”
o 2 Tapcon screws 1¼”
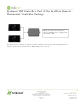
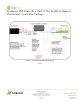
EcoSmart VRF Controller Installation
The EcoSmart VRF Controller connects to the HVAC system via standard wiring conventions, using 12VDC or
24VAC supplied by the HVAC equipment.
The EcoSmart VRF Controller accepts Molex wiring, typically 18-22 AWG (the Molex is specific to the project).
Wiring conventions follow industry standards.
There are 2 options-select based on code and desired look: wall mount or side of VRF unit.
Always ensure power has been turned off before starting installation.