y ar in im el Pr PHONECELL® SX5P CDMA2000 1X • Fixed Wireless Phone 800/1900 MHZ CDMA USER MANUAL 01/08/04 Part Number 56029701
QUICK CONNECTION GUIDE Fixed Wireless Phone Phonecell® SX5 CDMA i User Manual
SX5 MENU STRUCTURE Phonebook Menu Search Add Name Edit Erase Call Log Time/Alarm Alarm Time Format Date Fortmat Outgoing Incoming Erase Logs Call Time Air Time Clear Air Time Ring/Alert Ring Type Ring Tone Ring Volume 1 Min Alert Service Alert Alarm Tone Phone Settings Banner My Phone Number DTMF Length Key Volume Auto Send Delay Freq.
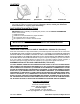
CONTENTS Phonecell® SX5 Desktop Phone Spike Antenna Power Supply AC Power Cord Before installing your Phonecell® SX5, carefully remove the contents from the shipping carton and check for evidence of shipping damage. If damage is found, contact your Authorized Telular Distributor or shipping agent immediately. SAFE OPERATION INSTRUCTIONS IMPORTANT! Before installing or operating this product, read the SAFETY INFORMATION section of this manual. • Install unit indoors.
TABLE OF CONTENTS QUICK CONNECTION GUIDE .......................................................................................i SX5 MENU STRUCTURE .............................................................................................iii CONTENTS ...................................................................................................................iv SAFE OPERATION INSTRUCTIONS...........................................................................iv IMPORTANT NOTICES.................
Alarm Tone...............................................................................................................15 PHONE SETTINGS ......................................................................................................15 Banner .....................................................................................................................15 My Phone Number Display ......................................................................................15 DTMF Length ................
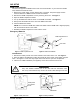
SX5 SETUP RUIM Card Installation The SX5 unit supports the RUIM card to store account information. If your unit has an RUIM card, follow the instructions below. 1. Remove the power supply if it has already been connected. The power supply must be removed whenever a RUIM Card is removed or installed. 2. 3. 4. 5. 6. Remove the RUIM compartment cover by removing the screw - see Figure 1. Open the RUIM compartment holder. Line up the RUIM card with the arrow on the RUIM card holder - see Figure 2.
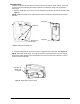
Battery Operation The unit will not automatically switch from AC to battery upon loss of AC power. The AC/Battery switch must be changed manually to the battery position - see Figure 5. Battery power will provide up to 4 hours of talk time and 11 hours of standby. AC/Battery Switch AC Position / Power On Battery Position Figure 5 – AC battery Switch. Location and Setup The SX5 comes with a standard spike antenna (TNC). 1. Attach and finger-tighten the antenna - see Figure 6.
Desk-Mounting A wedge is included with the SX5 to be used to position the SX5 for easier viewing of the LCD screen and keypad. Attaching the wedge is optional. To attach the wedge, use the following instructions. 1. Slide the wedge tabs on the thin end of the wedge into the bottom tab slots on the SX5 - see Figure 9. NOTE: Holding the wedge at an angle makes it easier to slide the wedge tabs into the bottom tab slots.
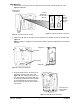
Wall-Mounting 1. Remove the mounting clip from the cradle and re-insert it with the tab pointing up - see Figures 11 and 12. Mounting Clip in Cradle (tab up) Remove Mounting Clip from the Cradle (tab down) Insert Mounting Clip into the Cradle (tab up) Figure 12 – Handset mounting clip for wall-mount. Figure 11 – Handset mounting clip assembly. 2. Slide the wedge tabs on the thin end of the wedge into the bottom tab slots on the SX5 - see Figure 13.
4. Mark two hole locations 83 mm (3-1/4 inches) vertically apart and drill two holes into the wall. 5. Install the screws (not supplied) into the wall, leaving a gap of approximately 3 mm (1/8 inches) between the screw head and the wall. 6. Align the mounting holes with the screws and mount the SX5 onto the screws - see Figures 15 and 16. 83 mm (3-1/4 inches) Mounting Holes Figure 16 – Mount the SX5 onto the screws. Figure 15 – SX5 mounting hooks. Connect the SX5 to AC Power 1.
GETTING TO KNOW YOUR SX5P Function Keys Operation of the SX5 is accomplished through the function keys on the keypad of the unit - see Figure 18. CLR- To clear an entry, erase a digit during entry, or to go back one menu level MSG- To access voicemail or to send an SMS (text message) LCD Screen - Displays icons, information, and menu options necessary to operate the SX5. STO- To store an entry Volume - Controls the speaker volume level for the handset and the speakerphone when the SX5 is off-hook.
LCD Screen Icons Icons displayed on the LCD screen indicate the features in use, the status of the phone, signal strength and battery status - see Figure 19. Speaker - Indicates speaker phone is activated. Message - Displays when a new text or voicemail message has been received. Alarm - Indicates that the alarm feature has been set. Call - Indicates that a call is in progress. Battery - Indicates the level of battery power. The more bars, the more power.
CALL FUNCTIONS Making Calls 1. Pick up the handset or press the SPEAKERPHONE key. The SX5 is now “off-hook.” 2. Listen for dial tone. 3. Dial the phone number. The dialed number will be displayed. The name will also be displayed if it is stored in the phonebook. Correct Dialing Errors • To erase one digit, press the CLR key once. • To erase all digits, press and hold down the CLR key until all digits are erased. Redial the Last Telephone Number Dialed 1. Pick up the handset or press the SPEAKERPHONE key.
call and completes the 3-way call. Voicemail Access Contact your service provider regarding the availability of voicemail. 1. Press MSG. 2. Select 1: Voice Mail. 3. To listen to your voicemail, Select 1: Listen. 4. If you have deleted all your messages and the message indicator does not go away after an hour, press 2: Erase Msg Ind.
PHONE BOOK The SX5 can be programmed to store frequently called numbers via an electronic phone book. To access this feature press the MENU button on the deskphone. The SX5P phone book can hold up to 99 entries. A phone book entry can be speed dialed as follows: For entries 1-9, lift the handset and hold down the location number until it dials. For entries 10-99, lift the handset, press the first digit and then hold down the 2nd digit until it dials. Searching the Phone Book Start by pressing MENU 1.
7. When the unit displays, "Make Secret?" press STO if the entry can be displayed in the phonebook, otherwise if you want it to be hidden, hit the arrow down to YES and hit STO. Edit a Phone Book Entry Start by pressing MENU 1. Select 1:Phone Book 2. Select 3: Edit There are 3 options for editing an entry: 1. All - displays all entries from location 01 through 99 Use Up and down arrows to select the location and press STO to select it. 2.
Note: You can hit the FLASH key to dial that number. View Incoming Calls Start by pressing MENU 1. Select 2:Call Logs 2. Select 2: Incoming 3. Use the up and down arrows to select the desired call and press STO to view it. Note: You can hit the FLASH key to dial that number. Erase All Call Logs Start by pressing MENU 1. Select 2:Call Logs 2. Select 3: Erase logs 3. Press STO to erase the logs. View Last Call Time Start by pressing MENU 1. Select 2:Call Logs 2.
TIME / ALARM The SX5 allows you to set an alarm clock that can be used one time or for every day Alarm Start by pressing MENU 1. Select 3:Time / Alarm 2. Select 1: Alarm Time Format Start by pressing MENU 1. Select 3:Time / Alarm 2. Select 2: Time Format This allows you to set the time format to be 12-hour or 24-hour format. Note: The current time is set by the network and therefore cannot be set on the phone. Date Format (option 3) Start by pressing MENU 1. Select 3:Time / Alarm 2.
RING / ALERT The SX5 is capable of supporting multiple ring tones and types of alerts. To adjust these settings follow these instructions. Ring Type Start by pressing MENU. 1. Select 4: Ring / Alert 2. Select 1: Ring Type 3. Select the desired option and press STO to save. There are 2 options for ring type: 1. Sound + LED 2. LED (silent) Ring Tone Start by pressing MENU. 1. Select 4: Ring/Alert 2. Select 2: Ring Tone 3. Use the up / down arrows to select the desired ring tone and press STO to save.
Alarm Tone The alarm tone is the sound that the alarm clock makes when it rings. 1. Start by pressing MENU. 2. Select 4: Ring / Alert 3. Select 6: Alarm Tone 4. Use the up / down arrows to select the desired ring tone and press STO to save. PHONE SETTINGS Banner The banner is the text on the screen shown when the phone is not in use. This can be used to personalize your phone. 1. Start by pressing MENU. 2. Select 5: Phone Settings. 3. Select 1: Banner. My Phone # (display only) 1.
Frequently Dialed Number If you dial a phone number twice and stay connected for at least 15 seconds, the unit will remember that phone number and automatically send it without delay. This feature may be enabled or disabled. 1. Start by pressing MENU. 2. Select 5: Phone Settings. 3. Select 6: Freq Dial Num. 4. To enable this feature, Select 1: On. To disable this feature, Select 2: Off. Change Language Displayed On LCD The SX5 is capable of displaying multiple languages on the LCD screen. 1. 2. 3. 4.
DATA SETTINGS Data Port Type 1. 2. 3. 4. Start by pressing MENU. Select 6: Data Settings. Select 1: Data Port Type. Select the data cable being used and press STO to save. 1. USB 2. RS232 Baud Rate Set the baud rate appropriate for the application. PC fax uses 19,200. For 1X data, use 115,200. 1. 2. 3. 4. Start by pressing MENU. Select 6: Data Settings. Select 2: Baud Rate. Select the desired baud rate and press STO to save.
TTY (Text Telephone for the Deaf) To use a TTY device with the SX5, a Telular SX5 data cable is required. 1. Start by pressing MENU. 2. Select 6: Data Settings. 3. Select 6: TTY 4. Select the desired setting and press STO to save. 1. TTY Off 2. TTY Only 3. TTY VCO (TTY + talk) 4. TTY HCO (TTY + hear) SECURITY New Lock Code The lock code is a 4-digit password used to prevent unauthorized access to the phone. This setting will allow you to change it. The default lock code is 0000. 1.
3. Select 4: Voice Privacy Alert. 4. Select the desired option and press STO to save. Auto Lock The Auto Lock setting determines whether the phone will automatically lock. This would require you to enter your lock code before being able to access the phone. 1. 2. 3. 4. Start by pressing MENU. Select 7: Security. Select 5: Auto Lock. Select the desired option and press STO to save. Software Version Info 1. Start by pressing MENU. 2. Select 7: Security. 3. Select 6: SW Version Info.
SX5 TROUBLESHOOTING Telephone Service is Not Working (Cannot make or receive calls) · Make sure the SX5 powered on properly. · Make sure any equipment that is externally connected to the SX5 is correctly connected. · Test any externally connected equipment on a known system to verify operation. · Do you have the antenna connected? If not, connect the antenna. · Is service established with a service provider? If so, is there any service provider issue.
CONFORMANCE STATEMENTS FCC Part 15 Class B Compliance This Phonecell® SX5 model has been tested and found to comply with the limits for a Class B digital device, pursuant to Part 15 of the FCC rules. Changes or modifications not expressly approved by Telular Corporation will void your authority to operate the equipment per FCC part 15 paragraph 15.21.These limits are designed to provide reasonable protection against harmful interference in a residential installation.
devices may affect inadequately shielded electronic equipment. RF energy may affect improperly installed or inadequately shielded electronic operating and entertainment systems in motor vehicles. Check with the manufacturer or its representative to determine if these systems are adequately shielded from external RF energy. You should also check with the manufacturer of any equipment that has been added to your vehicle.
WARRANTY I. WHAT THIS WARRANTY COVERS AND FOR HOW LONG: TELULAR CORPORATION ('Telular") warrants to a distributor Buyer, or to a customer only if the customer is a Buyer directly from Telular, that the Products (including accessories) shall comply with the applicable Specifications and shall be free from defects in material and workmanship under normal use and service for a period of fifteen (15) months from date of shipment from Telular.
tomer normal use. (i) Costs and expenses, including without limitation handling, labor and transportation, incurred in returning Product for warranty service to Telular's Repair Center. (j) Repair, programming or servicing by someone other than Telular. V. GENERAL PROVISIONS: THIS WARRANTY IS GIVEN IN LIEU OF ALL OTHER EXPRESS OR STATUTORY WARRANTIES.
y ar in im el Pr Phonecell® SX5 CDMA 25 User Manual
y ar in im el Pr 647 North Lakeview Parkway Vernon Hills, Illinois 60061, USA Tel: 847-247-9400 • Fax: 847-247-0021 E-mail: support@telular.com http://www.telular.