PHONECELL® SX6P GSM • Fixed Wireless Phone 850/1800/1900 MHZ GSM (TRI BAND) AND 900/1800/1900 MHZ GSM (TRI BAND) MODELS USER MANUAL 12/15/04 Part Number 56031701
Serial Cable or USB Cable (SX6P-300G series only) Fixed Wireless Phone This manual is for use with all SX6P-200G and SX6P-300G series deskphones only. To determine which model of phone you have, pick up the phone and view the label underneath for verification.
SX6P MENU STRUCTURE Phonebook Menu Service Numbers View Names Add Name Settings Call Log Messages Received Messages Saved Messages Create Message Message Settings Voicemail Info Message All Calls Missed Calls Received Calls Dialed Numbers Clear Logs Call Time GPRS Info Call Divert Clock Set Alarm Clock Settings Set Time Set Date Set Time Zone All Calls When Busy No Answer Not Found Cancel All Diverts Settings Phone Settings Audio Settings Call Settings Data Settings* Dial Settings Network Setti
CONTENTS Phonecell® SX6P GSM Desktop Phone Spike Antenna Power Supply AC Power Cord Before installing your Phonecell® SX6P, carefully remove the contents from the shipping carton and check for evidence of shipping damage. If damage is found, contact your Authorized Telular Distributor or shipping agent immediately. SAFE OPERATION INSTRUCTIONS IMPORTANT! Before installing or operating this product, read the SAFETY INFORMATION section of this manual. • Install unit indoors.
TABLE OF CONTENTS QUICK CONNECTION GUIDE .......................................................................................i SX6P MENU STRUCTURE............................................................................................ii CONTENTS ...................................................................................................................iii SAFE OPERATION INSTRUCTIONS...........................................................................iii IMPORTANT NOTICES.................
SUPPLEMENTARY SERVICES (NETWORK DEPENDENT) .....................................20 In-Call Options .........................................................................................................20 Call Divert (Forwarding)...........................................................................................20 Call Waiting..............................................................................................................21 Multiparty Calling ...........................................
SX6P SETUP SIM Card Installation The SX6P requires a Subscriber Identification Module (SIM) for normal operation. The service provider supplies the SIM card, which carries the account information needed to operate the SX6P. The SIM compartment is on the back of the SX6P. NOTE: If you don’t have a SIM card, contact your network service provider. 1. Make sure the unit is off and the power supply disconnected before removing or installing a SIM Card. 2. Remove the SIM compartment cover by removing the screw.
Battery Operation The SX6P will recharge its battery pack when connected to AC power. If AC power is interrupted, the SX6P will continue to operate, using power from the battery. (Standby and talk-times will vary based upon phone usage during power interruption.) Location and Setup The SX6P comes with a standard spike antenna (TNC). NOTE: The supplied antenna will support either 850/1900 MHz or 900/1800 MHz frequincies, as specified by your wirless service network provider. 1.
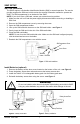
Wall-Mounting 1. Remove the mounting clip from the cradle and re-insert it with the tab pointing up - see Figures 7 and 8. Mounting Clip in Cradle (tab up) Remove Mounting Clip from the Cradle (tab down) Insert Mounting Clip into the Cradle (tab up) Figure 8 – Handset mounting clip for wall-mount. Figure 7 – Handset mounting clip assembly. 83 mm (3-1/4 inches) 2. Mark two hole locations 83 mm (3-1/4 inches) vertically apart and drill two holes into the wall. 3.
Connect the SX6P to AC Power 1. Connect the barrel connector of the power supply to the AC power input on the rear panel of the SX6P - see Figure 11. 2. Plug the AC power cord into the power supply. 3. Plug the AC power cord into the wall socket. 4. Press and hold the ON/OFF button for 3 to 5 seconds. 5. Check the cellular signal strength and move the unit until the best signal possible is achieved - see the Service Indication section of this manual.
GETTING TO KNOW YOUR SX6P Function Keys Operation of the SX6P is accomplished through the function keys on the keypad of the unit - see Figure 12. LCD Screen - Displays icons, information, and menu options necessary to operate the SX6P. Power - Used to power unit On and Off. Volume - Controls the speaker volume level for the handset and the speakerphone when the SX6P is off-hook. LCD Soft Keys - Provide access to the SX6P menu options and features. Redial - Dials the last number called from the SX6P.
LCD Screen Icons Icons displayed on the LCD screen indicate the features in use, the status of the phone, signal strength and battery status - see Figure 13. Speaker - Indicates speaker phone is activated. Message - Displays when a new text or voicemail message has been received. Call - Indicates that the handset is off-hook. Alarm - Indicates that the alarm feature has been set. Battery - Indicates the level of battery power. The more bars, the more power.
CALL FUNCTIONS Making Calls 1. Pick up the handset or press the SPEAKERPHONE key. The SX6P is now “off-hook.” 2. Listen for dial tone. 3. Dial the phone number. The dialed number will be displayed. The name will also be displayed if it is stored in the phonebook. Correct Dialing Errors • To erase one digit, press the CLEAR key once. • To erase all digits, press and hold down the CLEAR key until all digits are erased. • To insert numbers, use the arrow keys. Redial the Last Telephone Number Dialed 1.
SX6P BASIC FEATURES Date and Time Settings The SX6P allows customization of the date, time, time zone, and time format (12 or 24 hour). Set the Date 1. Press the MENU key. 2. Select Clock. 3. Scroll to Set Date, then press the CHANGE key. 4. Enter the desired date. 5. Press the OK key. Change the Date Format 1. Press the MENU key. 2. 3. 4. 5. 6. Select Clock, then select Clock Settings. Scroll to Date Format. The current format will display. Press the CHANGE key. Select the desired date format.
Adjust Alert Tones (Ringer) Alert tones can be customized for different types of calls, such as voice or text. 1. Press the MENU key. 2. Select Settings, then select Audio Settings. 3. Use the arrow keys to scroll through the alert types. 4. Select the desired alert sound.(Voice call alert, SMS alert, Voicemail alert) NOTE: If No Alert is selected, no alert will sound. Turn On/Off the Keypad Tones 1. Press the MENU key. 2. Select Settings, then select Audio Settings. 3. Select Keypad Tones. 4.
Keypad Buttons for Text Entry (Multitap) There are three or four letters (as well as a number) assigned to each key on the telephone keypad. During text entry, pressing a key displays the first letter, then cycles through the other letters. For example, if the number 3 is pressed, a “D” will appear. If it is pressed again, the “E” will appear, and if it is pressed three times, the “F” will appear. The cursor will move on to the next space after a brief pause, so the letter must be selected quickly.
Speed Dialing Speed dialing permits one-touch dialing for up to 10 telephone numbers stored in the phone book. 0 through 9 on the keypad are used for speed dialing. You must press and hold the corresponding key for 2 seconds to use speed dial. Assign a Number to a Speed Dial Location 1. Press the NAME key. 2. 3. 4. 5. Select the desired entry to add to the speed dial list. Press the OPTIONS key. Select Add to Speed Dial. Use the arrow keys to scroll to a location, then press the SELECT key.
SX6P ADDITIONAL FEATURES Call Logs The SX6P stores the telephone numbers of the last ten outgoing calls and the last ten incoming calls with the dates and times of the calls. These numbers are displayed and can be dialed directly from the call log. View the Call Log 1. Press the MENU key. 2. Select Call Log. 3. Select the desired calls to view (All, Missed, Received,Dialed). Calls are denoted by the following icons: Dial a Number From the Call Log 1. Press the MENU key. 2. Select Call Log. 3.
Set Alarm to Repeat Daily 1. Press the MENU key. 2. Select Clock, then select Set Alarm. 3. Select Repeat Daily. Turn Alarm On/Off 1. Press the MENU key. 2. Select Clock, then select Set Alarm. 3. Select Alarm Status. 4. Select On or Off. 5. Press the OK key. Language Selection The SX6P is capable of displaying menu items in several different languages. Select a Language 1. Press the (MENU) key. 2. 3. 4. 5. 6. Select Settings. Select Phone Settings. Select Set Language.
Call Settings Minute Minder When turned on, the Minute Minder emits a low audible tone once every minute while a call is active. 1. Press the MENU key. 2. Select Settings, then select Call Settings. 3. Select Minute Minder, then select On or Off as desired. Call Timer When turned on, the Call Timer displays during an active call. It can be set to remain visible for 30 seconds after the call is terminated or until another action (key press or taking SX6P off-hook). 1. Press the MENU key. 2.
Network Settings Network settings allow selection of a desired network and addition of a network operator to the network list. Automatic Selection This option allows the SX6P to select the network automatically, based on the SIM Card account information. Manual Selection This allows you to see a list of networks in your area. Select the desired network from the list and the SX6P will attempt to use that network. 1. Press the MENU key. 2. Select Settings, then select Network Settings. 3.
Add New Network If a known network is not on the list, it can be added. The Country Code, Network Code, and Network Name must be provided in order to add a network to the list. Once added to the network list, the network can be accessed via the Set Preferred Network option. 1. Press the MENU key. 2. Select Settings, then select Network Settings. 3. Select Select Network. 4. Select Add New Network. 5. Press the SELECT key. 6. Select Add. 7.
Change SIM PIN1 SIM PIN1 must be enabled and a valid PIN must be entered before this menu item will appear. 1. Press the MENU key. 2. Select Settings, then select Security Settings. 3. Select SIM PIN1. 4. Select Change PIN. 5. Enter the old PIN, then press the OK key. 6. Enter the new PIN, then press the OK key. 7. Enter the new PIN again, then press the OK key. NOTE: The PIN must be between 4 and 8 digits. Press the CLEAR key to make changes. Change SIM PIN2 1. Press the MENU key. 2.
Add Additional Prefixes 1. Press the OPTIONS key, then select Add. 2. Enter the new prefix, then press the OK key. Edit Current Prefixes 1. Press the OPTIONS key, then select Edit. 2. Use the arrow and CLEAR keys to edit the prefix. 3. Press the OK key when finished. Delete Prefixes 1. Press the OPTIONS key, then select Delete. 2. Press the OK key to delete the prefix. NOTE: Press the BACK key to go back to the previous menu. Clear All Prefixes 1. Press the OPTIONS key, then select Clear All. 2.
Change Deskphone Lock PIN 1. Press the MENU key. 2. Select Settings, then select Security Settings. 3. Select Deskphone Lock, then select Change PIN. 4. Enter the old PIN, then press the OK key. 5. Enter the new PIN, then press the OK key. Closed User Groups (CUG) This feature depends entirely on your service provider and your account subscription. Contact your service provider for more information. CUG Settings 1. Press the MENU key. 2. Select Settings then Security Settings. 3. Select CUG Settings.
SUPPLEMENTARY SERVICES (NETWORK DEPENDENT) In-Call Options The following options are available during a call. While in a call, press the MENU key to access these options. Options display based on call status. For example, Retrieve will only display if a call is on hold or if Call Waiting indicates a second incoming call. Hold: Puts active call on hold. Retrieve: Activates a call that is on hold. Swap: Swaps between held call and active call. End Current: Ends the current call.
Call Waiting Call Waiting enables notification of incoming calls when the SX6P is off-hook (whether during a call or during dialing). To respond to Call Waiting, press the FLASH key or the hook switch. Contact your service provider to activate Call Waiting. Enable/Disable Call Waiting 1. Press the MENU key, then select Settings. 2. Select Call Settings, then select Call Waiting. 3. Select On to enable. Select Off to disable.
Voicemail The VM key will blink and the envelope icon will display when there are new voicemail messages. Contact your service provider to activate voicemail and for voicemail settings. Set Voicemail Access Numbers Typically, your service provider will set the voicemail access numbers for you. If they do not, contact them for the Home Mailbox , Roam Mailbox, Voice, and Message numbers. 1. Press the MENU key. 2. 3. 4. 5. Select Messages, then select Voicemail.
Forward Text Messages 1. View the desired message. 2. Press the OPTIONS key, then select Forward. 3. Enter the desired number or press the NAME key to select a phonebook entry. 4. Press the OK key. 5. To send the message, select Send Now. To save the message to send at a later time, select Send Later. Delete Text Messages 1. View the desired message. 2. Press the OPTIONS key. 3. Select Delete. Create Text Messages 1. Press the SMS key. 2. Select Create Message. 3. Enter the message text.
Message Settings Message Center The message center number is used to retrieve your text messages. Contact your service provider for this number. 1. Press the SMS key, then select Message Settings. 2. Select Message Center, then enter the number that your service provider gave you. NOTE: If the number is already entered, press the OK key. 3. Press the OK key. Message Lifetime Message lifetime is the amount of time that an unread message will remain on the network server before being removed. 1.
Network Call Barring The SX6P supports network call barring of incoming or outgoing calls and allows barring of specific types of services, such as voice or data. Contact your service provider to activate network call barring. The following call barring options are available: • Foreign Calls: Does not allow international calls. • Only local and home country: Only allows local and home country calls. • Bar Incoming: Does not allow any incoming calls.
DATA FEATURES (SX6P-300G series only) When connected to a personal computer (PC), the SX6P is capable of sending and receiving digital fax and data, sending and receiving email communications, and accessing the Internet. Data speeds may vary depending upon your cellular network. DB9 Data Port Connect SX6P to a Computer Use a RS232 serial cable to connect the DB-9 data port on the SX6P to the appropriate data port on your PC.
Baud Rate AT Commands The SX6P will accept AT commands to setup the port speed. If you want to change the SX6P port speed for a session or keep the change permanent, or if you just want to see the profile settings, use the following AT commands from a terminal application (like HyperTerminal). NOTE: Make sure DTE Fallback is OFF before making changes to the baud rate.
SX6P TROUBLESHOOTING Telephone Service is Not Working (Cannot make or receive calls) · Make sure the SX6P is powered on properly. · Make sure any equipment that is externally connected to the SX6P is correctly connected. · Test any externally connected equipment on a known system to verify operation. · Make sure the antenna is properly connected. · Make sure your account with your service provider is activated and that service is established.
CONFORMANCE STATEMENTS The SX6P 850/1900 Mhz models are in conformance with all applicable FCC requirements. FCC Part 15 Class B Compliance This Phonecell® SX6P model has been tested and found to comply with the limits for a Class B digital device, pursuant to Part 15 of the FCC rules. Changes or modifications not expressly approved by Telular Corporation will void your authority to operate the equipment per FCC part 15 paragraph 15.21.
Safe Operation Requirement The Phonecell® SX6P must be either wall mounted or desk mounted and should not be operated when any person is within 203 mm (8 inches) of the antenna. Temperature Environment Operating Temperature: From -10°C to +50°C ; Up to 95% relative humidity (non-condensing). Storage Temperature: From -40°C to +60°C; Up to 95% relative humidity (non-condensing). Antenna Care and Replacement Do not use the Phonecell® SX6P with a damaged antenna.
Potentially Explosive Atmospheres Turn your Phonecell® SX6P OFF when in any area with a potentially explosive atmosphere. It is rare, but your Phonecell® SX6P or its accessories could generate sparks. Sparks in such areas could cause an explosion or fire resulting in bodily injury or even death. Areas with a potentially explosive atmosphere are often, but not always, clearly marked.
WARRANTY I. WHAT THIS WARRANTY COVERS AND FOR HOW LONG: TELULAR CORPORATION ('Telular") warrants to a distributor Buyer, or to a customer only if the customer is a Buyer directly from Telular, that the Products (including accessories) shall comply with the applicable Specifications and shall be free from defects in material and workmanship under normal use and service for a period of fifteen (15) months from date of shipment from Telular.
IV. WHAT THIS WARRANTY DOES NOT COVER: (a) Subsequent upgrades and enhancements to the Product. (b) Defects, non-compliance or damage resulting from use of the Product in other than its normal and customary manner or environment. (c) Defects, noncompliance or damage from misuse, lightening, accident or neglect. (d) Defects, noncompliance or damage from improper testing, operation, maintenance, installation, adjustment, or any alteration or modification of any kind.
APPENDIX A PC SERIAL PORT SETUP FOR CIRCUIT SWITCHED DIGITAL FAX AND DATA (not for use with GPRS) (SX6P-300G series only) Requirements: · GSM account with your network service provider including a circuit switched data and fax facility. · PC, laptop, notebook with a RS232 serial port. · Windows 2000 or better. · RS-232 Cable (DB9 to DB15). NOTE: When all of the above have been satisfied, you may proceed. Modem Setup 1. Power on your PC or device that is connected to the SX6P. 2.
4. The Install New Modem window may appear asking for the type of modem to install. Select "Other" followed by clicking the NEXT button. If this window does not appear, go to Step 5. 5. The Install New Modem window will appear. Then, click on the "Don't detect my modem option" followed by clicking the NEXT button.
6. The Install New Modem will update again to select the manufacturer and the modem model.Select “Standard Modem Types” from the Manufacture’s list. Select “Standard 19200 bps Modem” from the Models list then click next. 7. The Install New Modem will update to select the COM port. Select the COM port that will be connected to the SX6P then click Next. Windows will now create a modem configuration file for the Phonecell ® SX6P. This may take several minutes.
8. The Modems Properties window should appear. Click on the Properties button. 9. The Standard 19200 bps Modem Properties window will open in the General tab. Set as shown with the COM port you have selected. 10. Then click on the Connection tab. Set as shown below.
11. Click on the Advanced button. Set as shown. 12. Click on OK and Close to back out of each window. Your modem is now set up. NOTE: When using the SX6P for PC fax operation, make sure the modem connection uses software flow control. When using PC data, either hardware or software flow control can be used, as long as the PC application (and modem) match the SX6P's configuration. The SX6P defaults to hardware flow control. The following AT commands are used to change the SX6P's flow control.
Phonecell® SX6P GSM 39 User anual
Phonecell® SX6P GSM 40 User Manual
Phonecell® SX6P GSM 41 Technical Manual
647 North Lakeview Parkway Vernon Hills, Illinois 60061, USA Tel: 847-247-9400 • Fax: 847-247-0021 E-mail: support@telular.com http://www.telular.com ©2004 Telular Corporation, all rights reserved.