
User's Manual


P
HONECELL SX3i AMPS
13 U
SER M
ANUAL
12/08/99
Battery Installation Continued
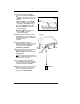
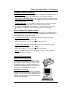
7) Connect the batteries as follows:
··
Connect one end of the BLUE wire
(attached to the battery cover) to the
BLACK (-) terminal of the second
battery
··
Attach the other end of the BLUE
wire to the RED (+) terminal of the
first battery as shown in Fig. 9
··
Connect the BLACK wire to the
unattached BLACK (-) terminal
of the first battery
··
Attach the RED wire to the unat-
tached RED (+) terminal
of the second battery.
8) Carefully lower the batteries into the
compartment as a pair, ensuring that
the wires are not pinched against the
compartment wall
or guides.
9) Once the batteries lay flat,
replace the battery compartment cover
and slide the cover closed until the
securing tab pops up. Battery
Installation is complete.
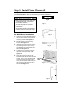
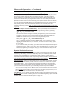
10) Re-connect the AC line cord from the
power port on the front of your
Phonecell SX3i to the power source
see Figure 10.
OR
if an external DC power source is
used, re-connect the optional DC input
cable to the DC Input port.
11)
Turn ON the Power switch. After
approximately 10 seconds, the LED
indicator on the front of the Phonecell
should turn RED, then GREEN.
NOTE: the FWT must be connected to AC
power for at least 24 hours to fully
charge the batteries before theyll
back up your Phonecell SX3i.
Fig. 9
BLACK
RED
BLUE
AC Power
AC Port
DC Port
LED
Indicator
Fig. 10
l
l
Power
Switch