Tenda WiFi App User Guide for Whole Home Mesh WiFi System I
Copyright Statement © 2018 Shenzhen Tenda Technology Co., Ltd. All rights reserved. is a registered trademark legally held by Shenzhen Tenda Technology Co., Ltd. Other brand and product names mentioned herein are trademarks or registered trademarks of their respective holders. Copyright of the whole product as integration, including its accessories and software, belongs to Shenzhen Tenda Technology Co., Ltd.
Preface Thank you for choosing Tenda! Please read this user guide before you use the Tenda WiFi App to set up your whole home mesh WiFi system. Conventions The typographical elements that may be found in this document are defined as follows. Item Presentation Example Cascading menus > System > Live Users Parameter and value Bold Set User Name to Tom. Variable Italic Format: XX:XX:XX:XX:XX:XX UI control Bold On the Policy page, click the OK button. Message “” The “Success” message appears.
Additional Information For more information, search this product model on our website at http://www.tendacn.com. Technical Support If you need more help, contact us by any of the following means. We will be glad to assist you as soon as possible. Global: (86) 755-27657180 United States: 1-800-570-5892 Hotline Email support.nova@tenda.com.cn Canada: 1-888-998-8966 Hong Kong: 00852-81931998 http://www.tendacn.
Contents Registering and Binding ...................................................................................................................................................... 1 Management Type .............................................................................................................................................................. 5 My WiFi .............................................................................................................................................
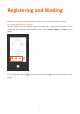
Registering and Binding Binding an account to your nova network helps you secure your nova network and manage it remotely. Binding with third party accounts After you complete setup and installation using the Tenda WiFi App, a login prompt page appears. You can authorize the Tenda WiFi App to use third party accounts, including Google+, Facebook, and Twitter, to login quickly. If you miss the page above, tap on the upper-right corner and tap Login. Then choose one type of account to login.
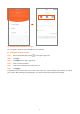
Binding with a registered account You can register a Tenda account to manage your nova network. To Register a Tenda account: Step 1 Run the Tenda WiFi App, and tap on the upper-right corner. Step 2 Tap Login. Step 3 Tap Register on the upper-right corner. Step 4 Enter a valid email address. Step 5 Customize a password for your Tenda account. Step 6 Tap Register. A confirmation email will be sent to your email inbox. Check your email and follow the instruction to activate your account.
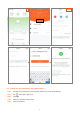
To bind your nova network to your Tenda account: Step 1 Connect your smart phone to your nova WiFi network, and run the Tenda WiFi App. Step 2 Tap Step 3 Tap Login. Step 4 Enter your registered Tenda account. Step 5 Enter the password. on the upper-right corner.
Step 6 Tap Login. After you log in, your nova network is bound to your Tenda account successfully. After your nova network is bound to an account, login with the account is required for network management. This account is your administrator account.
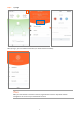
Management Type All Tenda nova whole home mesh WiFi systems support the Tenda WiFi App for local and remote management. You can choose either of them as needed. Local Management Local management indicates that you can use the Tenda WiFi App to manage your nova network after connecting your smart phone to the nova network. Procedure: Step 1 Connect your smart phone to the WiFi network of your nova nodes.
My WiFi After completing the internet settings, the Tenda WiFi App shows you the following page. You can view the status of your nova nodes, real-time upload/download speed and connected devices, and manage your nova network.
To check or manage your nova nodes Tap the WiFi name, which is my-my-my in the following picture, on the upper-left corner of the My WiFi page to enter the following page. All nova nodes in a network share the same WiFi name. Tap here to add manageable Tenda devices. WiFi Name To view details of the internet settings Tap the icon on the home page of the App.
To view details of the nodes Tap the icon on the home page of the App to see details of the corresponding nova node. Choose this to delete the node from your WiFi network. Choose this to change the location information of the node. Choose this to enable/disable the LED indicator of the node. Choose this to see more information about the nova node.
To view the connected devices Tap the icon on the home page of the App. If you want to check the details of a device or manage more closely, choose the device. This indicates the frequency band of the WiFi network the device connects. This indicates the time the device connects to the WiFi network. Choose this to remove connected devices from the blacklist. Choose this to rename the device, such as Jack’s iPhone.
My Profile Tap the icon in the upper-right corner of the home page (My WiFi) page to enter the following page. Choose this to log in or register a Tenda account. Choose this to see FAQ or give us your feedback. Choose this to upgrade the App or learn about Tenda. Choose this to clear the cache for better performance.
Wireless Settings In this section, you can change the WiFi name and password of your nova WiFi network. To change your WiFi name and password Step 1 Choose Settings > Wireless Settings to enter the configuration page. Step 2 Change the WiFi name and password as required. Step 3 Tap Save. Tap here to share the WiFi name and password with your family. Tap here to hide the WiFi password.
Guest Network The Guest Network function allows you to create a separate network for your guests to secure the main network. Procedure: Step 1 Choose Settings > Guest Network to enter the configuration page. Step 2 Set the button Step 3 Change the WiFi name, password and validity period as required. Step 4 Tap Save. to the enabled state . Tap here to share the WiFi name and password with your friends. Tap here to hide the WiFi password. Tap here to select a valid period for the guest network.
Parental Control The Parental Control function allows you to create a healthy time session for internet access for your family members. Procedure: Step 1 Choose Setting > Parental Control to enter the configuration page. Step 2 Create a group. 1. Tap Add Group. 2. Enter a group name, which is Family in this example, and tap Next. 3. Select the devices to be added into the group. 4. Tap Complete.
Step 3 Tap or to change the rules. indicates that the devices in the group are allowed to access the internet. indicates that the devices in the group are not allowed to access the internet. Step 4 Specify a period for the rule. 1. Choose the group. 2. Tap Period. 3. Tap Add Period. 4. Specify a Period Name, Start Time, End Time, and the dates from when the rule takes effect. 5. Tap Save.
15
Internet Settings Generally, you complete the internet settings by following the quick setup wizard of the Tenda WiFi App when you set the nova nodes at the first time. If your internet connection type or parameters are changed, you can set them again here to enable your nova nodes to access the internet. The nova nodes support the following four connection types. PPPoE: If this type is selected, you need to enter the PPPoE user name and password provided by your ISP for internet access.
Setting up PPPoE Step 1 Choose Settings > Internet Settings to enter the configuration page. Step 2 Tap Connection Type. Step 3 Select PPPoE. Step 4 Enter the PPPoE user name and password provided by your ISP. If a service name and a server name are provided, tap Advanced and enter them. Step 5 Tap Save. Tab here to select a connection type. Tap here to see the PPPoE password. Setting up DHCP Step 1 Choose Settings > Internet Settings to enter the configuration page.
Setting up Static IP Address Step 1 Choose Settings > Internet Settings to enter the configuration page. Step 2 Tap Connection Type. Step 3 Select Static IP Address. Step 4 Enter IP Address, Subnet Mask, Default Gateway and Primary DNS Server. If a secondary DNS server is provided, enter it as well. Step 5 Tap Save. Setting up Bridge Ensure that the one of the nova nodes in your nova network is connected to your router with internet accessibility using an Ethernet cable.
Russian UI is used for illustration here. Setting up PPPoE Russia Step 1 Choose Настройки > Настройки Интернета to enter the configuration page. Step 2 Tap Тип подключения. Step 3 Select PPPoE Россия. Step 4 Enter Имя пользователя PPPoE, Пароль PPPoE, Имя сервиса and Имя сервиса, and change the MTU value as needed. If a static IP address and related information are provided, set the Получить IP адрес автоматически button to Step 5 state, and enter them as well. Tap Сохранить.
Setting up PPTP/PPTP Russia Step 1 Choose Настройки > Настройки Интернета to enter the configuration page. Step 2 Tap Тип подключения. Step 3 Select PPTP/PPTP Россия. Step 4 Enter IP адрес/ Имя PPTP сервера, Имя пользователя and Пароль, and change the MTU value as needed. If a static IP address and related information are provided, set the Получить IP адрес автоматически button to Step 5 state, and enter them as well. Tap Сохранить.
Setting up L2TP/L2TP Russia Step 1 Choose Настройки > Настройки Интернета to enter the configuration page. Step 2 Tap Тип подключения. Step 3 Select L2TP/L2TP Россия. Step 4 Enter IP адрес/ Имя L2TP сервера, Имя пользователя and Пароль, and change the MTU value as needed. If a static IP address and related information are provided, set the Получить IP адрес автоматически button to Step 5 state, and enter them as well. Tap Сохранить.
QoS The QoS function prioritizes gaming and web browsing activities. To enable the QoS function Step 1 Choose Settings > QoS to enter the configuration page. Step 2 Set the button Step 3 Enter download and upload speed based on your bandwidth value. to the enabled state . If you don’t know the value, tap Online Test or ask your ISP. Step 4 Tap Save. To get an accurate value, ensure that wireless devices connected to your nova network have no internet activity when you operate online test.
Add nova If you want to expand your WiFi coverage, you can add nova nodes coming with different models to your existing nova network. The maximum number of the nova nodes supported in a nova network is shown in the following table. Model MW2 MW3 MW5/MW5s MW6 MW12 Max. nova nodes supported 3 5 6 9 12 To add another nova node into your existing nova network Step 1 Choose Settings > Add nova to enter the configuration page. Step 2 Follow the on-screen guide to complete the settings.
24
Fast Roaming The Fast Roaming function lets you enjoy uninterrupted internet service when moving around your house. To enable the Fast Roaming function Step 1 Choose Settings > Fast Roaming to enter the configuration page. Step 2 Set the button to the enabled state .
Smart Assistant With this function enabled, the mobile device used to do the setup, such as your smart phone, is connected to 2.4 GHz WiFi network for 30 minutes. This is to allow the mobile device to discover and set up smart home devices that only support 2.4 GHz WiFi networks. To enable the Smart Assistant function Step 1 Choose Settings > Smart Assistant to enter the configuration page. Step 2 Tap Enable.
Port Forwarding The Port Forwarding function enables users to access your LAN resources, such as resources on the web server or FTP server, through the internet. Procedure: Step 1 Choose Settings > Port Forwarding to enter the configuration page. Step 2 Tap Add rule. Step 3 Select the device to which the rule applies. Step 4 Tap Next. Step 5 Set up a port forwarding rule. Common Protocol/Port: optional.
After completing the settings, internet users can visit “Protocol name://WAN port IP address of the nova node:External port” to access LAN resources. Ensure that the WAN IP address of the nova node is a public IP address, and the internal port you entered is correct. Security software, antivirus software, and the built-in OS firewall of the server may cause port forwarding function failures. Disable them when using this function.
UPnP After the UPnP function is enabled, it can automatically enable ports for UPnP-supported programs, such as P2P and gaming software, in the internal network for a smoother network experience. To enable/disable the UPnP function: Step 1 Choose Settings > UPnP to enter the configuration page. Step 2 Set the button to the enabled state or the disabled 29 state as required.
DHCP Server The DHCP Server function allows you to change the IP addresses assigned to all devices that are connected to the nova network. To change the LAN IP address of the nova node: Step 1 Choose Settings > DHCP Server to enter the configuration page. Step 2 Select a LAN IP address for the nova node. Step 3 Tap Save.
DNS If clients connected to the nova network cannot access the websites using the domain names, but the IP address works, it may be due to a DNS resolution problem. You can try changing the DNS settings to solve the problem. To change the DNS settings: Step 1 Choose Settings > DNS to enter the configuration page. Step 2 Select Automatic (default) or Manual. Step 3 If you select Manual, enter the correct DNS IP address in the Primary DNS Server box.
Firmware Upgrade Tenda is dedicated to improving its products to let users enjoy better performance. Please update the firmware when the App prompts a new firmware version is available. To update the firmware: Step 1 Choose Settings > Firmware Upgrade to enter the configuration page. Step 2 Tap Detect Latest Firmware. Step 3 The New icon appears if a new firmware version is detected. Tap Update now to upgrade these nodes.
Do not remove the power supply of the nova nodes when upgrading.
Maintenance Schedule The Maintenance Schedule function makes the nova nodes reboot at specified time to keep the nova nodes in good condition. To set up the Maintenance Schedule function: Step 1 Choose Settings > Maintenance Schedule to enter the configuration page. Step 2 Set the button to the enabled state Step 3 Select a System Reboot Time. You are recommended to set a time when your network is idle. Step 4 Select the dates on which the rule takes effect.
Account Authorization You can authorize your family members to manage your nova network. An authorized account has the same permission as the bound account except for authorizing other accounts. To authorize another account: Step 1 Choose Settings > Account Authorization to enter the configuration page. Step 2 Tap Add an account. Step 3 Enter a registered account. If you want to authorize a Google+, Facebook, or Twitter account, enter the ID generated at your initial login. Step 4 Tap OK.
Tap here to authorize another account. Tap here to delete the authorized account.