
Assembly Instructions


ASSEMBLY OF STACKABLE WORKBENCH DRAWER
Two people are recommended for assembly. Approximate assembly time: 20-25 minutes.
Tools required: slotted screwdriver, Phillips screwdriver, and
7
/16” wrench or nut driver.
The reference numbers used throughout this sheet refer to the illustration on the back cover.
This is to help you to identify the various parts as they are mentioned.
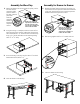
4. Insert the drawer into the housing.
1. Remove the drawer (Ref. No. 1) from the housing (Ref. No. 2)
by rst pulling it to the full extent that the suspensions allow.
Once the drawer is fully open, move the plastic lever inside
the suspension member (Ref. No. 7) to release the suspension
sections.
NOTE: On one side of the
suspension you will need to
move the lever up; on the
opposite side, you will need
to move the lever down.
NOTE: One set of mounting brackets comes with the standard
steel top workbench. Additional sets of mounting brackets must
be purchased separately if attaching more than one drawer or
attaching a drawer to a modular workbench.
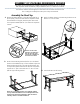
Assembly for Steel Top
2. Attach the two mounting brackets (Ref. No. 3) in the desired
location on the workbench top. It is most common to place the
drawer to either the far left or far right side of the bench, but
can be placed anywhere that there are two holes in the bench
top that are 15” apart. Secure with two
1
/4”-20 x
5
/8” bolts
(Ref. No. 9) per mounting bracket.
3. Attach the drawer housing to the mounting brackets. Secure
with four
1
/4”-20 x
5
/8” bolts.