
User's Manual


CAMERA SETUP continued
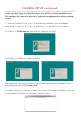
Network Configuration
Configure the Network parameters from this page.
• DHCP checkbox: If checked, the device will obtain an IP from the DHCP server (ensure the Router, with
which the device connects, has a DHCP function).
• IP address: Fill in the IP address assigned and make sure it is in the same subnet as the gateway (i.e. the
first three sections are the same).
• Mask: The default subnet mask of the equipment is: 255.255.255.0
• Gateway: Make sure it is in the same subnet with PC IP address. Default Gateway address is 192.168.0.1
• DNS: IP address of IPS network provider.
• Port: LAN port assigned for the equipment, usually 80.
• User & Password: (Default administrator User Name/Password = admin/No password).
If you enable using DHCP, the system will assign an IP address for your equipment only if your
gateway supports DHCP (which is the case with most gateways). NOTE: When the subnet doesn’t
match, double click to change it and set the camera’s IP address once again.
Upgrade Firmware
Enter the correct User Name and Password to upgrade the system Firmware and Web user interface.
Refresh Camera List
Refreshes the camera list manually.