
Instructions


4/17/2018 TeraRanger Evo Connection to Pixhawk Autopilots
https://www.terabee.com/connection-to-pixhawk-autopilots-teraranger-evo/ 13/16
4.3 ArduCopter – APM Planner 2
Please make sure you are running the latest version of APM Planner 2, available
here:http://firmware.ardupilot.org/Tools/APMPlanner/
1. Open APM Planner. Go to Initial Setup, Instal Firmware and flash the latest firmwareofArduPilot.
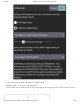
2. Click on USB device name on the right handside and select
the appropriate Serial Port and Baud Rate for your device and
pressthe Connect button.
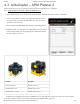
3. Go to Parameters/RNGFND and update the following fields:
RNGFND_TYPE : 14 / TrOneI2c / TeraRangerI2C (each of these
values should work, but they might appear differently based
on GCS software version.)
Evo 60m Evo 600Hz
RNGFND_ADDR: 49 RNGFND_ADDR: 49
RNGFND_MIN_CM: 50 RNGFND_MIN_CM: 75
RNGFND_MAX_CM: 6000 RNGFND_MAX_CM: 800
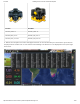
4. Reboot the autopilot and select the GRAPHS tab. On the right hand side you should see the messages
from the autopilot. From the list select; DISTANCE_SENSOR/current_distance: