Version 2 Dec „11 © Teradek, LLC 2011. All rights reserved.
Introduction Thank you for purchasing Cube – the world‟s first camera-top streaming HD video solution. The Cube Encoder streams HD video over any IP network. Wireless-equipped Cubes can connect directly to laptops, Cube Decoders, or mobile devices, or join an existing wireless network to stream over a LAN or WAN. USB-equipped Cubes are also capable of streaming using select 4G capable modems. Cube features native integration with Livestream.com for turn-key live Internet streaming and content distribution.
Table of Contents Introduction .................................................................................................................................................. 2 Support Resources ........................................................................................................................................ 2 Disclaimer...................................................................................................................................................... 2 Warning....
2. Network Services ......................................................................................................................... 22 Configuration pages .................................................................................................................................... 23 1. Dashboard ..................................................................................................................................... 23 2. Video Setup .........................................
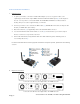
Connect and Power Your Device 1. Getting started: 1. To power your Cube, connect the included AC adapter (or accessory power cable, sold separately) to Cube via the 4 pin LEMO connector marked „6-28 DC Input‟ (b). Cube begins to boot as soon as power is connected. NOTE: The ENC/DEC LED blinks to indicate Cube is booting. This process takes approximately 1 ½ minutes. 2. Connect your video source to Cube via BNC cable (e) (SD/HD-SDI 1xx models, Composite 5xx models) or HDMI cable (2xx models). 3.
1. Audio/Video Input/Output: 1.1. Video intput: SD/HD-SDI (Cube 1xx Series), HDMI (Cube 2xx Series), PAL/NTSC Composite (Cube 5xx Series) 1.2. Video output: SD/HD-SDI (Cube 3xx Series), HDMI (Cube 4xx Series) 1.3. Audio input: 2Ch. Embedded HDMI/SDI audio, Line in via 1/8” stereo TRS, Mic in via 1/8” stereo jack* (Cube 150 and 250 models only) 1.4. Audio output: 2Ch. Embedded HDMI/SDI audio, Line out via 1/8” stereo TRS 2. Power: 4. 3. 1. 2. 1. 2. 4. 3. Male 0B.304 Female 0B.
3. Description of Button and Standard LED Operation 1. LED functions 1.1. USB/PWR (model dependent): 1.1.1.PWR – Green is on 1.1.2.USB – USB modem status. Off, nothing connected. Green, USB modem connected. Orange, USB modem connection in progress. Red, USB modem connection failed 1.2. WiFi 1.2.1.Cube 100/200 – USB modem status (see above). 1.2.2.Cube 120/150, 220/250, 320/350, 420/450 – Wireless status. Off, wireless disabled. Red, wireless disconnected. Green, wireless associated/connected. 1.3.
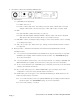
Connect Cube to Your Network Cube allows you to connect multiple ways. The simplest is to connect Cube to one other device (Ad Hoc mode), or you can add Cube to an existing network (Infrastructure mode). Find brief descriptions of these modes below. In Ad Hoc mode, Cube will create and advertise its own network name (SSID). Your computer, decoder, or mobile device connects directly to Cube, with no additional network equipment required.
2.1. Connect video and power to your Cube Encoder (see Connect and Power Your Device, page 5). 2.2. Connect Cube to your computer via Ethernet. 2.3. Launch TeraCentral (included on the USB drive), and click the „Configure Settings‟ button next to your Cube‟s listing. Your browser will open to Cube‟s setup wizard. 2.4. Click „Next‟ and then „Configure Wireless Interface.‟ 2.5. Select „Infrastructure Mode,‟ wait for Cube to scan for available wireless networks, and select your access point‟s SSID. 2.6.
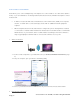
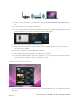
2. In TeraCentral, click your video stream‟s Launch button. The video will begin playing in VLC. You can also launch Cube‟s menu system from TeraCentral by clicking the „Configure settings‟ button next to your Cube‟s listing. 3. Refer to the following sections for other streaming applications. Encoder – Pick Your Application Cube can be used for a variety of different applications – local monitoring with a computer/decoder, local monitoring with iOS devices, or Internet streaming with Livestream.
information about the controls you have over the video stream. If using a decoder, please skip to the Decoder section (page 14). 2. Local monitoring with iOS devices using TeraCentral Cube can stream to iOS devices with a specially-configured stream called Quickview and Teradek‟s TeraCentral iPad app. You can download TeraCentral for iPad from the app store. 2.1. Open TeraCentral on your iPad. If the Quickview stream is enabled, you will see two stream listings from the Cube.
2.5. If the login screen appears, log in to Cube‟s web UI and Navigate to „Video Setup‟ -> „Stream settings.‟ 2.6. Click the „Quickview Stream‟ tab, select „Enabled‟ next to the „Quickview Stream‟ option, and click „Apply.‟ 2.7. Open TeraCentral, and wait for the Quickview stream listing (highlighted blue) to appear. Launch the video by clicking the „Play‟ button‟. 3.
Livestream Configuration 3.1. To enable Live Internet streaming, first launch Cube‟s configuration page by Clicking “Configure Settings” in TeraCentral. 3.2. If the wizard appears, click „Skip the Setup Wizard,‟ then log in to Cube‟s web UI. Navigate to „Video Setup‟ -> „Stream settings.‟ 3.3. Under General / Type, select „Live Internet Streaming.‟ 3.4. Enter your Livestream username, password, and channel short name.
Decoder If you purchased your decoder as a „Cubelet‟ (paired with an encoder) there is no additional configuration required beyond ensuring that the two devices are on the same network (see Connect Cube to Your Network, page 7). Find instructions for setting your video output resolution and switching between streams below. 1. Changing output format 1.1. Open your Cube decoder‟s web UI and log into the device. 1.2. Navigate to „Video Setup‟ -> „Device Settings.‟ 1.3.
2.1. To pair two Cubes without using a computer, hold both devices‟ ‟Go Live!‟ buttons until the ENC/DEC and WiFi LEDs blink green rapidly. NOTE: if set to „Live Internet Streaming‟ mode, the encoder will attempt to start a broadcast before entering pairing mode. 2.2. After a short time, the decoder will restart and connect to the encoder. 3. Switching between available streams 3.1. Open your Cube decoder‟s web UI and log into the device. 3.2. Navigate to „Video Setup‟ -> „Decoder Settings.‟ 3.3.
1.2. RTP is Cube‟s default streaming mode. Use this for local streaming to computers and Cube decoders. The URL for a standard RTP stream is rtsp://xxx.xxx.xxx.xxx/stream1, where the x‟s are your Cube‟s IP address or link-local hostname. 1.3. RTP Port and Max clients – Use these fields to configure the port Cube accepts RTP requests on and how many simultaneous clients are allowed. The default port is 554 and the default maximum number of clients is 10. 1.4.
3.1. 3.2. HTTP Live streaming allows native streaming to iOS devices using the built in Safari browser. While this mode does support audio and HD video, there is a large amount of latency (~10 seconds or more) due to the stream type. For low latency streaming to iOS devices, please refer to the Secondary Quickview Stream instructions above or Encoder – Pick Your Application (page 12). 3.3.
4.1.1.Account and Configuration options: Encoder Controls In addition to configuring your stream type, Cube allows you to control various characteristics of the network video stream. These include bitrate, frame rate, video scaling, and more. All of these settings can be found under „Video Setup‟ -> „Encoder Settings.‟ Use this page to adjust the video stream to best suit your streaming environment. Version 2 Dec „11 © Teradek, LLC 2011. All rights reserved.
1. Options (in order of display): 1.1. Title Text: Enter your desired title text here. Check „Show Title‟ to display the title text on your video stream. If the title text is enabled, you can also display Cube‟s system time by checking „Show Time Code.‟ The title text is also used as your channel name, and is displayed wherever you see a Cube stream advertisement. The default name is „Channel 1.‟ 1.2.
and may improve performance in challenging or restricted network environments. 1.9.1.Rate Control Mode: Select „Auto‟ or „Manual.‟ Additional options are present when set to „Manual‟ mode. 1.9.2.Static Scene Detection: Enabling this prevents bitrate spikes during static-to-dynamic scene transitions. Disabling static scene detection improves video quality in mostly static scenes. 1.9.3.Complexity Detection: Enabling this allows the encoder to adapt more quickly to very complex content and scene changes. 1.
Cube‟s network configuration and services options can be found in Cube‟s web UI under the „Network‟ menu item. 1. Network Configuration 1.1. The network configuration page contains all of the necessary options to control Cube‟s wired, wireless, and USB network interfaces. 1.2. Global settings – The global settings displays the currently used gateway and nameserver values, current domain, and allows you to set Cube‟s hostname.
1.3.1.4. Link Local (wireless only) – Cube does not request an IP address via DHCP, and instead assigns itself a link local IP address. 1.3.2.Nameserver and Search domain: When using DHCP, the DHCP typically assigns the nameserver and search domain values, but you can set them manually if desired. If the IP address mode is set to „Static‟, these values must be configured manually. 1.4. Wireless configuration 1.4.1.
the serial number. The friendly name must only contain alphanumeric characters, and can be up to 40 characters long. 2.2. SSL/TLS Encryption: Enables or disables encryption using a self-signed certificate. Note: if encryption is enabled, „https://‟ (not „http://‟ ) must be used to access Cube‟s web UI. Cube will not redirect users if „http://‟ is entered. 2.3. Dynamic DNS: Cube can utilize DDNS services for remote network discovery.
(streaming) resolution, frame rate, bitrate, and Key Frame Interval. For more information on these options, please refer to the Encoder Controls section (page 18). 2. Video Setup 2.1. The Video Setup pages allow you to control options for your video input or output (Device Settings), options for the encoded video (Encoder Settings, see Encoder Controls, page 16), and the stream type (Stream Settings, see Stream Types, page 14). 2.2.
2.3.1.Basic Operation -- The Decoder Settings page contains two main panels, an available streams panel, and a cameo panel displaying information about the currently configured stream. 2.3.1.1. Selecting a video stream – To choose a stream to decode, select your Cube from the list of available streams to expand the listing. Pick your desired stream (if multiple streams are available) and drag it into the Channel 1 panel. After you have dragged the stream across, click „Apply.
2.3.2.Advanced/Manual Configuration – If your network restricts Cube‟s service advertisements or if streaming over a WAN or the Internet, manual configuration of the Cube decoder may be necessary. The manual configuration panel also contains options for adjusting Cube‟s latency settings. Note that after manually configuring your decoder settings and clicking „Set,‟ you will still need to click „Apply‟ for the configuration to take effect. 2.3.3.Stream Type: RTP 2.3.3.1. Stream Protocol: Select UDP or TCP.
activatable applications, page 30. 3.1.1.Adding licenses – To add a license, paste your 40 digit license string into the „Add a New License Key‟ field and click „Add Key.‟ If the license is added successfully, you should see the description and license key displayed in the licenses table. If you see a message saying „Invalid License,‟ verify that there the full license has been posted and there are no extra spaces following the string.
3.2. User settings – The user settings page allows you to change your password and import, export, or reset Cube‟s settings. 3.2.1.Password – To change your password from the default value „admin,‟ enter your desired password in the „New Password‟ field and click „Change Password.‟ Passwords are case sensitive and may contain alphanumeric (a to z, 0 to 9) and special characters (@, #, etc.). 3.2.2.
network settings by leaving the „Preserve network settings‟ box checked. If you are unable to access the configuration pages, Cube can also be reset by holding the „Go Live!‟ button on the back of Cube; see Button Operation, page 7, for more information. 3.3. System Time – The System time page allows you to set Cube‟s system time. Cube‟s system time can be set manually (Reference mode: Manual), or using NTP (Network Time Protocol).
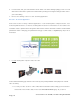
Advanced and/or activatable applications The following options offer additional functionality over Cube‟s default feature set. Licenses for some features are available by request at no charge (RTMP, RTSP announce, RTP push). Licenses for the other features can be purchased through Teradek or your local reseller. For instructions on installing licenses, please refer to the Licenses section, page 26. 1. RTMP 1.1. 1.2. RTMP streaming allows you to stream to your own custom server or CDN.
2.1. 2.2. RTSP Announce streaming allows Cube to start and stop broadcasts to a remote streaming server (such as Wowza). The RTSP announce license is provided by request, free of charge. 2.3. Configuration: Enter the host name or IP address of your server in the „Host Name‟ field. Enter the host port configured on your server in the „Host Port‟ field (default is 1935). In the „File‟ field, enter the name of your application and desired stream name. The file will vary based on your chosen server.
3.4. Using RTP Push: After applying your configuration, a link to the SDP file will be displayed towards the bottom of the Stream Settings page. To open the stream, either copy the URL and open it using your video player software, or right click the and save the file. The saved file can be opened directly, or added to your streaming server‟s content directory. 4. UDP multicast 4.1. 4.2. UDP multicast allows Cube to send multicast streams over RTP/RTSP.
and may adversely affect network conditions. Please refer to your network device documentation when using multicast. 5. Transport stream 5.1. 5.2. In transport stream mode, Cube sends video to a specified unicast or multicast address. The MPEG transport stream protocol is used in many broadcast applications and is also supported by many IPTV set top boxes. The transport stream license can be purchased online at http://store.teradek.com . 5.3.
5.5.1.Decoder Configuration 5.5.2.Select „Manually Configure‟ on the Video Setup ->Decoder Settings page (see page 24). 5.5.3.Stream Protocol: Select UDP or TCP. This value should match the value configured on your encoder. UDP streaming requires less network overhead but does not guarantee that video data will arrive intact on lossy networks. TCP streaming ensures data will arrive at its destination, but requires more network overhead and may impact performance when bandwidth is limited. 5.5.4.
5.5.8.Latency Options – Caching: Set this equal to or greater than the encoder‟s caching value. Default is 300ms. See Encoder Controls (page 18) for more information. 5.5.9.Intra Refresh: Set this to „Enabled‟ if your encoder is using Intra Refresh mode. 5.5.10. Jitter Buffer: The jitter buffer, when enabled, improves stream quality when network conditions are inconsistent (e.g. when streaming over the internet).
6.3.1.2. 6.3.1.3. Click „Browse‟ and select the folder you want to share for recording. Click „Open,‟ and then „Add.‟ You may be prompted to enter an administrator password. 6.3.1.4. After the share is created, an entry will appear in the setup menu. Your NFS share is configured. Clicking „Copy Path to Clipboard‟ will copy your NFS share location so that it can be entered on Cube. 6.3.2. Windows 6.3.2.1. An NFS server can be enabled with a number of third party NFS tools (nfsAxe, HaneWin NFS, etc.).
6.4.2. 6.4.3.Mounting your NFS share 6.4.3.1. Click „Mount Network Volume‟ under the „Volume Management‟ field. A window appears for you to enter your NFS share information. 6.4.3.2. 6.4.3.3. Enter your NFS Server computer‟s IP Address (found under your Network Preferences), and paste the NFS share path that you configured previously. Click mount. 6.4.3.4.
6.4.4.2.1. 6.4.4.2.2. Recording Format – Choose your preferred format (MOV, MP4, MKV, H4V) 6.4.4.2.3. Recording Destination – Choose none (place files directly in the mounted directory), „Sort by Magazine‟ (places files into a folder named for the current magazine, e.g. „A001‟), or „Sort by Date‟ (places files into a folder named with th the current month and day, e.g. „0704‟ for July 4 ). 6.4.4.2.4. Embedded Timecode – Enable to add a timecode track to recorded files. 6.4.4.2.5.
Troubleshooting 1. Power/Connection Issues SYMPTOM Cube will not power on. CAUSE Power cable may be connected incorrectly. External battery may be discharged. VID LED stays off, ENC LED cycles orange to red No video input is detected. VID LED stays orange Resolution mismatch. REMEDY -Remove video cable. Verify power cable or battery plates are connected and cables are not damaged. -Check battery charge. Verify that your source is connected to Cube. Check cables for damage.
Cannot Connect to Cube (Infrastructure mode). May be disconnected from network, network settings may be incorrect. Cube is visible in TeraCentral/ Bonjour, but the webpage will not open. Advertisement may be taking a long time to update, network settings may be incorrect. Cannot log in to Web UI Password may be changed. range.