T4-0048-TV44-OM.
T4-0048-TV44-OM.qxp 4/28/04 11:31 AM Page 1 Safety Precautions Warning! Use extreme caution when installing or removing an outdoor antenna that is located close to overhead wires such as power lines, telephone lines or cable TV lines. If any part of the antenna makes contact with overhead power lines, touching the antenna or the antenna cable can cause electrocution and death.
T4-0048-TV44-OM.qxp 4/28/04 11:31 AM Page 2 About your new TV44 outdoor TV antenna The TV44 features an internal amplifier that minimizes signal loss. The satellite receiver powers the amplifier, so no additional power supply is required. Because TERK’s antenna elements are manufactured to be weather-resistant, they’ll perform at their best for many years to come. For best reception results...
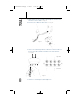
T4-0048-TV44-OM.qxp 4/28/04 11:31 AM Page 3 Installing the TV44 on a satellite dish 1. Make sure all satellite receivers are turned off and unplugged from the electrical outlet. 2. Unsnap the antenna from the back notch of the mounting clamp. See Fig 2. Fig 2 3. Hold the antenna to the back of the dish so that the circular housing is centered with the TERK logo facing out. See Fig 3.
T4-0048-TV44-OM.qxp 4/28/04 11:31 AM Page 4 4. Maneuver the clamps over or around the edge of the dish one at a time. See Fig 4. Fig 4 5. Snap the antenna back into the back notch of the mounting clamp. 6. Tighten the clamps by turning the thumb-wheel screw clockwise. Note: We recommend the use of the enclosed security clips for any dish 20” or larger. Snap the security clips onto the TV44 and slide down towards the mounting clips. See Fig 5.
T4-0048-TV44-OM.qxp 4/28/04 11:31 AM Page 5 Connecting the TV44 Depending on the type of satellite dish you have, go to one of the following five scenarios to determine how to connect the TV44 antenna to your satellite dish. A-Single LNB (Phase1) Satellite Dish 1. Remove the LNB from the arm of the satellite dish to expose the satellite cables. See Fig 6. Fig 6. 2. Disconnect the satellite cable(s) from the satellite dish’s LNB and pull them out through the bottom of the satellite dish arm. See Fig 6.
T4-0048-TV44-OM.qxp 4/28/04 11:31 AM Page 6 4. Slide 2 black 32”antenna cables up through the satellite arm and connect to the LNB. See Fig 8. 5. Reconnect the LNB to the dish arm. See Fig 8. Fig 8. 6. Connect the remaining end of the 2 black 32” antenna cables to the IN 1 and IN 2 terminals on the TV44 antenna. See Fig 9. Logo Side Dish Side Fig 9. 6 7. Continue to “Installing the Indoor Diplexers.
T4-0048-TV44-OM.qxp 4/28/04 11:31 AM Page 7 Connecting the TV44 (continued) B - Triple LNB (Phase3) Satellite Dish 1. Remove the LNB from the arm of the satellite dish to expose the satellite cables. See Fig 10. Fig 10. 2. Disconnect the satellite cable(s) from the satellite dish’s LNB and pull them out through the bottom of the satellite dish arm. See Fig 10. 3. Connect the satellite cables to the terminals marked OUT 1, OUT 2, OUT 3, and OUT 4 on the TV44 antenna. See Fig 11.
T4-0048-TV44-OM.qxp 4/28/04 11:31 AM Page 8 4. Slide 4 black 32” antenna cables up through the satellite arm and connect to the LNB. See Fig 12. 5. Reconnect the LNB to the dish arm. See Fig 12. Fig 12. 6. Connect the remaining end of the 4 black 32” antenna cables to the IN 1, IN 2, IN 3 and IN 4 terminals on the TV44 antenna. See Fig 13. Logo Side Dish Side Fig 13. 8 7. Continue to “Installing the Indoor Diplexers.
T4-0048-TV44-OM.qxp 4/28/04 11:31 AM Page 9 Connecting the TV44 (continued) C - Phase 2 Satellite Dish 1. Disconnect the satellite cables from the “OUTPUT” or “TO RECEIVER” terminals on your multiswitch. 2. Connect the satellite cables to the OUT 1, OUT 2, OUT 3, and OUT 4 terminals on the TV44 antenna. See Fig 14. Logo Side Dish Side Fig 14. 3.
T4-0048-TV44-OM.qxp 4/28/04 11:31 AM Page 10 D- Using a Multiswitch with an Antenna Input 1. Complete “Scenario A” instructions. (Page 5) 2. Locate your multiswitch and disconnect the satellite wire from the 18 volt or Satellite A/101 18 volt terminal. 3. Connect the satellite wire to the TV/SAT terminal of the diplexer. See Fig 16. Fig 16. Diplexer Logo Side Dish Side 4.
T4-0048-TV44-OM.qxp 4/28/04 11:31 AM Page 11 Connecting the TV44 (continued) E - With Dish 500 Using SW21 Switches 1. Locate your SW21 multiswitches and disconnect the satellite leads connected to the “TO RECIEVER” terminals. See Fig 17. 2. Connect the satellite leads to the OUT 1 and OUT 2 terminals on the TV44. See Fig 17. NOTE: You may need to extend the satellite leads using a barrel connector and extra RG6 coaxial cable if they are not long enough. 3.
T4-0048-TV44-OM.qxp 4/28/04 11:31 AM Page 12 Installing the indoor diplexers 1. Disconnect the satellite cable from the “SAT IN” terminal on your satellite receiver. See Fig 19 . Fig 19. 2. Connect the satellite cable to the terminal marked “TV/SAT” on the indoor diplexer. See Fig 20 . 3. Connect one of the supplied white 12” connector cables from the terminal labeled “SAT” on the inside diplexer to your satellite receiver’s “SAT IN” terminal. See Fig 20. 4.
T4-0048-TV44-OM.qxp 4/28/04 11:31 AM Page 13 Setting up your TV 1. Access the menu of your TV and make sure the TV is in ANT/AIR mode and not CABLE/CATV mode. Please refer to your TV manual for the exact steps to change this option. 2. Access the menu of your TV and run the “Auto Program” option. Please refer to your TV manual for the exact steps to change this option. 3. Set your TV to your favorite channel. 4.