
Quick Start Guide

EN
6) Not usually needed for home users (select "no" and
follow step 7). If you are using a proxy server, select "yes"
and confirm. You should know the entries that follow.
For more information, refer to the manual or the CD!
6) Not usually needed for home users (select "no" and
follow step 7). If you are using a proxy server, select "yes"
and confirm. You should know the entries that follow.
For more information, refer to the manual or the CD!
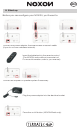
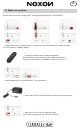
4) If using a wireless network, please enter your network
key (see Pretest) and confirm with
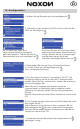
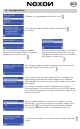
III. Configuration
1) Select your language and confirm it with
2) As with all other NOXON menus, please press
to confirm.
7) Now all you need to do is confirm the configuration with
Done!
3a) You may also find other wireless
networks in the area! Select your home
network and confirm it with
3b) If you have connected your NOXON
with a cable (wired Ethernet), you can
skip step 4 because you do not need a
key. Simply confirm with
5) For most users, the "Automatic (DHCP)" setting is the
right setting because the router assigns the IP address
automatically. If you are not sure, simply select and confirm
this setting.
If you want to assign a static IP address (kind of like a
"home address" for your network) for your NOXON, select
the corresponding entry. For more information, refer to the
manual or the CD.