
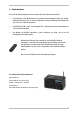
Quick Start Guide


9
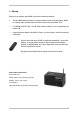
4 - Configuration
1) Once your NOXON has been activated for the first time, follow these steps to link it to your network for
the first time: Select a language and confirm your selection here, as in all further NOXON menus, with
(right). The network wizard appears automatically:
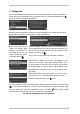
2) Network selection: Depending on whether you connect the NOXON to your network using wires (A) or
wirelessly (B), the integration proceeds similarly to what is depicted here:
A) If you have used a cable to
connect the NOXON (Wired
Ethernet), the installation is
very simple, since you do not
require a network key. Confirm
the selection again with .
B) When the NOXON contacts the network over its WLAN antenna, all
of the WLAN networks that it finds are listed here automatically. You
may also find other wireless networks in the area! Select your home
network and confirm it with
.
Then, you can enter your network key (see Pretest) if necessary.
3) Acquiring the IP address (kind of like a "home address" for your
network): If you are unsure, simply select 'Automatic (DHCP)'. This is
the correct setting for most users, as in this case the router assigns
the IP address itself. If you want to assign a static IP address to your
NOXON, select the corresponding entry. For more information, refer to
your manual.
4) Not usually needed for home users (select "no"). If you are using a
proxy server, tick "yes", and continue as described in the manual.
5) Confirm "Apply configuration" with
. Done!
If all of the settings are correct, you should be able to access the Internet radio stations in the main menu
( ) or look at the podcast directory. If you can't, then your NOXON cannot connect to the Internet. Please
check the settings and repeat the configuration process if necessary ( -button, network wizard).
Sometimes even a single incorrect character can be the source of the problem.
We hope your NOXON brings you hours of enjoyment!