
Installation Instructions
Manual
Before installation
Note: Remove all packaging materials from the product.
The included mounting material (screws and wall plugs ) is suitable for ordinary solid concrete or
masonry construction. Check which mounting material is suitable for your chosen mounting
surface. If necessary, seek expert advice.
Installation
Note:For best effect,the security light should be installed at a height of 0.5-1.6m
above ground level.
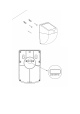
Installing the wall light
Drill two mounting holes on the wall using an appropriately sized drill bit for mount screws
After inserting the anchor, install the screws and reserve a small screw head outside.
Align the two holes at the back of the lamp with the two screws.
Note:if the mounting surface requires the use of wall plugs(e.g.brick or concrete)or
pre-drilling(e.g. hard wood),first mark and drill pilot holes in the wall using the wall bracket
as a template.
Ensure that the solar panel is angled so that it receives the maximum amount of sun
exposure.
Operation
The switch has three gears.
Auto: Induction mode, lights up for 30 seconds after detecting the induction
Off: off mode, the light does not work
On: long light mode, continuous lighting