
Manual


Operation
Testboy
®
TV 293 21
DEUTSCH
DEUTSCH
ENGLISH
DEUTSCH
DEUTSCH
Basic functions
To switch the instrument on and off, press the button ON/ OFF/ MENU button and keep it pressed
for 3 seconds.
Once the instrument is switched on, press the MENU button for 1 second in order to call up the
display that sets up the basic functions. The selection options of “Image Registration”, “Images”,
“Colour Palette”, “Emissivity” and “Settings” are now displayed. To display the other menu
options, press the arrow buttons. Press MENU to return to the normal measuring mode.
After activating the MENU button in the basic function mode, press the SELECT/ENTER button in
order to execute the settings of the basic functions. Using the arrow buttons select the desired
value for the respective setting.
Once the desired settings have been executed, press the MENU button to exit the Settings mode.
On the main display the lowest row (MIN/MAX and Time) is faded out by pressing on the “Up”
arrow button.
Measurement
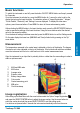
The temperature measured in the central area is indicated on the top of the display. The degree
of emission set is also indicated on the top of the display. If the hot and cold marks are activated,
move the instrument until the hot or cold location is in the central measurement area.
Align the instrument to an object that is probably hotter or colder than the surroundings in order to
attain an optimum result.
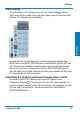
1 MAX and MIN value
2 MAX value
3 Average value
4 Emission value
5 Battery charge status
6 Colour scale
7 Central measuring point
8 MIN value
9 Clock/time stamp
Image registration
After calling up the Main Menu with the arrow buttons select the Option “Image Registration ”
and press the SELECT/ENTER button to adjust the image overlay. Use the arrow buttons to
select the overlay level and then press SELECT/ENTER to exit the editing mode.
It no buttons are pressed after 6 seconds the instrument automatically exits from the menu.