
User Manual


5 First steps
21
4. Turn the lens lock ring clockwise to the stop.
Always store lenses not in use in the container designed for this in
the case.
> Turn the lens ring clockwise to the stop, place the lens in the
container and close it.
The following steps are only relevant for USA:
5. Note or remember the serial number (Serial no.) which is
displayed on the lens.
6. Press [ ].
If you have changed from a wide-angle to a telephoto lens or vice
versa:
- The information No lens/wrong lens appears.
> Press [OK] to confirm the information.
If you have changed between two wide-angle or two telephoto
lenses:
> [OK] | Configuration… | [OK] | Optics… | [OK].
- The dialog Optics opens.
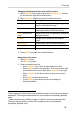
7. Move joystick up/down to select the lens used.
- The lens selected is outlined in orange.
8. Press function key [Apply].
- The information Restart instrument appears.
9. Press [
].
- The instrument switches off.
> To switch on the instrument: Press [ ].
Switch the imager on/off
1. Remove protection cap from the lens.
2. Press [ ].
- The start screen appears on the display. The type designation
of the imager and the firmware version are shown.
- The measurement view is opened after the warm-up period.
- The imager performs an automatic zeroing approx. every 60
sec. This can be recognized by means of a "click". The image is
frozen briefly when this occurs.
> To switch off: Press [
].
- The display goes out and the imager is switched off.
Manually focusing the image
> Turn Rotating ring of the lens until the image is in focus.