
User Manual


5 First steps
20
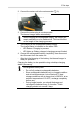
mounting or removing the high-temperature filter, otherwise the
specified measuring accuracy is not ensured
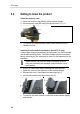
Mount tripod adapter
Using the included tripod adapter, the imager can be fastened to
the testo tripod (accessory) or to a commercially available standard
tripod. With the tripod adapter mounted, the battery cannot be
changed!
1. Place the tripod adapter on the lower end of the handle and
screw on using the included Allen key (ISO 2936, size 4).
2. Slide thermal imager into the fastening plate of the testo tripod
and lock or fasten it to the commercially available standard
tripod (screw-type fastening).
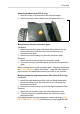
Mounting Softcase
The Softcase combines the functions of instrument protection, Sun
Shield and carrying function (strap).
1. Set the Softcase on the imager from above (1) and pull both
sides of the Softcase down around the display (2).
2. Guide Velcro strip through the two plates (3) and close (4).
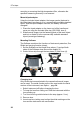
Changing lens
Only lenses that were adjusted to the respective thermal imager
can be used. The serial number on the lens must match the serial
number of the instrument, see Optics..., page 34.
> Switch instrument off before changing the lens.
> To keep the lens from falling out: Hold the instrument with the
lens pointing up.
1. Turn lens lock ring anticlockwise to the stop (approx. 2 cm).
2. Remove lens.
3. Insert new lens, taking care to align the white markings on the
lens and the instrument with one another.