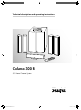
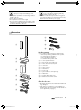
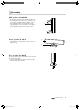
Technical description and operating instructions gb was here Columa 300 R 5.1 Home Cinema System 91497 GB 20120227.indd 1 27.02.
Contents General notes and information . . . . . . . . . . . . . . . . . . . 3 Safety notes . . . . . . . . . . . . . . . . . . . . . . . . . . . . . . . . . 4 Special function buttons . . . . . . . . . . . . . . . . . . . . . . . 16 Surround mode. . . . . . . . . . . . . . . . . . . . . . . . . 16 Dolby Digital 5.1 and DTS . . . . . . . . . . . . . . . . . 16 Overview . . . . . . . . . . . . . . . . . . . . . . . . . . . . . . . . . . . 5 Test tone . . . . . . . . . . . . . . . . . . . . . . . . . . . .
General notes and information Notice The information in this document may be changed without prior notice and in no way constitutes any liability on the part of Lautsprecher Teufel GmbH. No part of these instructions may be reproduced in any form or be broadcasted in any way electronically, mechanically, by photocopy or recording without the written permission of Lautsprecher Teufel GmbH. © Lautsprecher Teufel GmbH Version 1.
Safety notes Caution icons You will find the following caution icons used in these instructions: Danger High risk! Failure to observe the warning may result in severe personal injury or death. Attention Moderate risk! Failure to observe the warning may result in property damage. Minor risk! Points which should be observed when handling the unit. Safety notes Danger Risk of electric shock! Faulty installation of electrical equipment or mains voltage which is too high can cause electric shocks.
Attention Fire hazard! Improper use may lead to damage or fire. • Do not place open flames such as burning candles or similar on the unit. • Ensure sufficient ventilation. • Do not place the unit in direct sunlight. • Do not cover the ventilation slots with curtains, cloths, newspapers or similar. Heat build-up inside the unit can shorten the lifetime of the unit. Attention Risk of damage! Power overload due to lightning strike may damage or destroy the unit.
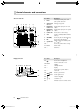
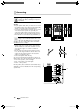
Control elements and connections Pos Name Subwoofer back side 1 2 3 4 5 6 7 1 Phase Activate/deactivate phase shift (180°) of the subwoofer 2 Analog Input Aux 1 - 3 Analogue input jacks 3 Digital Input Coaxial 1 - 2 Digital audio input jacks for coax cables 4 Digital Input Optical 1 - 2 Digital audio input jacks for optical cables 5 Control Unit Connector for control unit 햶 6 Auto Switch to enable/disable automatic wake-up 7 AM GND/+ Connector jacks for AM antenna 햸 8 FM Conne
Remote control 32 Pos Name Description 23 Mute speakers 23 24 0…9 Number and function buttons 24 25 Test/Mem 31 30 Activate test tone/store station to memory slots 25 26 ◀/▶ Set buttons left/right 29 26 27 27 OK Select button 28 Front L. ... Side R. Adjust channel level 28 29 +/– Set buttons +/– 30 Mode Select surround/stereo mode 31 Presets/Frequ. In Radio mode: Select station memory slot or tuning frequency 32 Turn the subwoofer on or to standby Remote control Two 1.
Setup Setup tips • Select a stable, level base. • Make sure that the environment is clean and free of dust. • Avoid placing the unit close to sources of heat or in direct sunlight. • Do not place any heavy objects on the cables or the speakers.
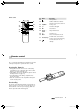
Assembly Wall speakers CL 300 FCR • The brackets on the back of the satellite speakers are for mounting them on a wall or on a support foot. You can purchase installation materials (cables, support feet, wall brackets and resonance dampers) especially designed for to these speakers in our webshop (www.teufelaudio.com) in the “Accessories” area. Center speaker CL 300 C 햲 햳 • Simply place the center speaker 햳 on the enclosed support foot 햴.
Connecting Danger Danger of injury/damage! Arrange the cables so that they do not pose a trip hazard. Speakers • Lay the speaker cables from your subwoofer to each of the satellite speakers. This cable should be high-quality double-core speaker cable with marked wires. • A connector terminal with two terminal clips is located on the back of each speaker. You optionally can connect the speaker cables using pin plugs. Here we describe the direct connection without using pin plugs.
Antennas Danger Risk associated with lightning strike! If you are using outdoor or roof antennas, be absolutely sure that the antenna is equipped with a lightning rod. FM antenna Connect the antenna for receiving FM stations to the jack 8 “FM”. This can be a roof/outdoor antenna or a cable television connection. You will need a coaxial cable for this. If an antenna connection is not available at your setup location, you can use the enclosed throw-out aerial 햻.
Inputs for source devices 2 3 4 The subwoofer offers you three inputs for analogue source devices (Aux 1 – 3) as well as two optical and two coaxial digital sound inputs. AUX 1, AUX 2 and AUX 3 You can connect three source devices with analogue sound to the jacks 2. To do so, you will need a double RCA cable (L and R) for each device. Coaxial 1 + 2 You can connect the coaxial digital sound outputs from two different source devices to the jacks 3.
Basic functions Activating and deactivating • With the mains switch 11 “Power” on the back of the device you can switch your subwoofer on and off. After activation, the device is in standby mode and the indicator 15 lights up in red. • With the button 14 “Power” or 32 “ ” you can switch your subwoofer to operating and/or standby mode. 11 Automatic activation With the switch 6 “Auto” you can enable automatic activation: On The subwoofer switches on when an audio signal is detected at the input “Aux 1”.
Menu functions Set the different subwoofer functions using the menu. You can navigate through the menu as follows: • Push the select button 20 and/or 27 “OK”. The main menu will appear in the display 16. • Select the desired submenu with the set buttons 21 and/or 26 “◀/▶” and push the select button 20 and/or 27 “OK”. The submenu will open and you can change the values with the set buttons 21 and/or 26 “◀/▶“. • With the select button 20 and/or 27 “OK” you apply the setting.
“DELAY” menu When the speakers are located at different distances to the listening position, the surround sound may be compromised. To compensate such run-time differences, you can set a slight delay in the signal for the center and both rear channels in relation to the two stereo channels front left/right here. • Measure the distance from the listening position to the front speakers. • Measure the distance from the listening position to the center speaker.
Special function buttons Surround mode With the button 30 “Mode” you can select the surround mode in this order: PLII Movie Dolby ProLogic II for movies PLII Music Dolby ProLogic II for music 5.1 Stereo Stereo via all channels 2.1 Stereo Stereo via front left/right and subwoofer Some options may not be available if not all satellite speakers are connected. Dolby Digital 5.
Radio playback Select one of the two radio frequency modes (FM/AM) as source (see page 12): FM – Reception of stereo and mono stations in the range of 87.5 to 108 MHz, RDS mode is possible. AM – Reception of mono stations in the range of 522 to 1,629 kHz. 24 Setting the radio stations Direct entry of the tuning frequency: • Tip the button 31 “Presets/Frequ.” twice so that the tuning frequency appears in the display panel.
Care and cleaning Clean the subwoofer and the satellites regularly with a soft, damp microfiber cloth. When doing so, please be absolutely sure to observe the following instructions: Danger Risk of electric shock! In contact with live parts, water can lead to electric shock or short circuit. • Make sure that no liquid penetrates the unit. • Disconnect the mains plug before cleaning. Attention Risk of damage! Using the wrong cleaning materials may damage the delicate surface of the case.
Troubleshooting The following instructions should help you to solve problems. If this doesn’t work, please contact our hotline (see page 3). Mind the warranty instructions. Problem The subwoofer doesn’t work, the power LED 14 or the display panel are not illuminated. Possible cause The subwoofer is switched off or doesn’t have any power. Solution Turn on the switch 11 (“On I”). Check the mains cord and socket. Fuse is defective. Replace the fuse: Disconnect the mains cord.
Trademarks Dolby DTS Manufactured under license from Dolby Laboratories. Dolby, Pro Logic, and the double-D symbol are trademarks of Dolby Laboratories. Manufactured under license under U.S. Patent#’s: 5,451,942; 5,956,674; 5,974,380; 5,978,762; 6,487,535 & other U.S. and worldwide patents issued & pending. DTS and DTS Digital Surround are registered trademarks and the DTS logos and Symbol are trademarks of DTS, Inc. ©1996-2009 DTS, Inc. All Rights Reserved.