
Installation Guide

What’s in the box?
The following items are included in the delivery:
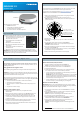
• EXPLORER 323 terminal
• Combined DC power and Ethernet cable, 6 m
• 3 pcs M6 mounting bolts and washers
• Torx bit for the screws for the SIM compartment
EXPLORER 323
Installation guide
Power and Ethernet (LAN) connection
1. Take the combined 6 m cable supplied with the EXPLORER 323.
NOTE: If you are using a longer cable, you must use 24 VDC power.
2. Connect the end with the circular connector to the EXPLORER 323.
3. Lead the cable inside the car.
4. Connect the other end of the cable according to your conguration. You may
use a connection box or mount connectors directly on the cable.
• Connect the power wires (red and black) to the vehicle’s battery power. For pin
allocation and wire colors see the next page.
IMPORTANT: There is a risk of draining the vehicle’s battery. It is recommended
to connect the blue Ignition on/off wire to the ignition of the vehicle and then
enable the Ignition function in the built-in web interface. With this function, the
terminal will only be on when the Ignition is on.
• Connect the Ethernet wires, e.g. via the Connection box, to the EXPLORER 3647A,
to a switch or directly to your PC, depending on your conguration.
Wireless connection (WLAN)
IMPORTANT: Before you can use the WLAN interface you must connect a computer
using a LAN cable, access the built-in web interface and enable and congure the WLAN
interface. When WLAN is enabled and congured, do as follows:
1. Start the ignition of the vehicle to switch on the EXPLORER 323 (if connected
to the ignition).
2. Place your WLAN-enabled device (computer, tablet or smartphone) close to the
EXPLORER 323 (max. 50 m with free line of sight).
NOTE: The reception of the WLAN signal is reduced inside the vehicle.
3. On your device, search for available WLAN networks.
4. Select the EXPLORER 323 WLAN access point when it appears in your list of
available wireless networks. The default name is EXPLORER323.
5. Enter the password. By default the password is the serial number of your
EXPLORER 323
1
and the encoding type is WPA2-AES.
NOTE: We recommend changing the password in the WLAN page of the web
interface.
1 You nd the serial number on the label on the bottom side of the EXPLORER 323
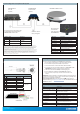
Step 3: Connect the system
For best performance, mount the EXPLORER 323 in the center of the roof, with 10 mm
space between roof and terminal and with free line of sight in all directions.
For details, see the User & Installation Manual in https://sync.cobham.com/ (select
Products and search for EXPLORER 323 manual).
1. Make sure the material of the mounting surface is strong enough to hold the
antenna during the intended use.
2. Use the drawing below to mark the position of the holes in the roof.
NOTE: Remember to check the wanted position of the cable compared to the
position of the holes!
320 mm
10 mm
87 mm
224 mm (Mounting holes)
120
120
120
3 pcs. M6 x 25 mm
This length suits a panel
thickness of 2-6 mm
3. Drill the 3 holes.
4. Depending on your conguration, you may want to drill a fourth hole for the
cable as well.
5. Use the 3 plastic spacers that are mounted on the EXPLORER 323.
IMPORTANT: Make sure there is 10 mm of space between any part of the
EXPLORER 323 bottom and the roof.
6. Mount the supplied bolts through the roof and spacers and into the bushings in
the bottom of the EXPLORER 323.
7. The length of the bolts suit a panel thickness of 2-6 mm. If you have a different
panel thickness, use longer or shorter M6 bolts.
8. Make sure that all mounting bolts and nuts are secured properly.
Step 2a: Installation instructions, with bolts
EXPLORER 323
We recommend mounting the antenna with bolts through the roof instead of
using the magnetic mount kit. However, if you want a temporary installation, you can
use the magnetic mount kit.
Safety guidelines for magnetic mount
Note the following safety guidelines for mounting the antenna with magnetic mounts:
WARNING! Do not place your ngers underneath the antenna when placing the antenna
on the vehicle! The magnetic force is very powerful and your ngers may be hurt if they are
caught between the antenna and the mounting surface.
Under normal driving circumstances the magnetic force of the magnetic mount kit for the
antenna should be sufcient to hold the antenna. However, the magnets may not be able
to hold the antenna in place, if:
• the vehicle is involved in an accident or similar extreme conditions,
• the magnets are not mounted properly,
• the roof is not plain or is made of a material that will not stick properly to the
magnets,
• the speed of the vehicle is too high
Mounting with magnetic mount
1. Acquire a magnetic mount solution from your supplier (order number
403723A-009).
2. Remove the 3 plastic spacers from the bottom of the EXPLORER 323 and mount
the magnets according to the installation guide included with the magnets.
3. Wipe the roof surface clean before you place the terminal on the roof, in order
to make a better connection between the magnets and the roof and to avoid
scratches in the surface.
4. Carefully place the terminal with the magnets in the center of the car roof. Note
that the car roof must be at and made of magnetizable material!
5. Check that all 3 magnets are rmly attached and that there is 10 mm free space
under the bottom of the terminal.
The SIM card is placed in the SIM compartment on the bottom side of the terminal.
1. Use the included Torx bit to unscrew the 3 screws
for the SIM compartment and remove the cover.
Keep screws and cover for later.
2. Locate the SIM holder in the middle of the
compartment.
3. Slide the lock to release the SIM holder.
4. Lift the end of the SIM holder and insert the SIM
card as shown.
5. Lower the SIM card holder with the SIM card
inserted and lock it.
6. Remount the small cover and use the included Torx bit to fasten the 3 screws.
IMPORTANT: Before you install the terminal, note the serial number from the label
on the bottom side of the terminal. You will need it if you want to connect to the terminal
using WLAN and/or if you log into the web interface as user.
Step 1: Insert SIM
Step 2b: Installation instructions, Magnetic mount