
Datasheet


www.ti.com
Quick Start
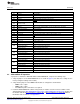
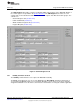
Table 1. ADS1x98ECG-FE Default Jumper/Switch Configuration
Jumper Default Position Description
JP1 Installed RLD feedback
JP2 Installed 1-2 AVDD selected for bipolar supply operation selected (AVDD = +2.5V)
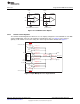
JP3 Header Not Installed External Vref buffer not connected
JP4 Installed EVM +5V provided from J4 (power header)
JP5 Open PWDN pin controlled from J5 header (pulled up to DVDD)
JP6 to Header Not Installed (Pins 1-2
DC-coupled input signals
JP14 shorted on PCB)
JP15 Installed 2-3 Shield drive is open
JP16 Installed Wilson Central Terminal (WCT) connected to INM for CH1 and CH4-8
JP17 Header Not Installed ECG shield drive
JP18 Installed 2-3 CLK connected to OSC1
JP19 Installed 1-2 OSC1 enabled
JP20 Installed 2-3 AVSS selected for bipolar supply operation (AVSS = -2.5V)
JP21 Installed 1-2 CS connected to DSP via J3.1
JP22 Installed 2-3 START comes from J3.14
JP23 Installed 1-2 CLKSEL set to 0 (ADS1198 uses Ext Master Clock (OSC1))
JP24 Installed 2-3 DVDD supply = 3.3V
JP25 Header Not Installed No external reference selected
Installed 1-2 (top) WCT connected to CH8- input
JP26
Installed 3-4 (bottom) ECG_V1 connected to CH8+ input
Installed 1-2 (top) WCT connected to CH7- input
JP27
Installed 3-4 (bottom) ECG_V5 connected to CH7+ input
Installed 1-2 (top) WCT connected to CH6- input
JP28
Installed 3-4 (bottom) ECG_V3 connected to CH5+ input
Installed 1-2 (top) WCT connected to CH5- input
JP29
Installed 3-4 (bottom) ECG_V4 connected to CH6+ input
Installed 1-2 (top) WCT connected to CH4- input
JP30
Installed 3-4 (bottom) ECG_V2 connected to CH4+ input
Installed 1-2 (top) ECG_RA connected to CH3- input
JP31
Installed 3-4 (bottom) ECG_LL connected to CH3+ input
Installed 1-2 (top) ECG_RA connected to CH2- input
JP32
Installed 3-4 (bottom) ECG_ LA connected to CH2+ input
Installed 1-2 (top) WCT connected to CH1- input
JP33
Installed 3-4 (bottom) ECG_V6 connected to CH1+ input
2.2 ADS1x98ECG-FE Operation
To prepare to evaluate the ADS1298 with the ADS1298ECG-FE, complete the following steps:
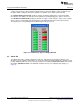
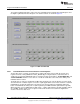
1. Verify the jumpers on the ADS1298ECG-FE are as shown in Figure 2 (note that these settings are the
factory-configured settings for the board).
2. Verify that the jumpers on the MMB0 motherboard are configured as shown below:
• MMB0 J13A → Open
• MMB0 J13B → Open
• No additional power connections are required
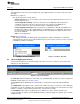
3. Install the ADS1298ECG-FE software using the latest software version. The latest software can be
downloaded from the ADS1298ECG-FE product page or ADS1198ECG-FE product page. Double click
the installer and follow the instruction to complete the software installation. For detailed installation
information and screenshots, see Appendix C.
11
SBAU171C–May 2010–Revised September 2012 ADS1298ECG-FE/ADS1198ECG-FE
Submit Documentation Feedback
Copyright © 2010–2012, Texas Instruments Incorporated