
User's Guide
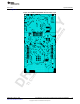

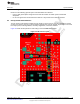


Table Of Contents
- CC3235MODSF SimpleLink™ Wi-Fi® and IoT Solution With MCU LaunchPad™ Hardware
- Table of Contents
- 1 Introduction
- 2 Hardware
- 2.1 Block Diagram
- 2.2 Hardware Features
- 2.2.1 Key Benefits
- 2.2.2 XDS110-Based Onboard Debug Probe
- 2.2.3 Debug Probe Connection: Isolation Jumper Block
- 2.2.4 Application (or "Backchannel") UART
- 2.2.5 JTAG Headers
- 2.2.6 Using the XDS110 Debug Probe with a Different Target
- 2.2.7 Power Connections
- 2.2.8 Reset Pullup Jumper
- 2.2.9 Clocking
- 2.2.10 I2C Connection
- 2.2.11 Sense on Power (SOP)
- 2.2.12 Push-Buttons and LED Indicators
- 2.3 Electrical Characteristics
- 2.4 Antenna Characteristics
- 2.5 BoosterPack™ Header Pin Assignment
- 3 Layout Guidelines
- 4 Operational Setup and Testing
- 5 Development Environment Requirements
- 6 Additional Resources
- 7 Assembly Drawing and Schematics
- Revision History
- Important Notice

TI Confidential – NDA Restrictions
Operational Setup and Testing
www.ti.com
40
SWRU548A–February 2019
Submit Documentation Feedback
Copyright © 2019, Texas Instruments Incorporated
CC3235MODSF LaunchPad™ Development Kit (LAUNCHCC3235MOD)
4.3 Design Files
4.3.1 Hardware Design Files
Schematics can be found in Section 7.2.All design files, including schematics, layout, Bill of Materials
(BOM), Gerber files, and documentation are available for download from LAUNCHCC3235MOD.
4.4 Software
All design files, including firmware patches, software example projects, and documentation are available
from the CC3235 Software Development Kit. Inside of the SDK, a set of very simple CC3235 code
examples can be found that demonstrates how to use the entire set of CC3235 peripherals. When starting
a new project or adding a new peripheral, these examples serve as a great starting point.
5 Development Environment Requirements
The following software examples with the LaunchPad require an integrated development environment
(IDE) that supports the CC3235MOD.
The CC313x and CC323x SimpleLink™ Wi-Fi
®
Embedded Programming User's Guide has detailed
information about software environment setup with examples. See this document for further details on the
software sample examples.
5.1 CCS
CCS 6.0 or higher is required. When CCS is launched, and a workspace directory is chosen, use
Project → Import Existing CCS Eclipse Project. Direct it to the desired demo project directory containing
main.c.
5.2 IAR
IAR 6.70 or higher is required. To open the demo in IAR, choose File → Open → Workspace…, and direct
it to the *.eww workspace file inside the \IAR subdirectory of the desired demo. All workspace information
is within this file.
The subdirectory also has an *.ewp project file; this file can be opened into an existing workspace, using
Project → Add-Existing-Project….