
Datasheet

© 2013 Texas Instruments Incorporated. The platform bar, Hercules and Code Composer Studio are
trademarks of Texas Instruments. All other trademarks are the property of their respective owners.
SPNU588
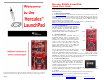
Hercules RM42x LaunchPad
Quick Start Guide
Welcome to the Hercules RM42x LaunchPad Evaluation Kit. The Hercules LaunchPad is a USB-
based evaluation platform that provides everything you need to start evaluation and development
with Hercules MCUs.
1. Software and Driver Installation
Go to www.ti.com/launchpad. Select Launchpads tab and then select Hercules. Here you can
download and install Code Composer Studio™ (CCS). This will install the necessary drivers for
LaunchPad. If you choose the custom install option of CCS, select ‘Cortex-R4F MCUs’ support at
a minimum. Select 'Free CCS License – For use with XDS100 emulators'. Note: Complete the
CCS installation before connecting the board.
Additional software and documentation can be found on the Hercules LaunchPad wiki page:
http://processors.wiki.ti.com/index.php/Hercules_LaunchPad
2. Connecting the Hardware
Connect the LaunchPad using the included USB cable to
a Windows PC (XP or 7). The board will be powered via
the PC's USB port. If prompted, allow Windows to
automatically install the driver software for the on-board
XDS100v2 JTAG emulator and the Virtual COM Port.
3. Quick Start Application
The MCU on the Hercules LaunchPad comes pre-
programmed with the Hercules Safety MCU Demo
Software. This software can be used stand alone on the
LaunchPad or in conjunction with the PC application
shown in section 4 of this guide. When the board is
powered on via the USB port the demo software will
show a startup blinking sequence on the GIOA2 and
NHET08 LEDs. The demo also lets you toggle the
GIOA2 LED through the push button GIOA7.
You can start learning about the Hercules MCU’s built-in
safety features right out of the box. Inject an Oscillator
fault by connecting OSCIN to GND (close jumper JP1).
Upon detecting the fault, on-board Hercules MCU will respond by asserting the error pin
(nERROR) low, indicated by the red LED on the bottom right corner of the board. Note: Open
jumper JP1 and reset the board before continuing with other demos.
4. Hercules Safety MCU Demos
Go to the Hercules LaunchPad wiki page to download and install
the Hercules Safety MCU Demos. Once the installation is
complete, start the Hercules demo software. The software will be
available in ‘Start->All Programs->Texas Instruments->Hercules-
>Hercules Safety MCU Demos'.
It includes a safety features demo and other demos using LEDs and ambient light sensor that let
you interact with and learn about features on Hercules MCUs.
5. Project 0
When you are ready to take the next step, complete Project 0. For more information go to
www.ti.com/launchpad and click on the Project 0 link for Hercules LaunchPad.
Explore LaunchPad BoosterPacks at www.ti.com/boosterpacks
Watch Hercules ‘How-to’ videos at www.ti.com/herculestraining. Technical support: www.ti.com/hercules-support