
User Manual
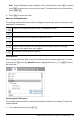


Table Of Contents
- Getting Started with TI-Nspire™ CX II Handhelds
- About Math Modes
- TI-Nspire™ CX II Handheld Keys
- Preparing the TI-Nspire™ CX II Handheld for Use
- Turning On the TI-Nspire™ CX II Handheld for the First Time
- Adjusting the Brightness of the Backlighting
- Using the TI-Nspire™ Touchpad
- Understanding the Scratchpad
- Using the Home Screen
- The TI-Nspire™ CX II Handheld Screen
- Using Hints
- Using Keyboard Shortcuts
- Using the Scratchpad
- Working with Documents on TI-Nspire™ CX II Handhelds
- Opening a Document
- Creating a New Document
- Saving Documents
- Working with Applications
- Using the Application Menu
- Context Menus
- Working with Problems and Pages
- Adding a Problem to a Document
- Viewing and Reordering Pages in a Document
- Copying, Pasting, and Deleting Problems
- Renaming a Problem
- Adding a Page to a Problem
- Moving Through Pages in a Document
- Managing Documents
- Closing a Document
- Understanding the TI-Nspire™ Tools
- Working with Images
- Working in a TI-Nspire™ CX Premium Teacher Software Classroom
- Configuring Handhelds
- Checking Battery Status
- Recharging the Handheld
- Changing Handheld Settings
- Changing a Preferred Language
- Customizing the Handheld Setup
- Customizing Document Settings
- Customizing Graphs & Geometry Settings
- Viewing Handheld Status
- Replacing TI-Nspire™ Rechargeable Batteries
- Precautions for Rechargeable Batteries
- Connecting Handhelds and Transferring Files
- File Management
- Updating the Handheld Operating System
- General Information

Note: If you open a new document, you will be prompted to save and close the
current document.
5. Press / V.
Note: If pasting an image into the Graphs & Geometry application, press ·, and
then press / V.
The image is copied to the page in the document.
Repositioning an Image
Complete the following steps to reposition an image on a page.
1. Open the document and navigate to the page that contains the image.
2. Select the image.
• In the Question or Notes applications, move the cursor over the image, and
then press, hold, and release x. The image appears shaded.
• In the Graphs & Geometry application, press b 1 2 2.
• In the Data & Statistics application, press b 3 6.
A border appears around the image.
3. Move the image.
• In the Question or Notes applications, move the cursor to the new location and
press x.
• In the Graphs & Geometry or Data & Statistics applications:
- Press and hold x until the cursor changes to a four-sided arrow ( ).
The image floats in the background and the border changes to a dashed
line.
- Move your finger over the Touchpad to move the image to the new
location, and then press x or · to place the image.
Resizing an Image
Complete the following steps to resize an image on a page.
1. Open the document that contains the image.
2. Select the image.
• In the Question or Notes applications, or in Quick Poll, move the cursor over the
image and press, hold, and then release x. The image appears shaded.
• In the Graphs & Geometry application, press b 1 2 2.
• In the Data & Statistics application, press b 3 6.
A border appears around the image.
Working with Images 51