
User manual
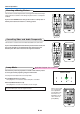
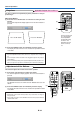
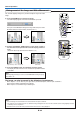
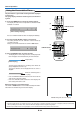


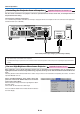
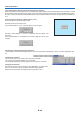

Table Of Contents
- INDEX
- English
- IMPORTANT SAFETY INFORMATION
- Major Features
- Table of Contents
- Checking the Supplied Accessories
- Names of the Main Unit Parts
- Names of the Remote Control Parts/Preparing the Remote Control
- The Procedure Up to Projecting to the Screen
- Placement Guide
- Connecting Personal Computers and Video Equipment
- Power Cable Connections and Switching the Power On/Off
- Adjustment of the Projection Screen
- General Operation
- Input Selection
- Automatic Adjustment
- Selection of Aspect Ratio
- Freezing a Moving Picture
- Cancelling Video and Audio Temporarily
- Lamp Mode
- Keystone
- Adjustment of the Volume
- Enlargement of the Image and Video Movement
- Using the Presentation Timer
- Using the Laser Pointer
- Performing Mouse Operations on the Computer with the Remote Control Unit
- Controlling the Projector from a Computer
- Use as a High-Brightness Monochrome Projector
- Protecting the Projector with the Security Lock
- Using the Quick Menu
- Menu Operation Method
- Image
- Color
- View
- Setup
- Option
- Info.
- When an Indicator is Lit or Flashing
- Troubleshooting
- Cleaning
- Replacing the Lamp Cartridge
- Specifications
- Table of Supported Frequency
- Cabinet Dimensions

E-33
General Operation
Using the Presentation Timer
Note:
* The timer display will be closed while the menu or the quick menu is displayed, and while a message is displayed; however, the timer will
still be operating at such times. Also, the timer will not be displayed unless a signal is being input.
* While the presentation timer is being displayed, screen movement will not be possible in the zoom mode.
RGB
STANDBY
VIDEO
FREEZE
MUTE
ECO AUTO
ASPECT
VOL KSTN ZOOM
CANCEL QUICK
MENU
Q
1234
FREEZE
MUTE
LASER
AUTO
VOL
ZOOM
RGB
VIDEO
R-CLICK/
CANCEL
QUICKMENU
STANDBY
Q
12
34
TIMER
ENTER
TIMER
ENTER
[Timer settings display]
The presentation is given while checking the timer displayed
on the screen.
The gauge display allows the remaining time to be known at
a glance.
(1) Press the TIMER button to show the settings display.
The display will close when an operation has not been made
for about 10 seconds.
Press the CANCEL button to close the display immediately.
(2) Use the 왗 and 왘 SELECT buttons to set the time.
The setting contents are “Off” and from 10 to 60 minutes (in
10-minute intervals)
Settings can also be made with the SELECT 왗왘 buttons.
Gauge (Blue)
• Press the ENTER button to restart the timer. The timer will
start with the same time setting.
• Press the CANCEL button to close the timer display. The
timer setting will return to “Off”.
Moving the Position of the Timer Display
The SELECT 왖왔왗왘 buttons on the remote control permit move-
ment within the movable range of the timer display.
(3) Press the ENTER button and start the timer.
• The display of the timer setting will close, the display of the
timer will appear and simultaneously the timer will start.
The blue gauge indicates the remaining time. When the
gauge disappears,the time is up.
The gauge continues to be displayed when the timer is
stopped.
[Timer Display]
When the remaining time is
“0” (Gray)
Movable Range of the Timer Display
(1)
(2)
(3)
(1)
(2)
(3)
CANCEL button
CANCEL button