
user manual
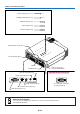
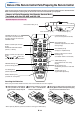
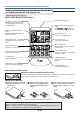

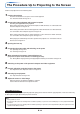
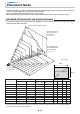
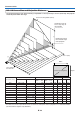
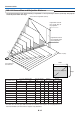
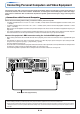
Table Of Contents
- INDEX
- English
- IMPORTANT SAFETY INFORMATION
- Major Features
- Table of Contents
- Checking the Supplied Accessories
- Names of the Main Unit Parts
- Names of the Remote Control Parts/Preparing the Remote Control
- The Procedure Up to Projecting to the Screen
- Placement Guide
- Connecting Personal Computers and Video Equipment
- Power Cable Connections and Switching the Power On/Off
- Adjustment of the Projection Screen
- General Operation
- Input Selection
- Automatic Adjustment
- Selection of Aspect Ratio
- Freezing a Moving Picture
- Cancelling Video and Audio Temporarily
- Lamp Mode
- Keystone
- Adjustment of the Volume
- Enlargement of the Image and Video Movement
- Using the Presentation Timer
- Using the Laser Pointer
- Performing Mouse Operations on the Computer with the Remote Control Unit
- Controlling the Projector from a Computer
- Use as a High-Brightness Monochrome Projector
- Protecting the Projector with the Security Lock
- Using the Quick Menu
- Menu Operation Method
- Image
- Color
- View
- Setup
- Option
- Info.
- When an Indicator is Lit or Flashing
- Troubleshooting
- Cleaning
- Replacing the Lamp Cartridge
- Specifications
- Table of Supported Frequency
- Cabinet Dimensions

E-11
FREEZE
MUTE
LASER
AUTO
TIMER
VOL
ZOOM
RGB
VIDEO
R-CLICK/
CANCEL
QUICKMENU
ENTER
STANDBY
Q
12
34
Names of the Remote Control Parts/Preparing the Remote Control
Infrared transmitter [E-13]
VOL button [E-31]
(Volume adjustment)
STANDBY button [E-23, 25]
This button is used to switch ON
the power aand set the unit to the
STANDBY mode.
AUTO button [E-28]
(Automatic adjustment of the RGB
moving image)
Buttons used for menu operations
[E-40]
The , , and buttons are
the select (왖, 왔, 왗 and 왘) buttons.
Applicable Projector: U5-232/U5-132
There are two types of remote control units included with the U5 series of projectors. Both types are described below.
Refer to the description (and diagram) for the remote control unit included with your projector.
Names of Parts/Preparing the Remote Control Unit
Included with the U5-232 and U5-132
Laser transmitter [E-34] L-CLICK button [E-35]
FREEZE button [E-30]
(Freezes moving pictures)
MUTE button [E-30]
(Temporarily cancels the video and
audio)
TIMER button [E-33]
(Presentation timer time setting
display)
ZOOM button [E-32]
(Digital zoom adjustment)
Buttons used for input selection
[E-28]
RGB button and VIDEO button
(VIDEO / S-VIDEO)
LASER button [E-34]
(Turns the laser point on and off)
QUICK button [E-39]
(Displays a simplified menu)
Buttons used for the PC mouse
function [E-35]
(JOG button and R-CLICK button)
Number buttons [E-37]
(Used for the security lock.)
Inserting the Batteries
When using the remote control for the first time, install the batteries that were supplied.
(B)
(C)
(A)
2
Insert the batteries to match
the "+" and "–" as indicated in-
side the compartment.
1
Slide the battery compartment
cover (located on the bottom
of the remote control) and pull
off.
3
(A) Leaving a little space in the front, close
the lid, (B) then with the back pressed tightly,
(C) press the lid towards the front.
* When replacing batteries, purchase two of the same type of AAA battery.