TI-Navigator™ Installation Guide _____________________________________________ Write the System ID number here. The number is printed inside the case for the CD.
Important Information Texas Instruments makes no warranty, either express or implied, including but not limited to any implied warranties of merchantability and fitness for a particular purpose, regarding any programs or book materials and makes such materials available solely on an "as-is" basis.
will not occur in a particular installation. If this equipment does cause harmful interference to radio or television reception, which can be determined by turning the equipment off and on, the user is encouraged to try to correct the interference by one or more of the following measures: • Reorient or relocate the receiving antenna. • Increase the separation between the equipment and receiver. • Connect the equipment into an outlet on a circuit different from that to which the receiver is connected.
Canadian IC Information Product Name: TI-Navigator™ IC ID: 451E-TINAVAP Model Number/Name: NAV-AP-US Product Name: TI-Navigator™ IC ID: 4773A-CX6601B Model Number/Name: Network Hub Industry Canada Statement: Operation is subject to the following two conditions in Canada: 1. this device may not cause interference, and 2. this device must accept any interference, including interference that may cause undesired operation of the device To prevent radio interference to the licensed service (i.e.
Declaration of Conformity Marking by this symbol: indicates compliance with the Essential Requirements of the R&TTE Directive of the European Union (1999/5/EC). This equipment meets the following conformance standards: Safety: EN 60950-1:2001 + A11:2004 EMC: EN 55022:2006, EN 55024:1998 + A1:2001 + A2:2003, EN 301-489-1 v1.7.1, EN 301-489-17 v1.3.2, CISPR22:1997, CISPR24 Including: EN 61000-3-2, -3-3, -4-2, -4-3, -4-4, -4-5, -4-6 and -4-11.
Dansk Undertegnede Texas Instruments erklærer herved, at følgende udstyr TI-Navigator™ Access Point overholder de væsentlige krav og øvrige relevante krav i direktiv 1999/5/EF. Overensstemmelsesdirektivet (Declaration of Conformity) kan findes på Product Stewardship siden på education.ti.com. Norsk Texas Instruments erklærer herved at utstyret TI-Navigator™ Access Point er i samsvar med de grunnleggende krav og øvrige relevante krav i direktiv 1999/5/EF.
Italiano Con la presente Texas Instruments dichiara che questo TI-Navigator™ Access Point è conforme ai requisiti essenziali ed alle altre disposizioni pertinenti stabilite dalla direttiva 1999/5/CE. La dichiarazione di conformità può essere consultata sulla pagina Product Stewardship del sito education.ti.com. Nederlands Hierbij verklaart Texas Instruments dat het toestel TI-Navigator™ Access Point in overeenstemming is met de essentiële eisen en de andere relevante bepalingen van richtlijn 1999/5/EG.
Countries of Operation and Restrictions of Use in the European Community Operation Using the 2.400 to 2.4835 GHz Channels in the European Community The installer and/or end user should use the configuration utility provided with this product to verify the current channel of operation and to confirm that the device is operating in conformance with the spectrum usage rules for the selected European Community country. This device is intended to be operated in all countries of the European Community.
Warning! Intentional radiators, such as the TI-Navigator Access Point, are not intended to be operated with any antenna(s) other than those furnished by Texas Instruments. An intentional radiator may only be operated with the antenna(s) with which it is authorized. Warning! The access point radio(s) are disabled by default and can be enabled only by the system administrator using the Management software application.
x
Contents Important Information................................................................... ii Regulatory Information ................................................................. ii USA FCC Information Concerning Radio Frequency Interferenceii Federal Communication Commission Interference Statement ii RF Radiation Exposure and Hazard Statement: ................... iii Non-modification Statement:................................................ iii Deployment Statement:.............................
Battery information for wireless network hubs .................. 24 Storing the hubs .................................................................... 24 Removing the battery pack................................................... 25 Hub LEDs ................................................................................ 25 Troubleshooting............................................................................ 27 Lost connections ....................................................................
Overview The TI-Navigator™ classroom learning system from Texas Instruments can help you: • Assess student understanding. • Verify that students are on task. • Use classroom results to engage students. • Get immediate feedback from your students to promote student achievement. The system is composed of two parts, hardware and software. The hardware creates a wireless communications network so that your computer can communicate with your students’ TI graphing calculators.
• Data sets (lists, matrices, and so on) There are several ways to learn to set up and use the TI-Navigator™ system: • The Getting Started poster—a short version of the setup process with fewer details. • The Installation Guide (this book, provided in both printed and PDF formats)—complete setup details, troubleshooting, and technical information. • Online Help—After you install the TI-Navigator™ software on your computer, you can access Online Help from the Help menu.
• Data cables and cradles for the TI-83 Plus and TI-83 Plus Silver Edition calculators are sold separately. • The latest operating system (1.90 for the TI-73 Explorer, 1.19 for the TI-83 Family, and 2.41 for the TI-84 Family) must be installed on each calculator used with the TI-Navigator system. These operating systems are included on the CD and are available at education.ti.com/latest.
Classroom kit • 1 access point with AC9930 power adapter • 1 USB computer cable • 2 CDs, one containing system and application software, and one containing educational activities • 1 USB Silver Edition cable • This Installation Guide, the TI-Navigator™ Reference Guide, and other printed materials USB cable Two CDs Access point AC9930 power adapter USB Silver Edition cable Two user guides Classroom kit The Standard-A to Mini-B USB cable and the black and gray TI-GRAPH LINK™ cables do not work
Student kit (up to 16 students) • 1 charging bay with AC9940 power adapter • 4 network hubs • 4 network connectors • 4 clamps (to attach hubs to student work surfaces) • 16 data cables (to connect the calculators to the network connectors) 4 network hubs and 4 network connectors Hub-charging bay 16 data cables AC9930 power adapter (for individual hub or access point) AC9940 power adapter (for the charging bay) 4 network hub clamps Student kit Individual kit • 1 network hub with AC9930 powe
Assembling and charging the network hubs The network hubs contain rechargable batteries. Hub batteries are already charged when shipped, but you should charge them overnight before using them in your class. When the hubs are fully charged, they will function all day under continuous use. You should recharge them each night. The network charging bay can hold from one to four hubs. After you place the hubs in the charging bay, they are charged simultaneously until all are fully charged.
Note: If you purchased the individual kit and do not have a charging bay, you can charge a single hub using the AC9930 power adapter instead. The network connector acts as an on-off switch for the network hub. It must be connected for the hub to function on the network, but you can charge a hub with or without a network connector attached. If you remove a hub from the charging bay with no network connector attached, the hub’s power-status LED goes off until you attach a connector.
Checking the LEDs Three LEDs (small lights) at the top of each hub blink or change colors to indicate various operations or status. LEDs The LED indicates whether the hub is configured. The LED indicates network activity. The LED indicates battery-charging status. When the network hubs are still in the charging bay: • The LED blinking in a green-amber-red sequence means the hubs are currently recharging. • A solid green LED means the hub is fully charged.
Note: If your computer is running Windows® XP Service Pack 2, you may see the following message. If so, click Yes to continue. Note: If the setup program does not run, click Start > Run, and then type D:\Autorun.exe, where D is your CD-ROM drive, and click OK. 2. Click TI-Navigator Software, and then click Install TI-Navigator™. The TI-Navigator™ Setup dialog displays. 3. Click OK to continue.
4. Five separate installations will occur: – TI Connect™ – TI-Navigator™ software – Class Analysis – LearningCheck™ Creator – Network Manager software Note: If version 1.3 or earlier of TI Connect is already installed on your computer, the installation program will uninstall it, and install TI Connect 1.6. If earlier versions of other TI-Navigator™ components are already installed, the installation program will uninstall it and install the current version.
7. When the installation is complete, the TI-Navigator™ Setup dialog displays the status of installed components. You are now ready to set up your network. 8. After pressing OK, you may be required to reboot your computer. Setting up your TI-Navigator™ network the first time A Network Setup wizard helps you activate the access point and hubs for wireless communication. Before you begin 1. Make sure you have installed the TI-Navigator™ software on your computer. 2.
The LED changes from solid green to blinking green when you remove a hub from the charging bay. 4. Have a ball-point pen or paper clip handy; you’ll need it to reset the hubs. Connecting the cables to the access point 1. Identify the cables. USB cable AC9930 Power adapter 2. Connect the AC9930 power adapter to the power jack on the access point. 3. Connect the USB cable to the access point.
USB conection Power adapter jack Access point, side view Starting the wizard A First Time Setup screen opens automatically when you complete the installation of the TI-Navigator™ software. You are immediately prompted to run the network setup wizard. Note: If you want to run the Setup Wizard later, click Start > Programs > TI Tools > TI Network Manager. When Network Manager opens, click Actions > Setup Wizard. 1. Click Setup to start the wizard. 2.
6. Click OK. The next step is to add the network hubs to your classroom network. 7. Make sure the hubs are charged (that is, the blinking). LED is green and 8. Select Wireless Hubs. 9. Click Next. The Network Manager software reconfigures the access point to add hubs to the system. 10. When the next screen appears, follow the directions on the screen.
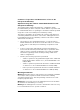
Reset button Network hub, bottom view 11. Use a ball point pen to press the reset button on the back of the hub. Hold the button in until the LEDs are solid amber, then release the button. This resets the hub to its factory default settings. Repeat for each hub in the classroom. A serial number is printed on the back of each network hub. The last five digits of the serial number of each hub are displayed on the screen as the access point recognizes and associates with each hub.
12. Compare the number of hubs that are found with the total number of hubs in your classroom. (For example, you know you have 10 hubs in your classroom, but only 8 were found.) 13. If some of the hubs were not found, match the serial numbers on the screen with the hubs in the classroom to identify which hubs were found. Use a sticker or some other method to mark the hubs that were found, and then press the reset button again on the hubs that were not found. 14.
When all of the hubs are found, Network Manger displays the list of hubs. Installing the calculator operating system Before you can use the calculators on the network, you must use the TI Connect™ software to update the operating system on each calculator. All calculators on the network must have the latest operating system installed for the TI-Navigator™ system to work properly. For TI-73 Explorer, use OS version 1.90 or higher, TI-83 Plus calculators, use OS version 1.19 or higher.
3. Click the Calculator Software button. The Calculator Software screen appears. 4. Under Required OS, click the version number of the model of calculator to which you are installing. 5. Use TI Connect™ to install the operating system on the calculator. 6. 18 a) Locate the operating system file on the CD. b) Right-click the operating system file. c) Click Send to TI device. The TI Connect™ Select TI Device dialog box opens. d) Follow the instructions on the screen.
Warning: Do not disconnect the cable at any time while updating an operating system or installing Apps to a calculator. Note: Consider keeping one or two spare calculators with the latest operating system and ample memory. It is also a good idea to have spare cradles and data cables on hand. If a problem occurs, you can substitute a spare part.
3. Plug as many as four TI graphing calculators into the four jacks on the network connector at the top of each network hub. Insert the plug carefully; do not bend the plug. 4. Connect the graphing calculator with a data cable.
Note: Connecting a calculator to the teacher’s computer with the USB Silver Edition cable adds the calculator to the network without the need for a network hub. When a teacher uses the calculator to login using her teacher account, she can send and receive QuickPolls, send files to the class, or use the Activity Center, all without using the computer. See the TI-Navigator™ Reference Guide or Help for more information.
e) If you want to import a list of students into a class, click to select the class name in the list, and then click Import Students. or f) Click Finish. You can then enter the names of the students manually into each class. Note: Refer to the TI-Navigator™ Reference Guide or the TI-Navigator™ Help for details on using the TI-Navigator™ software. 3. On the TI-Navigator™ home screen, click the Tools tab. 4.
Technical information Wireless access point LEDs USB port Power jack Wireless network information The TI-Navigator™ classroom learning system includes a wireless localarea network based on the IEEE 802.11b/g industry standard, also known as Wi-Fi (wireless fidelity). This networking standard provides high-speed data transfer in the license-free 2.4 GHz band. The TI-Navigator™ system has been tested to perform at a range of 70 feet.
If possible, avoid sources of potential interference, such as metal walls, microwave ovens, and wireless phones. Access point LEDs POWER – Indicates that the access point is receiving power from the power adapter. TEST – The access point is in self-test mode. This LED should blink for a minute and then stop. STATUS: 100 LINK/ACT – Indicates data transfer. SIGNAL: 802.11 b/g – Indicates wireless link activity.
Removing the battery pack If you need to store the wireless network hubs for more than two months, remove the battery pack from the hub. 1. Disconnect the clamp, network connector, and power adapter from the hub. 2. Insert a coin at the bottom end of the hub and twist to remove the front section of the case. 3. Insert your forefinger to remove the battery pack, and then reassemble the outer case. Under normal use, the rechargeable battery pack will last 2-3 years.
Battery (Power Status) LED Color and pattern Meaning Changing from green to amber to red The battery is charging. Solid green Power on; fully charged and powered by a charging bay or power adapter. Blinking green Power on; battery powered. The battery is 30% to 99% charged. Blinking amber Low battery (lower than 30% charged). Blinking red Battery is critically low (lower than 8% charged).
Troubleshooting This section provides troubleshooting information related to the TI-Navigator™ hardware and the Network Manager software. For information about the TI-Navigator™ software, see the TI-Navigator™ Reference Guide or TI-Navigator™ Help. Lost connections Certain actions, such as resetting the access point, can cause the TI-Navigator™ network to lose its connection to one or more hubs. This can occur even when Network Manager reports that the hubs are responding.
Messages Problem or message Possible solutions Device not found • Make sure the data cable from the calculator is properly connected to the network connector. • Ensure that the access point is connected and its power adapter is plugged in. Problem or message Possible causes or solutions Device is incorrectly configured Troubleshoot the Access Point procedure to reconfigure this device. (See “Setting up your TI-Navigator™ network the first time” on page 11.
Problem or message Possible causes or solutions Device is incorrectly configured • Repeat the Add Hubs procedure to reconfigure this hub. • Remove the hub and then add it back into the network. The device did not respond • The access point was not found. • The hub’s network connector is removed. The hub was previously added to the classroom network, but was not located at this time. • The hub is too far away from the access point. Try to keep the hubs within 70 feet of the access point.
Problem or message Possible causes or solutions The device did not respond, or hub is not listed in the Network Manager window. • Refresh the network status (Click View > Refresh). After checking for the previous conditions, refresh the status screen to see if the hub has been detected. • Make sure the hub’s battery is fully charged or verify that the power adapter is connected. • Make sure that the network connector is properly attached to the hub.
Problem or message Possible causes or solutions The batteries in the network hubs run down during class time, resulting in dead or low batteries. • Make sure the network hubs are recharged overnight every night. • Normally, the network hubs’ rechargable batteries can be recharged and used for up to three years. If you charge a battery overnight and the LED on the network hub still blinks red or amber, contact Texas Instruments for help. Phone: 1.866.TI.NAVIGATOR (1.866.846.
Problem or message Possible causes or solutions You have a conflict on the operating channel used by your TI-Navigator™ access point. • A conflict could be caused if another access point or a cordless telephone is using the same channel. • To try a different channel, open Network Manager, click Actions > Change Operating Channel. In the Operating Channel list, click a different channel number, and click OK. If the changing the channel doesn’t correct the problem, try a different channel.
Texas Instruments Support and Service For general information Home Page: education.ti.com KnowledgeBase and education.ti.com/support e-mail inquiries: Phone: (800) TI-CARES / (800) 842-2737 For U.S., Canada, Mexico, Puerto Rico, and Virgin Islands only International information: education.ti.com/international For TI-Navigator™ technical questions E-mail: ti-navigator@ti.com Phone: (866) TI-NAVIGATOR / (866) 846-2844 For product (hardware) service Customers in the U.S.
Battery Precautions for Calculators Take these precautions when replacing batteries. THERE IS A RISK OF EXPLOSION IF REPLACED BY AN INCORRECT TYPE. REPLACE ONLY WITH THE SAME OR EQUIVALENT TYPE RECOMMENDED BY TEXAS INSTRUMENTS. DISPOSE OF USED BATTERIES ACCORDING TO LOCAL REGULATIONS. • Do not leave batteries within the reach of children. • Do not mix new and used batteries. Do not mix brands (or types within brands) of batteries. • Do not mix rechargeable and non-rechargeable batteries.
Battery Precautions for Rechargeable Battery Packs The TI-Navigator™ network hub contains a Lithium Ion battery pack. Adherence to the following instructions and cautions will help you get the most from your battery pack. Contact TI if you have problems with the battery. WARNING: THERE IS A RISK OF EXPLOSION IF REPLACED BY AN INCORRECT TYPE. REPLACE ONLY WITH THE SAME OR EQUIVALENT TYPE RECOMMENDED BY TEXAS INSTRUMENTS. DISPOSE OF USED BATTERIES ACCORDING TO LOCAL REGULATIONS.
36
Index A connecting calculators to 19 resetting 11 access point activating 11 illustrated 23 LEDs 24 assembling and charging hubs 6 Individual kit 5 inventory 3 B K batteries charging 6 battery information 24 battery precautions 34 battery precautions (rechargeables) 35 kit C calculators connecting to hubs 19 installing software on 21 CellSheet 1 charging and assembling hubs 6 clamping hub to work surface 19 Classroom kit 4 connecting calculators to hubs 19 contact information 33 contents of kits 3 c
R system requirements 2 recharging network hubs 6 resetting hubs 11 T S safety battery 34 rechargeable batteries 35 service and support 33 setting up network 11 software installing on calculators 21 Student kit 5 StudyCard 1 support and service 33 38 technical information 23 TI-Navigator overview 1 trademarks ii troubleshooting 27, 28 U unpacking the boxes 3 W wizard network setup 11