Setting up the TI-Nspire™ Navigator™ Teacher Software This TI-Nspire™ Navigator™ Teacher Software Getting Started Guide is designed to help you get started with your TI-Nspire™ Navigator™ classroom learning system. This guide gives you information on setting up the TI-Nspire™ Navigator™ Teacher Software for the first time, setting up the hardware, creating and managing classrooms, managing student accounts; and guides you through an introduction of using some of the features included in the software.
There are a few ways to learn to set up and use the TI-Nspire™ Navigator™ Teacher Software: • The Start Here Guide—a short version of the setup process with fewer details. • This TI-Nspire™ Navigator™ Teacher Software Getting Started Guide, provided in both printed and PDF formats. The Getting Started Guide introduces you to the software and walks you through setting up classrooms. • The TI-Nspire™ Navigator™ Teacher Software Guidebook, provided in PDF format and available at education.ti.com/guides.
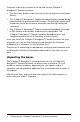
Each TI-Nspire™ Navigator™ system comes with the following items.
If you purchased the TI-Nspire™ Navigator™ System for use with the TI-Nspire™ CX, TI-Nspire™ CX CAS, TI-Nspire™, or TI-Nspire™ CAS handhelds, your contents include the following items: • TI-Nspire™ Navigator™ Cradles • AC9940 power adapter (includes power supply and power cord) • TI-Nspire™ Navigator™ Cradle Charging Bay Cradles AC9940 power adapter (for the charging bay) Cradle charging bay If you purchased the TI-Nspire™ CX Navigator™ System for use with the TI-Nspire™ CX or TI-Nspire™ CX CAS hand
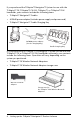
Charging the cradles The TI-Nspire™ Navigator™ Cradles contain rechargable batteries. You must charge the batteries overnight before using them in your class. When the cradles are fully charged, they will function all day under continuous use. You should recharge them each night. The TI-Nspire™ Navigator™ Cradle Charging Bay can hold from one to five cradles. After you place the cradles in the charging bay, they are charged simultaneously until all are fully charged.
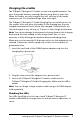
LEDs The LED indicates network activity. The charging status. LED indicates battery- When the cradles are still in the TI-Nspire™ Navigator™ Cradle Charging Bay: • A solid amber recharging. LED means the wireless cradle is currently • A solid red LED means the wireless cradle does not have good contact with the charging bay. Reposition the cradle so it has good contact and the LED turns amber. • A solid green LED means the wireless cradle is fully charged.
4. If multiple handhelds are connected, click the handheld to which you want to connect. 5. Click Help >Check for Handheld OS Update. TI-Nspire™ Navigator™ Teacher Software displays a dialog box asking if you want to install the OS on the handheld, save it to your computer, or both. 6. Click Browse if you want to change the location to save the handheld operating system. 7. Click Continue. 8. Accept the license agreement and click Continue.
A progress screen is displayed. 9. When the operating system software has transferred to your TI-Nspire™ handheld, click OK. You may now disconnect the handheld from your computer, and the operating system software will install itself onto your handheld. Note: Consider keeping one or two spare handhelds with the latest operating system and ample memory. It is also a good idea to have spare cradles on hand. If a problem occurs, you can substitute a spare part.
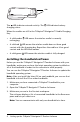
Connecting the cables to the access point 1. Identify the cables. USB cable AC9930 Power adapter 2. Connect the AC9930 power adapter to the power jack on the access point. 3. Connect the USB cable to the access point. USB connection Power adapter jack Access point, side view 4. Make sure the access point power light is on.
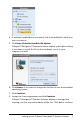
Checking the access point LEDS Status Signal Power Test POWER – Indicates that the access point is receiving power from the power adapter. TEST – The access point is in self-test mode. This LED should blink for a minute and then stop. STATUS: 100 LINK/ACT – Indicates data transfer. SIGNAL: 802.11 b/g – Indicates wireless link activity. Starting the wizard When you complete the installation of the TI-Nspire™ Navigator™ Teacher Software, open TI-Nspire™ Network Manager to set up your system.
5. Select your country. The operating channel is automatically set to a default setting. 6. Click OK. TI-Nspire™ Network Manager sends signals to the access point to add it to the network. After the access point is found, the wizard displays a message. 7. Click OK.
The software may display a message saying the access point firmware needs to be updated. Click Yes to update the access point firmware. The next step is to add the TI-Nspire™ CX Wireless Network Adapters or TI-Nspire™ Navigator™ Cradles to your classroom network. The wireless adapters are used to communicate between the TI-Nspire™ CX handhelds and the access point. The cradles are used to communicate between any of the TI-Nspire™ handhelds and the access point.
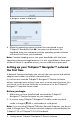
4. Highlight each wireless adapter or wireless cradle you want to add, and click Add. To add all of the wireless clients listed in the Available Wireless Clients column, click Add All. Note: If the adapter or cradle does not appear in the Available Wireless Clients column after 6 minutes, try these tips: • Check the ID numbers of the wireless adapters or cradles to see which ones are not connecting. • Detach and reattach the wireless adapter or wireless cradle to the handheld.
3. Enter a nickname in the Wireless Client Nickname box (optional). Nicknames can consist of letters, spaces, and numbers. A nickname must contain a minimum of 1 character and can contain a maximum of 64 characters. 4. Click Add Next to add another adapter or cradle if you have more than one wireless client to add. 5. When you are finished adding all of the adapters and cradles, click Finish.
Connector Guides for aligning with handheld 2. Slide the adapter into position, making sure the guides on the sides of the adapter slide into the grooves on the sides of the handheld. Grooves to align wireless adapter Sideview of handheld 3. Firmly press the adapter into place.
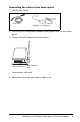
Connecting the handhelds to the cradles The cradles work with the TI-Nspire™, TI-Nspire™ CAS, TI-Nspire™ CX and TI-Nspire™ CX CAS handhelds. To connect the handheld to the cradle, follow these steps. 1. Slide the lock on the back of the cradle to the OFF position. Lock in OFF position. 2. To attach the handheld, face the screen upward and slide the handheld onto the top of the TI-Nspire™ Navigator™ wireless cradle. Be sure that both sides of the handheld are inserted into both of the side guides.
3. Press firmly to make a good connection. When properly connected, the TI-Nspire™ handheld appears to be sitting on top of the cradle. 4. Lock the handheld in place by sliding the lock on the back of the cradle to the ON position. Lock in ON position. 5. Insert each cradle into the charging bay. Make sure the LED is amber. At the end of the school day, return the wireless cradle to the charging bay and charge them overnight.
Storing the wireless adapters and cradles When you charge the handhelds overnight, you can leave the TI-Nspire™ Wireless Network Adapters attached to the handhelds before placing the handhelds in the TI-Nspire™ CX Docking Station. When you are ready to use the handhelds the next morning, the handheld should be fully charged, and the adapter is ready for use. You can remove the wireless adapter from the handheld, and store the adapters in the adapter storage case overnight.
If the cradle is not charged, or the adapter or cradle is not connected to a TI-Nspire™ handheld that is powered on, TI-Nspire™ Network Manager displays the status as disconnected. TI-Nspire™ Network Manager remembers the adapter and cradle IDs you added, and the next time you turn on the TI-Nspire™ handheld that is connected to the adapter or cradle, TI-Nspire™ Network Manager recognizes it. Note: To refresh the TI-Nspire™ Network Manager window, click View > Refresh or click .
Now that you know where the non-working cradles are, you can add the cradles to the network again. Cradle LEDs The LEDs on each cradle use various colors and blink patterns to indicate data activity or power status. This can occur either when the cradles are seated in the charging bay or when they are outside the charging bay. The LEDs indicate status as follows. Activity LED Color and pattern Meaning Blinking green Indicates data transfer to and from the access point.
Battery (Power Status) LED Color and pattern Meaning In the charging bay Solid amber The battery is charging. Solid green Power on; charged and powered by a charging bay or power adapter. Solid red The battery is charging, but does not have good contact with the charging bay. Reposition the cradle so it has good contact. The LED should then turn amber to indicate it is recharging. Outside the charging bay Blinking green Power on; battery powered. The battery is 30% to 99% charged.
3. Enter a username. 4. Enter a password. 5. Select or deselect the preference for the teacher icon to appear in the classroom view. If you select this preference, the teacher icon will appear in the classroom view, and you will be included as a recipient in Send to Class, Collect from Class and Delete from Class operations. The teacher handheld screen will be included in screen captures of the class. 6.
The Teacher Preferences dialog box opens. 3. Click Reset. TI-Nspire™ Navigator™ software clears the current password. 4. Enter a new password. 5. Click OK. Changing the user name of your teacher account 1. Make sure you are not logged in to the TI-Nspire™ Navigator™ network on your handheld.
2. Click File > Settings > Teacher Preferences . The Teacher Preferences dialog box opens. 3. Enter a new user name. 4. Click OK. Logging in to the TI-Nspire™ Navigator™ system from the handheld The TI-Nspire™ Navigator™ classroom learning system uses both your computer and your students’ handhelds. In order for you and your students to communicate using the TI-Nspire™ Navigator™ network, your students must log in to the network from their handhelds.
Before your students log in, make sure you have completed these items: • Create your students’ accounts. • Provide your students with their usernames and, if necessary, their passwords. Logging in to the TI-Nspire™ Navigator™ network 1. To log in, do one of the following: – From the home screen of your TI-Nspire™ handheld, select 5:Settings & Status > 5:Login. – From a screen other than the home screen: On a TI-Nspire™ Touchpad, press ~ > 8:Login. On a TI-Nspire™ Clickpad, press / c > 8:Login. 2.
Icon 26 Status Meaning Blinking The handheld is connected to the network and is ready to login. Solid The handheld is logged in to the network and is fully charged.
FCC Statement Note: This equipment has been tested and found to comply with the limits for a Class B digital device, pursuant to Part 15 of the FCC Rules. These limits are designed to provide reasonable protection against harmful interference in a residential installation. This equipment generates, uses and can radiate radio frequency energy and, if not installed and used in accordance with the instructions, may cause harmful interference to radio communications.
radio communications. However, there is no guarantee that interference will not occur in a particular installation. If this equipment does cause harmful interference to radio or television reception, which can be determined by turning the equipment off and on, the user is encouraged to try to correct the interference by one or more of the following measures: • Reorient or relocate the receiving antenna. • Increase the separation between the equipment and receiver.
Canadian IC Information Product Name: TI-Nspire™ Navigator™ Cradle IC: 451E-TINAVWC2 Product Name: TI-Navigator™ Access Point IC: 451E-TINAVAP Model Number/Name: NAV-AP-US Product Name: TI-Nspire™ CX Wireless Network Adapter IC: 451E-TINAVWNA Industry Canada Statement: Operation is subject to the following two conditions in Canada: 1. these devices may not cause interference, and 2.
The TI-Navigator™ access point communicates with either a TI-Navigator™ network hub, TI-Nspire™ Navigator™ wireless cradle, or TI-Nspire™ CX Wireless Network Adapter via a wireless 802.11b/g link to provide wireless local area networking (WLAN) capabilities and with a personal computer using a standard USB cable. The TI-Navigator™ access point includes one 802.11a and one 802.11b/g radio. In the current model, NAV-AP-US, the 802.
English Hereby, Texas Instruments declares that the TI-Navigator™ access point, TI-Nspire™ Navigator™ wireless cradle, and TI-Nspire™ CX Wireless Network Adapter are in compliance with the essential requirements and other relevant provisions of Directive 1999/5/EC. The Declaration of Conformity may be consulted in the Product Stewardship page at education.ti.com.
Français Hereby, Texas Instruments declares that the TI-Navigator™ access point, TI-Nspire™ Navigator™ wireless cradle, and TI-Nspire™ CX Wireless Network Adapter are in compliance with the essential requirements and other relevant provisions of Directive 1999/5/EC. The Declaration of Conformity may be consulted in the Product Stewardship page at education.ti.com.
Português Hereby, Texas Instruments declares that the TI-Navigator™ access point, TI-Nspire™ Navigator™ wireless cradle, and TI-Nspire™ CX Wireless Network Adapter are in compliance with the essential requirements and other relevant provisions of Directive 1999/5/EC. The Declaration of Conformity may be consulted in the Product Stewardship page at education.ti.com.
Chinese-Simplified Hereby, Texas Instruments declares that the TI-Navigator™ access point, TI-Nspire™ Navigator™ wireless cradle, and TI-Nspire™ CX Wireless Network Adapter are in compliance with the essential requirements and other relevant provisions of Directive 1999/5/EC. The Declaration of Conformity may be consulted in the Product Stewardship page at education.ti.com.
Countries of Operation and Restrictions of Use in the European Community Operation Using the 2.400 to 2.4835 GHz Channels in the European Community The installer and/or end user should use the configuration utility provided with this product to verify the current channel of operation, the expected transmit power level, and to confirm that the device is operating in conformance with the spectrum usage rules for the selected European Community country.
Warning! Do not touch or move the TI-Navigator™ Access Point when the antennas are transmitting or receiving. Warning! The TI-Navigator™ Access Point, TI-Nspire™ Navigator™ Cradle, and TI-Nspire™ CX Wireless Network Adapter are intended for indoor use only. Do not install the device nor operate it outdoors.