
Application Guide

As you create a shape, a tool appears in the work area (for example,Circle ). To
cancel the shape, press ESC. To enable automatic labeling of certain objects, see What
You Must Know, in this chapter.
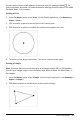
Creating a Circle
1. From the Shapes menu, select Circle. (In the Graphs application, click Geometry >
Shapes > Circle.)
2. Click a location or point to position the circle’s center point.
3. Click a location or point to establish the radius and complete the circle.
4. To resize a circle, drag its perimeter. To move it, drag its center point.
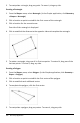
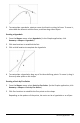
Creating a Triangle
Note: To ensure that the sum of the angles of a triangle equals 180° or 200 gradians,
you can force integer angles in the Geometry view. Refer to What You Must Know, in
this chapter.
1. From the Shapes menu, select Triangle. (In the Graphs application, click Geometry >
Shapes > Triangle.)
2. Click three locations to establish the vertices of the triangle.
Geometry Application 261