
User's Manual


Default Boot Configuration
3-2
3.1 Default Boot Configuration
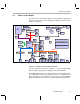
Out of the box, the EVM boots from flash and starts the demos
automatically after a few seconds when you power up the board. It does
not require an NFS mount or a TFTP server to run the standard demos.
Note: The default U-Boot bootargs definition sets "ip=off", which disables
the Ethernet connection.
The out-of-the-box boot parameters are listed in Section A.4.1. The
following are alternate ways you may want to boot the board:
❏ TFTP boot with NAND flash file system (Section A.4.2)
❏ Flash boot with NFS file system (Section A.4.3)
❏ TFTP boot with NFS file system (Section A.4.4)
❏ PAL video mode vs. NTSC video mode (Section 2.1)
To abort the standard boot, press any key in the console window (see
Section 2.2). Also see Section A.4, Alternate Boot Methods if you want to
change the boot configuration.
Note: It is best to power down the board cleanly in order to reboot,
rather than using the reset button or power switch. We recommend
that you use the shutdown command to shut down the operating
system and unmount the file system before removing power from
the board. This will help prevent corruption of the flash-based root
file system.
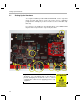
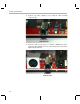
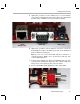
3.2 Starting the Standalone Demos
When you connect the EVM hardware, the pre-loaded examples run
automatically on your video display. These examples encode and
decode audio, video, and speech. There are two ways to use the demos:
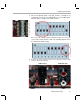
❏ Standalone. This is the default power-on mode. The demos run
automatically with no connection to a workstation in the default boot
configuration. This is the mode documented in the rest of this
chapter.
The standalone demo was set up by the DVSDK, which copies the
file /examples/dvevmdemo to the directory /etc/rc.d/init.d (the central
repository for startup scripts). This file is symbolically linked to
/etc/rc.d/rc3id/S88demo. When the board boots up and enters
runlevel 3, this file is executed to start the demo web server and the
demo interface.