
User's Manual
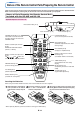
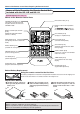
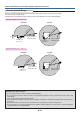
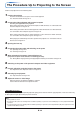
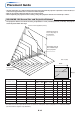

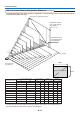
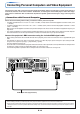
Table Of Contents
- INDEX
- English
- IMPORTANT SAFETY INFORMATION
- Major Features
- Table of Contents
- Checking the Supplied Accessories
- Names of the Main Unit Parts
- Names of the Remote Control Parts/Preparing the Remote Control
- The Procedure Up to Projecting to the Screen
- Placement Guide
- Connecting Personal Computers and Video Equipment
- Power Cable Connections and Switching the Power On/Off
- Adjustment of the Projection Screen
- General Operation
- Input Selection
- Automatic Adjustment
- Selection of Aspect Ratio
- Freezing a Moving Picture
- Cancelling Video and Audio Temporarily
- Lamp Mode
- Keystone
- Adjustment of the Volume
- Enlargement of the Image and Video Movement
- Using the Presentation Timer
- Using the Laser Pointer
- Performing Mouse Operations on the Computer with the Remote Control Unit
- Controlling the Projector from a Computer
- Use as a High-Brightness Monochrome Projector
- Protecting the Projector with the Security Lock
- Using the Quick Menu
- Menu Operation Method
- Image
- Color
- View
- Setup
- Option
- Info.
- When an Indicator is Lit or Flashing
- Troubleshooting
- Cleaning
- Replacing the Lamp Cartridge
- Specifications
- Table of Supported Frequency
- Cabinet Dimensions
E-12
RGB
VIDEO
FREEZE
MUTE
ECO AUTO
ASPECT
TIMER
VOL KSTN ZOOM
CANCEL QUICK
MENU
ENTER
Q
STANDBY
1234
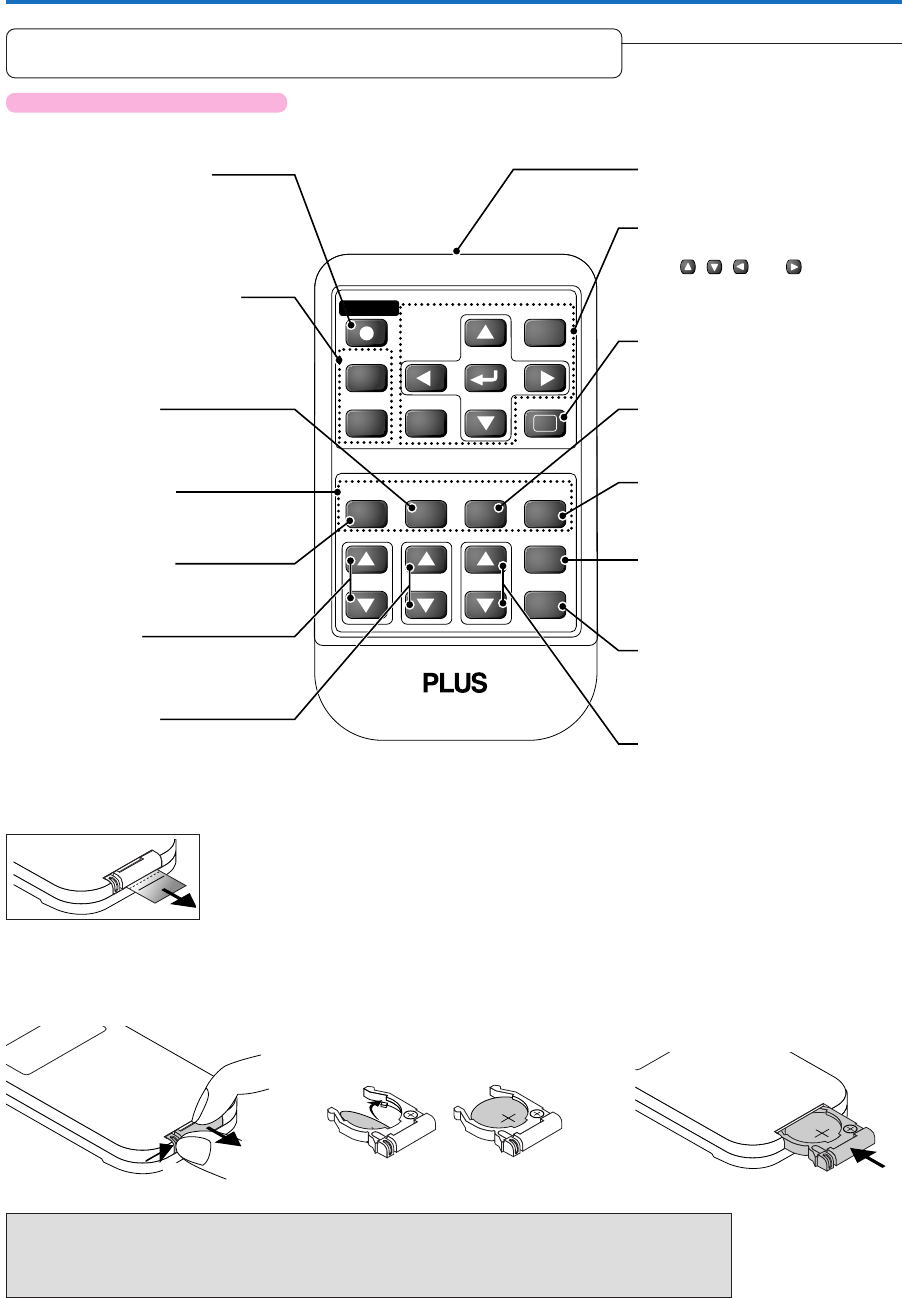
Infrared transmitter [E-13]
VOL button [E-31]
(Volume adjustment)
STANDBY button [E-23, 25]
This button is used to switch ON
the power aand set the unit to the
STANDBY mode.
AUTO button [E-28]
(Automatic adjustment of the RGB
moving image)
Buttons used for menu operations
[E-40]
The , , and buttons are
the select (왖, 왔, 왗 and 왘) buttons.
Applicable Projector: U5-112/U5-111
Names of Parts/Preparing the Remote Control Unit
Included with the U5-112 and U5-111
Names of the Remote Control Parts
FREEZE button [E-30]
(Freezes moving pictures)
MUTE button [E-30]
(Temporarily cancels the video and
audio)
TIMER button [E-33]
(Presentation timer time setting
display)
ZOOM button [E-32]
(Digital zoom adjustment)
Buttons used for input selection
[E-28]
RGB button and VIDEO button
(VIDEO / S-VIDEO)
QUICK button [E-39]
(Displays a simplified menu)
Number buttons [E-37]
(Used for the security lock.)
Button Battery Replacement
Names of the Remote Control Parts/Preparing the Remote Control
ECO button [E-30]
(Selection of lamp mode)
ASPECT button [E-29]
(Selects the vertical and horizontal
ratio of the screen)
KSTN button [E-31]
(Keystone correction adjustment)
Using the remote control for the first time
The battery compartment is fitted with a transportation insulation sheet at the time of shipping. Pull
out the sheet and remove it. The remote control is now ready for use.
Replacement Method
1
(A) With the knob pressed to
the right side, (B) draw out the
battery case.
2
Remove the old battery and in-
stall a new button battery with (+)
side facing upward in the battery
holder.
3
Insert the battery holder into the re-
mote control and push in until the
battery holder closes with a “click”
sound.
(B)
(A)
CR2025
CR2025
CR2025
Purchase a CR2025 type battery for replacement.
CAUTION
Danger of explosion if battery is incorrectly replaced.
Replace only with the same or equivalent type (CR2025) recommended by the manufacturer.
Dispose of used batteries according to your local regulations.