
User's Manual
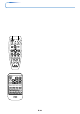
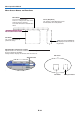
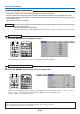


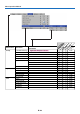


Table Of Contents
- INDEX
- English
- IMPORTANT SAFETY INFORMATION
- Major Features
- Table of Contents
- Checking the Supplied Accessories
- Names of the Main Unit Parts
- Names of the Remote Control Parts/Preparing the Remote Control
- The Procedure Up to Projecting to the Screen
- Placement Guide
- Connecting Personal Computers and Video Equipment
- Power Cable Connections and Switching the Power On/Off
- Adjustment of the Projection Screen
- General Operation
- Input Selection
- Automatic Adjustment
- Selection of Aspect Ratio
- Freezing a Moving Picture
- Cancelling Video and Audio Temporarily
- Lamp Mode
- Keystone
- Adjustment of the Volume
- Enlargement of the Image and Video Movement
- Using the Presentation Timer
- Using the Laser Pointer
- Performing Mouse Operations on the Computer with the Remote Control Unit
- Controlling the Projector from a Computer
- Use as a High-Brightness Monochrome Projector
- Protecting the Projector with the Security Lock
- Using the Quick Menu
- Menu Operation Method
- Image
- Color
- View
- Setup
- Option
- Info.
- When an Indicator is Lit or Flashing
- Troubleshooting
- Cleaning
- Replacing the Lamp Cartridge
- Specifications
- Table of Supported Frequency
- Cabinet Dimensions

E-47
Image
• Perform this operation while projecting the picture for which the adjustment/setting will be made.
• Select the menu name “Image”.
See “Menu Operation Method” on Page E-40 for information about performing menu operations. The item name display will
differ depending on the input signal. See “List of Item Names Offering Input Selection and Adjustments/Settings” on Page E-45.
Brightness / Contrast / Color / Tint / Sharpness
Picture qualities such as brightness and contrast will change depend-
ing on the whether the room is bright or dark. Please adjust to suit your
preference.
Select the desired item name and then adjust with the SELECT 왗왘 buttons.
Item Name
Brightness
Contrast
Color
Tint
Sharpness
SELECT
䊴
Button
SELECT
䊳
Button
Darker
Less contrast
Less dense color
More red
Softer image
Brighter
More contrast
Denser color
More green
Sharper image
Note:
* The adjustment values of the adjustable items are stored according to input source.
* “Tint” can only be adjusted when inputting NTSC composite/S-Video signals or
component signals.
Picture Adj. / Fine Picture / H Position / V Position
Usually, automatic adjustment is performed at the time of signal selec-
tion, but when automatic adjustment is not effective, these adjustments
can be performed.
Note:
When the image extends beyond the boundaries of the screen or is smaller than the
screen, check that the “View”
→
“Aspect” setting is set to “Auto”. See “Aspect” on
Page E-52.
Picture Adj. (Picture Adjustment)
Adjust this when bright and dark vertical bands appear on the screen.
Select the “Picture Adj.” item name and adjust with the SELECT 왗왘 buttons
so that the vertical bands disappear and brightness becomes uniform across
the screen.