
Instructions


CAUTION
Unauthorized repairs, alterations or changes to the product
are prohibited.
Do not expose the device to extreme temperatures,
vibrations or shocks.
Clean the instrument with a soft damp cloth. Do not use
solvents or scouring agents.
The base station is only suitable for indoor use. Protect it
from moisture!
The transmitter is splashproof, but not watertight.
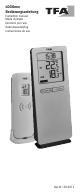
Elements:
Base station (receiver)
Display (Fig.3) Buttons (Fig.3)
A - Time H - SET/MAX/MIN
B - Symbol for auto-reset button
of the maximum-minimum values J - +/CHANNEL button
C - Battery symbol for base station
D - Indoor temperature
E - Battery symbol for the transmitter
F - Reception symbol
G - Circle symbol for the alternating channel
K - Channel number
L - Outdoor temperature
M - Max/min indicator
Housing (Fig.4)
A - Wall mounting hole
B - Battery compartment
C - Table stand (removable)
Transmitter
Display (Fig.1) Housing (Fig.2)
A - Transmission signal A - TX button
B - Channel 1, 2, 3 B - 123 switch for
C - Battery symbol for the transmitter channel selection
D - Outdoor temperature C - Battery
compartment
D - Table stand
(removable)
Getting started
Insert the batteries
Place the instruments on a table at a distance of about
1.5 meters from each other. Avoid being close to possible
sources of interference such as electronic devices and
radio equipment.
Open the battery compartment of the transmitter and
insert two new AA 1.5 V batteries, polarity as illustrated.
All LCD segments will be displayed for a short moment.
The display shows the temperature. The switch is set to
channel 1.
Close the battery compartment.
Open the battery compartment of the base station.
Insert two new AA 1.5 V batteries, polarity as illustrated. All
LCD segments will be displayed for a short moment. The
indoor temperature appears on the display.
Close the battery compartment.
Reception of outdoor transmitter
The base station will scan the outdoor temperature and the
reception symbol
(Fig.3 F) fl ashes.
If the reception is successful, the outdoor temperature
(Fig.3 L) and the reception symbol appear steadily on
the base station display.
If the reception of the outdoor temperature fails, „- -. -“
remains on the display. Check the batteries and try it again.
You can also activate the reception manually. Press and
hold the +/CHANNEL button (Fig.3 J) on the base station
for three seconds. The reception symbol for the outdoor
transmitter will be fl ashing.
Press the TX button (Fig.2 A) in the transmitter’s battery
compartment. The transmission of the outdoor data takes
place immediately and if the reception is successful, the
outdoor temperature appears on the base station display.
Operation
The device will automatically quit the setting mode if no
button is pressed for 20 seconds.
Settings
Press and hold the SET/MAX/MIN button (Fig.3 H) for
three seconds to enter the setting mode.
The hour digit fl ashes on the display.
Press the +/CHANNEL button (Fig. 3 J) to adjust the hours.
Press and hold the +/CHANNEL button for fast mode.
Con rm the setting with the SET/MAX/MIN button and set
minutes in the same way.
Con rm the setting with the SET/MAX/MIN button.
You can now activate or deactivate the automatic reset of
the maximum and minimum values. AUTO OFF min max
fl ashes on the display
Press the +/CHANNEL button to activate (ON) or deacti-
vate (OFF) the automatic reset.
9 10