
User manual

User guide for the Rosted
®
Barometer
Read these instructions thoroughly and keep them in a safe place.
This guide explains how you can derive the most pleasure and profit from the wealth of information
about current and future weather offered by this special product.
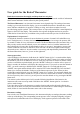
The Rosted Barometer is an electronic barometer in an elegant design. The analogue barometer
reading is given at the head of the display, just as on traditional barometers. Beneath this, a trend
arrow indicates whether the air pressure is falling or rising, and a future weather forecast is
provided using graphic symbols. The current pressure as expressed in mbar/hPa is stated digitally in
figures at the foot of the display. The barometer also registers the highest and lowest pressures
within the last 24 and 48 hours, in addition to the pressure trend of the previous 24 and 48 hours.
Explanation of “air pressure”.
As default the barometer measures from an absolute air pressure of around 1013 mbar/hPa at sea
level. The higher one is, of course, the lower the pressure becomes. On average, the pressure falls
by around 8-9 mbar for every 100 metres ascended. The Rosted Barometer takes account of this, so
that you only need to state the altitude you are at in relation to sea level, and the instrument will
then calculate the relevant value for that altitude (relative air pressure). Atmospheric pressure and
weather conditions can often be difficult to work with and even the most capable meteorologists
often make errors, and this is why the weather is an exciting and unpredictable phenomenon. With
the Rosted Barometer, however, you are on the right track.
Start-up procedure:
After installation of the batteries, hold down the “MODE” button (8) for 3 seconds and the display
will read METER while stating an altitude of zero. Press the “MAX” button (9) in order to increase
the altitude to your level in relation to sea level. Each press represents 10 metres of altitude. When
you have reached the required altitude, press the “MODE” button (8) to confirm. After a pause of
about 8 seconds, the barometer will display the current pressure. If you prefer to state the altitude in
FEET, you need at start-up to hold down the “MODE” button for 3 seconds and then press
“MODE” once again and the altitude will be stated as FEET rather than METER. Press the MAX
button (9) to increase the altitude. Each press of the button represents 50 feet. When you have
reached the required altitude, press the “MODE” button (8) to confirm. The maximum altitude that
can be input is 1200 metres or 4000 feet. If you are closer to 0 metres than 10 metres or 0 feet than
50 feet respectively above sea level, you only need to enter the altitude as 0 by pressing the MODE
button once.
If no action is taken within a period of 60 seconds following installation of the batteries, the
instrument will return to start-up mode. Hold down the “MODE” button again for 3 seconds in
order to make changes.
If at a later date you move the barometer to another location and need to adjust the altitude once
more, this can be done in exactly the same manner as described above. When changes to altitude are
made, all data is erased and the barometer starts with a clean memory.
Barometer readings.
Just as in the case of traditional barometers, this instrument displays an analogue barometer reading
at the top of the display. The corresponding current pressure value is displayed digitally in figures
and expressed in mbar/hPa at the foot of the display. Each segment represents 2 mbar/hPa. If the