
Instructions / Assembly


The Energy Guardian®
Pulldown Ladder Cover
Installation Instructions
Please check that all components are included and not damaged by shipping. If you have missing or
damaged components, STOP and call Customer Service at 1-877-377-4674 before returning the kit.
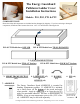
Glue Paern
ADHESIVE
ADHESIVE
LID and FRAME ASSEMBLY (PS2 and PT2 Models with 2-piece LIDS)
NOTE: If your kit has a one-piece lid (PS1 and PT1 models) skip to HANDLE INSTALLATION section below
1. Lay two LID components and four LONG FRAME SECTIONS on a flat surface
2. Utilizing Glue Pattern apply ADHESIVE to inside of one LID half, where it meets with other LID half allowing lips to align
properly (See Picture #1)
3. Utilizing Glue Pattern, apply ADHESIVE to the end of a 30.5” LONG FRAME SECTION and join (See Picture #2)
so ends are flush with each other. This will create a 61” LONG FRAME SECTION. Repeat with remaining LONG FRAME
SECTIONS
4. Place LONG FRAME SECTIONS on outer sides of top of LID, using LID as a template to ensure LID and LONG FRAME
SECTIONS are flush (See Picture #3)
5. Make sure pieces are tight together and aligned squarely. Let ADHESIVE cure for 3 hours.
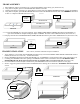
HANDLE INSTALLATION
1. Apply ADHESIVE to flanges of HANDLE (See Picture #4)
2. Apply two HANDLES to the lip of the LID, shoulder width apart. (See Picture #5)
3. Insert PIN through pre-drilled holes. Hold PIN by the stem and insert at least halfway into hole and foam to avoid
bending. Once inserted into foam, push from head of PIN until fully seated (See Picture #6)
4. Apply HANDLE to remaining SHORT FRAME SECTION (shown darker to emphasize HANDLE assembly) This is
the REMOVABLE FRAME SECTION (See Picture #7)
Picture #1 Picture #2
Picture #3
Picture #4
Picture #5
Picture #6
Picture #7
LID
LONG FRAME SECTION
LONG FRAME SECTION
LID
LIP of LID
Hold PIN by
stem to push
through the
hole and half
way into foam