
Instructions / Assembly


Picture #9
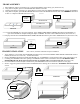
5. To ensure that FRAME cures in proper alignment, place REMOVABLE SHORT FRAME SECTION (with HANDLE), at
open end of FRAME to complete rectangular shape of FRAME. DO NOT GLUE THIS SECTION! (See Picture #11)
6. Wrap tape around end to hold REMOVABLE SHORT FRAME SECTION in place while ADHESIVE cures (See Picture #12)
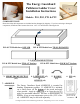
FRAME ASSEMBLY
1. Place LID down with lip of LID facing up. Label and HANDLES will be facing you (See Picture #8)
2. Using LID as template, place 2 LONG FRAME SECTIONS on the LID.
3. Utilizing Glue Pattern (see Picture #9), apply adhesive to both ends of the SHORT FRAME SECTION without the HANDLE
4. Using LID as template, place SHORT FRAME SECTION without the HANDLE between ends of LONG FRAME SECTION
to form “U” Shape for FRAME (See Picture #10)
APPLY ADHESIVE
TO BOTH ENDS
OF SHORT
FRAME SECTION
LID
LONG FRAME SECTION
LONG FRAME SECTION
LID
TAPE
REMOVABLE
SHORT FRAME
SECTION
FRAME INSTALLATION After 3 hours, the frame should be ready for installation.
1. Apply Adhesive to end of both LONG FRAME SECTIONS only at end where REMOVABLE SHORT FRAME SECTION is
located (See Picture #13 and #13a ). Utilize Glue Pattern.
2. Remove FRAME from LID and carefully flip FRAME over so ADHESIVE is facing the floor/deck of attic (See Picture #14).
3. Carefully place FRAME around attic opening so ADHESIVE makes contact with the attic floor and the REMOVABLE
SHORT FRAME SECTION (taped end) is located at top of ladder where you step into the attic (See Picture #15).
4. For Trussed Roof Construction (PT1 and PT2 Kits), Install FRAME in between roof trusses (Shown on next page)
5. NOTE: If gaps are present between bottom of FRAME and attic decking, this is addressed in FINISHING INSTALLATION
section.
ADHESIVE
FLIP FRAME SO
ADHESIVE IS
UNDERNEATH
Picture #13a
Picture #14
Picture #8 Picture #10
SHORT FRAME
SECTION
Picture #11 Picture #12
Picture #13
Picture #15
FLIP FRAME
LID
LID
LID
LID
ADHESIVE