
Installation & Assembly

Bulb Replacement Instructions
1. Unplug light string from power source.
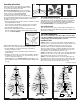
2. Pull up on the base lock unlatching the bulb from the
bulb socket. Gently pull the bulb straight out (Figure 15).
3. Before inserting the new bulb into socket,
make sure that the two wires on either side of
the bulb base are straight up and flush with
the base (diagram at right).
4. Carefully insert new bulb into socket and push
down Base Lock until it snaps into place (Figure 16).
Fig. 15
Fig. 16
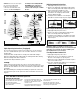
Fuse Replacement Instructions
1. Unplug light string from power source.
2. Slide the fuse access cover away from cord side (in
direction of arrow, Figure 17) exposing fuses.
3. Remove fuses from compartment and examine. Replace
burnt out fuse with new one.
4. Close fuse compartment by sliding access cover back in
towards cord side of plug (Figure 18).
Fig. 17
Fig. 18
OPERATING INSTRUCTIONS
Trees with light strings include 40 light
functions which are chosen by using
the push button controller.
Use the left side button to turn the
lights ON and OFF.
The four directional buttons will move
your light choice up, down, left and right
among the 39 listed functions on the
controller screen.
The fortieth and last function will cycle
through all 39 functions one after the
Storage
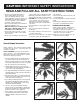
Gently compress the tips back into the center of each tree branch. Raise all
branches to original upright position taking care not to place undue pressure on the
attached ends of the branches. Secure the section branches together with tie wrap
(if included).
When disassembling tree, a twisting motion will help to separate the sections from
each other. All tree parts can be replaced in carton and should be stored in a cool,
dry place.
4
Low Voltage LED Bulb Replacement Instructions
1. Unplug light string from power source.
2.
3.
Pull up on the base lock unlatching the bulb from the
bulb socket. Gently pull the bulb straight out.
Carefully insert new bulb into socket (bulb is keyed and
only goes in one way) and push down Base Lock until it
snaps into place.
The foot switch operates the functions of the lights. There are nine functions,
each one is activated with the press of the foot switch. Functions occur in the
following order:
Steady warm white; steady multicolor; steady pastel; warm white fading to
multicolor; fading warm white; Fading multicolor; flashing warm white; flashing
multicolor; flashing warm white to multicolor.
Light functions always follow this sequence.
Lights Operating Instructions (if equipped)
Trees with
Multi-Function Light Sets
STYLE 4: These trees do not require
the connection of light strings
between sections. Electrical
connections are made when each
section is assembled. During tree
BOTTOM MIDDLE TOP
CONNECTION STYLE 4
Note: Not all low
voltage LED trees
include foot switch
Low
Voltage
LEDs
assembly or disassembly, DO NOT
DISCONNECT any of the factory
connected light strings that are
located on the center pole or within
the tree.
other. Press the button inside the arrows
for this function.
Note that after powering off, the last
function in use will be the start function
when string is next powered on.
NOTE: Fuse failure is sometimes a reason for non-
functioning light strings. The fuses are found in the light
string plug. If one is burnt out, replace it with a spare
fuse included in the accessories bag.