
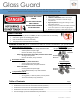
Specifications

4
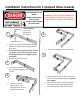
Installation Instructions for Rounds Glass Guards (5 Panels)
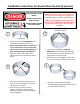
2
Continue to install glass panels one at a
time in the same procedure as step one
until all five panels are in place.
Once all five glass panels and top brackets
are in place, finish securely tightening all 10
of the set screws holding the glass together
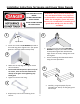
1
Loosen set-screws in TOP BRACKET and slide
two curved glass panels into it.
Ensure small silicone pad is in place on tip of
set screws. Never secure screws with only
the metal screw directly against the glass.
Overtightening may break glass!
Tighten set screw until snug. Do not tighten
all the way until all four brackets are on.
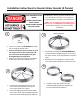
3
Continue by installing the BOTTOM BRACKETS
to the assembly and tightening the set screws in
the same manner as the top brackets in previous
steps.
Remember to not overtighten screws and be
sure silicone pad is adhered to end of set screw.
4
Carefully, using two people, flip fully
assembled glass guard over and place on
fire pit centered around burner.
Bottom Brackets
Top
Bracket
WARNING: Always perform assembly on a
soft, non-abrasive surface. Two people are
recommended for assembly and installation!
HINT: For rectangular, square and round
burners it is recommended to assemble guard
upside down and flip over after it is fully
assembled.
HOT GLASS WILL CAUSE
BURNS
DO NOT TOUCH GLASS
UNTIL COOLED
NEVER ALLOW CHILDREN
TO TOUCH GLASS